WordPress user registration is one of the essential features every WordPress website or blog must have. WordPress has provided a membership/ register option by default because a website needs to grow or become successful. However, the default option is not flexible enough to allow you to create an ideally beautiful and powerful WordPress user registration form.
With the default WordPress registration option enabled, you (as a website owner) can collect username and user email address while the registered users cannot do much as active users. So, WordPress professionals have developed multiple solutions for creating custom user registration forms quickly. And this post is a complete tutorial on creating such user registration forms/ pages, especially for beginners.
1. What is WordPress user registration?
In the simplest terms, WordPress user registration is very useful functionality for membership options provided in WordPress. It allows visitors to ‘register‘ on your website as ‘subscribers’ or any other user role. As a website owner, you can set what user role to provide for the ‘new registered users.’
The general logic of user registration is providing specific space to your loyal website visitors and making your site more interactive and user-friendly. Undoubtedly, your website visitors are your most valuable assets, and their opinions matter the most. So, providing a separate user space to them is certainly rewarding. ?
Through user registration, you can provide your site visitors a kind of membership to your site and also allow some specific actions (commenting on posts, contributing articles, reviews, etc.)
Besides, you can collect user emails and send some exciting content to registered users. Moreover, It can be a simple newsletter welcoming them to your network, some discount coupon or festival offer, information about your recent product launch, or anything interesting. Finally, this helps strengthen the bond between you and your site users and grow your online business.
That’s not all. It has several benefits. In the next section, I will explain why WordPress user registration is essential for your blog.
2. Why would you want to allow user registration on your WordPress site?
As discussed above, the most fundamental reason to allow user registration is to allow membership features on a WordPress site. But that’s not all. You can do much more with virtually powerful user registration forms; however, such forms need to be custom created. The default options won’t let you create ideally complete user registration forms/ pages.
We will discuss how to create custom user registration forms in the following sections so let’s quickly check out the benefits of creating powerful user registration forms/ pages here.
A – Grow your email list and get an effective marketing tool ready:
With a well-designed and beautiful custom user-registration page, you can lure your website visitors, including new visitors, to ‘register’ to your site. As your email list grows, you can use it for marketing purposes. In addition, create beautiful newsletters and send them to the registered users. You will do both reach out and promotion at the same time.
B – Engage the users, increase interaction, and plan success
An ideal user registration form not only collects user information for you but also lets an entire space for the registered users. I mean user profile pages. They can create a user profile of their own, manage their details, and contribute to your site in the possible ways as far as the assigned user role allows. In addition, this way, users get more engaged with your site, the interaction increases, and ultimately helps your site’s success.
C – Know your site visitors better and improve your site
A custom user registration form can create multiple fields and collect more user information. Such collected information helps you to know your site visitors better, about their interests, habits, and all. Finally, after understanding what attracts them most or what they don’t like on your site, you can improve your site.
D – Ideal for the guest blogging
If you want some content contributions on your site, user registration is an ideal way to do that. Moreover, you can provide a ‘Contributor’ user role to the interested users through which they can submit content.
3. How to enable WordPress user registration (default)?
Done with the basics, now let’s start the steps. The most fundamental step in creating WordPress User registration forms/ pages is enabling this feature in WP settings. Though there are functional limitations, it’s also essential to allow this option for creating custom user registration forms. In other words, you should have this ‘default feature’ entitled to have any custom plugin working.
So, let’s start with the steps.
First, go to WordPress Dashboard, and locate Settings. So, go to General Settings inside Settings, where you will find Membership options as shown below.
WP admin panel > Settings > General
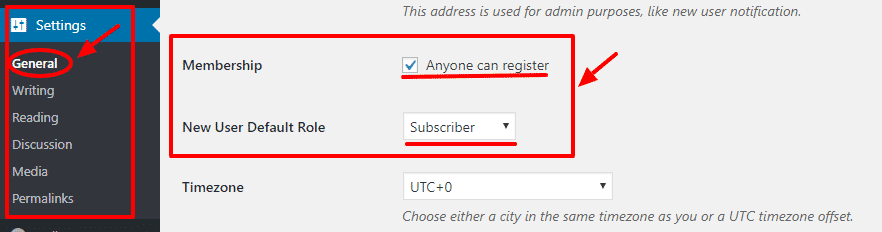
As shown in the image above, you must check the ‘Anyone can register option. In addition, Below, you can see ‘New User Default Role,’ which is ‘Subscriber’ by default. You can change it if you want. But it’s better to leave it as ‘Subscriber’ is the best user role for new users.
Then, scroll down and click on ‘Save Changes.’
Once this option is enabled, this adds a ‘Register’ link on your WP login page (e.g., www.yoursite.com/wp-login.php). The animation below shows you how the default user registration option works.

As you can see above, users can now insert a username and an email address and register to your site. So, if you want more fields on the registration form, you need to create a custom user registration form.
Besides, there is yet another problem. Users must find their WP login URL to find the default registration option. So, it looks tiresome for the users or a difficult task if your site visitors have no idea how to find the login page.
Well, there is a way to show the ‘register’ link on the front end of your website using the ‘meta’ widget. Please, follow the steps below to have the link on the front end.
First, go to the ‘Appearance‘ menu in the WP admin panel. Then, click on ‘Widgets. ‘ Then, you can see, you can see the list of all the available WordPress widgets, including the ‘Meta‘ widget. In addition, locate the Meta widget.
WP admin panel > Appearance> Widgets.
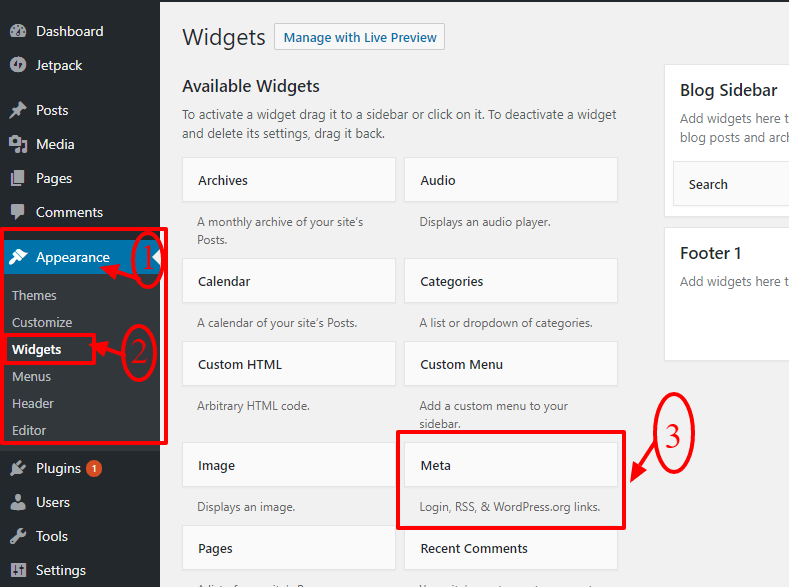
Next, drag and drop the widget into the widget-ready areas on your WordPress site.
Now you can go to your website front-end like in the image below. You can see Meta content on your site directly (in the footer as I placed the widget on the footer).
You can display the register link on your front-end website; however, it will redirect you to the WordPress login page with the basic registration form.
So, the next section will take you on a full tutorial on creating a beautiful and feature-rich custom user registration form.
4. How to create custom user registration forms/ pages beautifully on WordPress?
Thanks to WordPress enthusiasts worldwide who have given easy solutions to every WordPress problem. Like anything, many WordPress registration plugins enable you to create beautiful WordPress user registration forms.
Among numerous plugins available on the web, we have chosen the best WordPress user registration plugin ‘User Registration, here.

It is a fantastic free drag-and-drop registration form builder for WordPress. It is not just a registration plugin but also a WordPress profile builder that enables the users to create and manage their user profiles simply and beautifully on your site. Most noteworthy, it is highly user-friendly and straightforward.
Now, we will discuss how to create elegant front-end custom user registration forms using this plugin.
First, install the plugin. To install the plugin, go to ‘Plugins’ and ‘Add New.’ Then search ‘User Registration. The plugin can be directly installed from the official WordPress repository.
Once the results appear, locate ‘User Registration’ by WPEverest and click on ‘Install Now.
WP admin panel > Plugins > Add New.
Next, you have to activate the plugin. Click on the ‘Activate‘ button.
Following this, you will be redirected to the Plugins page, where you can see a ‘Welcome’ message from the User Registration plugin. As shown in the image below, you can see two buttons: ‘Install User Registration Pages‘ and ‘Skip Setup.’
The first button takes you to the automatic plugin setup process, including installing two sample user registration pages offered by the plugin. It takes you to the plugin settings and creates user registration pages step-by-step. You can click on this first button if you want an easy way to configure the plugin.
If you click on the ‘Skip Setup‘, you need to explore the plugin settings and features one by one manually.
Let’s take an easy way by clicking on the first button. Then, it will redirect you to the plugin Settings page, as shown in the image below.
A. User Registration Plugin Settings
The General Options has a number of significant plugin settings.
- Default user role: You can choose the default user role as ‘Subscriber’, ‘ Contributor’, ‘ Author’, ‘Editor’, or ‘Administrator’. The subscriber is usually used for new users.
- User login option: There are three user login options: 1. Manual login after registration. 2. Auto login after registration. 3. Admin approval after registration.
- Redirect URL: You can enter the redirect path after the successful user registration on this field here. For example www.yoursite.com/my-account
- Registration URL: You can enter the user registration page URL here. For example www.yoursite.com/registration-page
- Prevent dashboard access: You can choose the user roles to prevent dashboard access.
- Enable strong password: This option, when enabled, helps your site users choose a strong password during the registration process.
- Form submit button label: The form submit button label is ‘Submit’ by default which you can change into ‘Register.’
The other section is ‘My account endpoints.’ You can change the specific page URL endpoints from this option. Or you can simply save the default endpoints.
Another tab in plugin settings is ‘Integration. ‘
You can insert Google reCAPTCHA site key and secret key from here. Adding Google reCAPTCHA helps you prevent spammy non-human bots from entering your website.
You are almost done with the plugin configuration settings. Now you can start creating custom user registration pages. But before that, you may like to check out sample registration pages added through the automatic setup process.
Go to All Pages in Pages menu in WP Dashboard. There you will see two pages, ‘My Account’ and ‘Registration’ added by the plugin automatically (through the automatic setup process).
WP admin panel > Pages > All Pages.
To check how the sample pages look, you can simply click on the ‘View‘ link below the page.
Here is how the default registration form looks with the Twenty Seventeen theme. The registration form design usually depends on the theme active on your site.
You can use the default user registration form and page on your WP site if you want something simple. If you wish to have multiple fields and more options, you must create a form on your own. So, let’s start with how to complete a custom user registration form using this plugin.
B. Creating User Registration Forms
To create a new custom user registration form, you must go to ‘Add New’ in User Registration in the WP admin panel. User Registration plugin provides a highly intuitive, clean, and user-friendly interface for creating new forms.
WP admin panel > User Registration > Add New.
Now, you can see a page like in the image below. First, give a name to your new form (e.g., User Registration). To the left, you can Default User Fields and Extra Fields. And there is a drag and drop form editor to the correct part of the page. Now you can simply drag and drop the required fields to the form editor as the complete interface is a drag-and-drop platform.
Once you add all the required fields, you can simply click on Create Form button. Then, the plugin will provide a form shortcode. Now you can use the shortcode anywhere on your website and display the form you just created.
C. Creating multi-column multi-row grid-like forms
The plugin is full of unique features, including an ability to create grid-like multi-column multi-row registration forms. You can complete a state with a maximum of 3 columns and unlimited rows.
To add columns, click the arrow (3/3) shown at the top of every row. To add rows, you can simply click the + (plus) button shown after the last row. You can use the Default Fields only once in one form, while extra fields can be used as many times as you like. Here is the front-end preview of the User Registration form in the Twenty Seventeen theme.

It looks simple and elegant, doesn’t it?
D. Exploring the Field Options
In addition to extensive form settings, the plugin allows plenty of field options for each field.
To customize one field, you must select it by clicking. Once it is set, the new tab ‘Field Options‘ will open, where you can edit the details. Once you change all the field details, you can click on the Update form.
E. How and where to display the new user registration form?
Now we have the new user registration form ready. We have the shortcode, so what’s next? Here, we’ll discuss how and where to display the form. Since the plugin uses the shortcode method, you can easily use it anywhere, including widget areas, pages, and posts.
To show the plugin in a post/ page, you need to open the post/ page editor. WP admin panel > Pages > Add New / WP admin panel > Posts > Add New
In the post/page editor, you can see a new button, ‘Add Registration Form,’ added next to the media button. You can simply click the button and select the form you want to add to that page. Click on ‘Add Form’. And publish the page. Now you can add the carrier anywhere in your website menus, custom menu, or widget areas.
5. Wrapping Up
I have tried to explain everything you should know about WP user registration in this post. Hopefully, it was helpful. If you still have any queries or questions, feel free to write them below in the comment box.