WordPress Boxed Site Style
Guide & tutorial to learn how to create and add a boxed site design style in your WordPress and apply a background color or…

Guide & tutorial to learn how to create and add a boxed site design style in your WordPress and apply a background color or image.
WordPress Boxed Site Style Using Visualmodo Themes
In this WordPress themes usage tutorial on Visualmodo knowledge base, we will show how to create a boxed WordPress site style using our themes easily, quickly, and simply. Start showing the difference between the wide and the boxed site styles (the theme by default is wide. However, you can change it quickly).

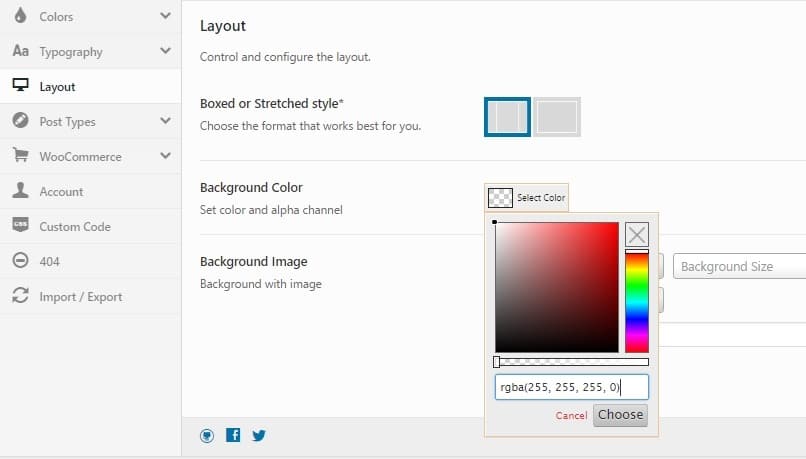
Firstly, navigate to your WordPress dashboard > Visualmodo < panel, Click on Theme options > Layout >, and you will see an opportunity to change to the ‘boxed’ style under the Boxed or Stretched style* area. Select the layout you want. Guide & tutorial to learn how to create and add a boxed site style in your WordPress and apply a background color or image.
Secondly, as soon as you select the ‘boxed WordPress site style options, you will see more settings. So you can upload the background. In addition to color and position to your boxed site style. An important note is that you need to have some color set on the background colors area.
Even if you upload an image as a background, you must fulfill the ‘background-color’ area with any color. If you want this color not to affect the image you will use as the background for your boxed site, just set it as ‘RGBA(255, 255, 255, 0)’ and click the ‘choose’ option. After that, upload your image and click on the ‘save changes button, and all done.
You also can edit the background site image under WP > dashboard > Appearance > Backgrounds < however, before it, you need to set the layout as ‘boxed’ under theme options.
Video Tutorial WordPress Boxed Site
WordPress Boxed Site Style with Visualmodo WordPress Themes. Guide & tutorial to learn how to create and add a boxed site style in your WordPress and apply a background color or image.
How To Change WordPress Website Background Color?
To change the background color of your WordPress website, you can follow these steps:
- Log in to your WordPress admin dashboard. This is typically done by visiting “yoursite.com/wp-admin” and entering your login credentials.
- Once logged in, navigate to the Appearance section in the left-hand menu and click “Customize.” This will open the WordPress Customizer.
- You will see a list of options in the Customizer on the left-hand side. Look for and click on the “Colors” option. This will allow you to customize various color settings for your website.
- Within the Colors section, you should see an option for “Background Color” or something similar. Click on it to expand the color settings.
- Select a pre-defined color from the available color palette or enter a specific color code in the provided field. You can also use the color picker tool to choose a color visually.
- As you change the background color, you will typically see a live preview on the right-hand side of the Customizer. This lets you see how the changes will affect your website in real-time.
- Once satisfied with the new background color, click the “Publish” button at the top of the Customizer to save the changes and make them live on your website.
How To Add a Background Image to a WordPress Website?
To add a background image to your WordPress website, you can follow these steps:
- Log in to your WordPress admin dashboard. This is typically done by visiting “yoursite.com/wp-admin” and entering your login credentials.
- Once logged in, navigate to the Appearance section in the left-hand menu and click “Customize.” This will open the WordPress Customizer.
- You will see a list of options in the Customizer on the left-hand side. Look for and click on the “Background Image” option. This will allow you to customize the background image settings for your website.
- In the Background Image section, you usually find options to upload a new image or select one from your media library. Click on the “Select Image” button to choose an image.
- If you haven’t uploaded the image before, click on the “Upload Files” tab and click the “Select Files” button to upload the photo from your computer. If the image is already in your library, click the “Media Library” tab and select the desired image.
- After selecting the image, additional settings may be available, such as the background-repeat, position, and size. These options allow you to control how the image is displayed on your website. Adjust these settings as desired.
- As you change the background image settings, you will typically see a live preview on the right-hand side of the Customizer. This lets you know how the changes will affect your website in real time.
- Once satisfied with the new background image, click the “Publish” button at the top of the Customizer to save the changes and make them live on your website.
How to Setup a Boxed Site Design in WordPress? (Using Other Themes)
To set up a boxed site design in WordPress, you can follow these steps:
- Choose a WordPress Theme: Look for a theme that supports boxed layouts. You can find such themes in the WordPress Theme Directory or from third-party theme marketplaces. Make sure to check the theme’s features and reviews before selecting one.
- Install and Activate the Theme: Download the theme files from the source after choosing a theme. Then, log in to your WordPress dashboard and navigate to “Appearance” → “Themes.” Click on the “Add New” button and upload the theme files. Activate the theme once it’s installed.
- Configure the Theme Settings: Each theme may have different options and settings. Look for theme-specific settings related to the layout. Usually, you can find these settings under “Appearance” → “Customize” or “Theme Options.” Check for options for the site layout, width, and boxed layout settings. Configure them as per your requirements.
- Set the Container Width: Find the setting to define the container width. In a boxed layout, the content is usually contained within a specific width, leaving space on the sides. Adjust the container width to your desired size. It’s typically specified in pixels or percentages.
- Customize the Background: To enhance the boxed layout, you can customize the background of your site. The theme may provide options to set background color, image, or pattern. Experiment with different background styles until you achieve the desired look for your boxed layout.
- Save and Publish: After making the necessary changes to the layout and background, save your settings and preview the site to ensure it looks as expected. Once satisfied, click the “Publish” or “Save Changes” button to make your boxed site design live.