WordPress Heading Simple Slider
Guide & tutorial to learn how to create, build, and setup a simple heading slider on your WordPress website heading section in different methods….

Guide & tutorial to learn how to create, build, and setup a simple heading slider on your WordPress website heading section in different methods.
WordPress Heading Simple Slider With Visualmodo Themes

In this tutorial on our Visualmodo Knowledge Base. We will show you another way to style up your WordPress page header area, a simple way to add a slider with an image background, title, and description. Build a WordPress Heading Simple Slider using the features of our theme.
This works perfectly when you want to build a simple slider out of the Revolution Slider WordPress plugin in an easier way.
This page uses a simple slider in our demo page here.
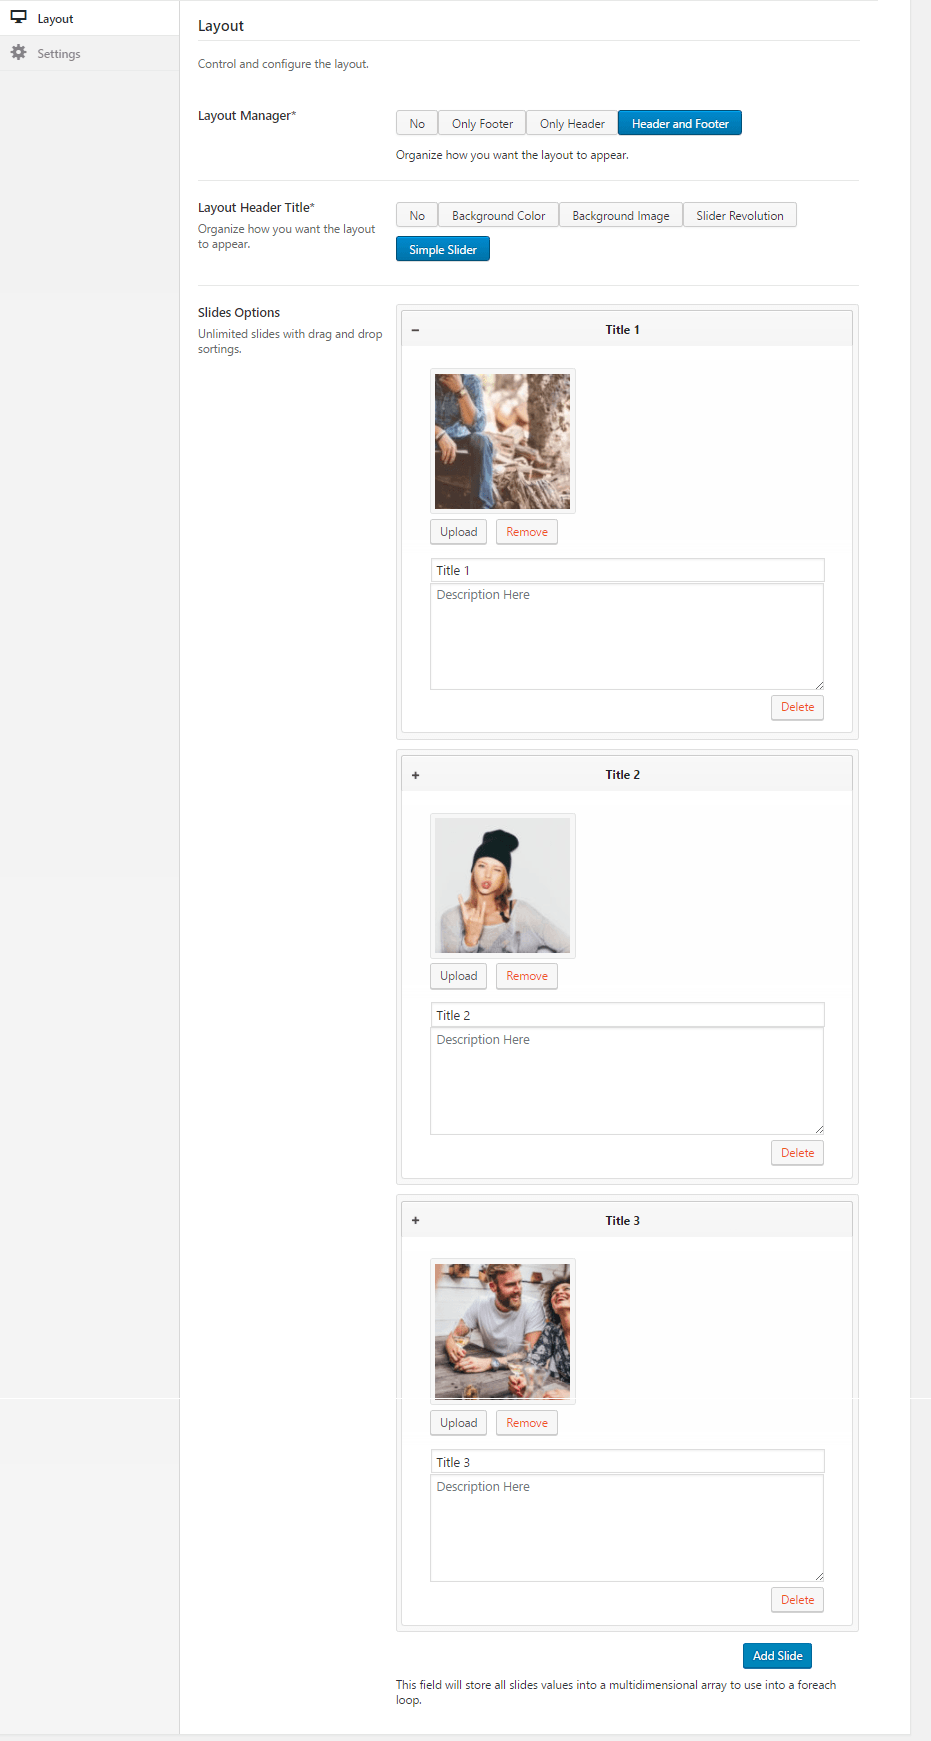
To start, go to your page editor area under WP > Dashboard > Pages > select the page and scroll down until you see a place called ‘Options’ and select the ‘Layout’ tab. Select the ‘Simple Slider’ option on the ‘Layout Header Title’ area, just like in the attached image above.
A tab will appear so you can upload the image, the title, and the description, and in case you want more sliders, click on the ‘Add Slider’ button to load other slider sections. Upload your image, fulfill the fields, and update your page. All done.
Video Tutorial
Build a WordPress Heading Simple Slider with Visualmodo Themes. Guide & tutorial to learn how to create, build, and setup a simple heading slider on your WordPress website heading section in different methods.
How To Create A Custom Slider In WordPress For Free Using Borderless WordPress Plugin
- Install Borderless Plugin and Elementor Plugin (Both for free).
- Navigate to pages, add new ones, and open the Elementor editor by clicking the ‘Edit with Elementor’ button.
- Search for the ‘Sliders’ widget in the left sidebar menu and customize the elements in the way you like.
Simple Heading Slider Using MetaSlider Free Plugin
- Install the MetaSlider plugin: setup Heading Simple Slider: Go to your WordPress dashboard, navigate to “Plugins” -> “Add New,” search for “MetaSlider,” and click “Install” and then “Activate” the plugin.
- Create a new slider: After activating the plugin, you will find a new menu item called “MetaSlider” in your WordPress dashboard. Click on it and select “Create Slider.”
- Choose a slider type: MetaSlider offers different types of sliders. Select the one that suits your requirements and click “OK.”
- Add slides to the slider: Once you’ve chosen the slider type, you can start adding slides. You can upload images, add captions, and customize other settings for each slide.
- Configure slider settings: After adding slides, you can configure various settings such as transition effects, slider dimensions, autoplay options, navigation controls, and more.
- Insert the slider into your website: Once you’ve customized your slider, click on the “Save” button. After saving, you will be provided with a shortcode for your slider. Copy the shortcode.
- Add the slider to your desired location: Go to the page or post where you want to display the slider. Edit the page/post and paste the shortcode into the content area. Save or update the page/post.
- Preview your website: Visit the front end to see the custom slider in action.
Build Setup Simple Slider In WordPress For Free Using Smart Slider 3 Plugin
- Install the Smart Slider 3 plugin: Go to your WordPress dashboard, navigate to “Plugins” -> “Add New,” search for “Smart Slider 3,” click “Install,” and then “Activate” the plugin.
- Create a new slider: After activating the plugin, you will find a new menu item called “Smart Slider” in your WordPress dashboard. Click on it and select “Create Slider.”
- Choose a slider type: Smart Slider 3 offers different types of sliders. Select the one that suits your requirements, or you can start with a blank slider. Click “OK” to proceed.
- Add slides to the slider: You can add slides once you’ve chosen the slider type or started with a blank slider. Smart Slider 3 provides an intuitive drag-and-drop interface where you can add images, videos, and other content to each slide.
- Customize slide settings: After adding slides, you can customize the appearance and behavior of each slide. You can set transitions, add captions, adjust background settings, configure animations, and more.
- Configure slider settings: Once you’ve customized the individual slides, you can configure the overall slider settings. This includes options like autoplay, navigation controls, pagination, and other settings.
- Insert the slider into your website: After customizing your slider, click on the “Save” button. Once saved, Smart Slider 3 will provide you with a shortcode for your slider. Copy the shortcode.
- Add the slider to your desired location: Go to the page or post where you want to display the slider. Edit the page/post and paste the shortcode into the content area. Save or update the page/post.
- Preview your website: Visit the front end to see the simple slider you created using the Smart Slider 3 plugin.