WordPress Permalinks Settings
Guide & tutorial to learn how to use and customize WordPress permalinks structure settings to edit or change the website permanent links & URLs…
Guide & tutorial to learn how to use and customize WordPress permalinks structure settings to edit or change the website permanent links & URLs in an easy way.
How To Change WordPress Permalinks?
- Login to your WordPress dashboard. You can access it by adding “/wp-admin” to the end of your website URL (e.g., www.yourwebsite.com/wp-admin).
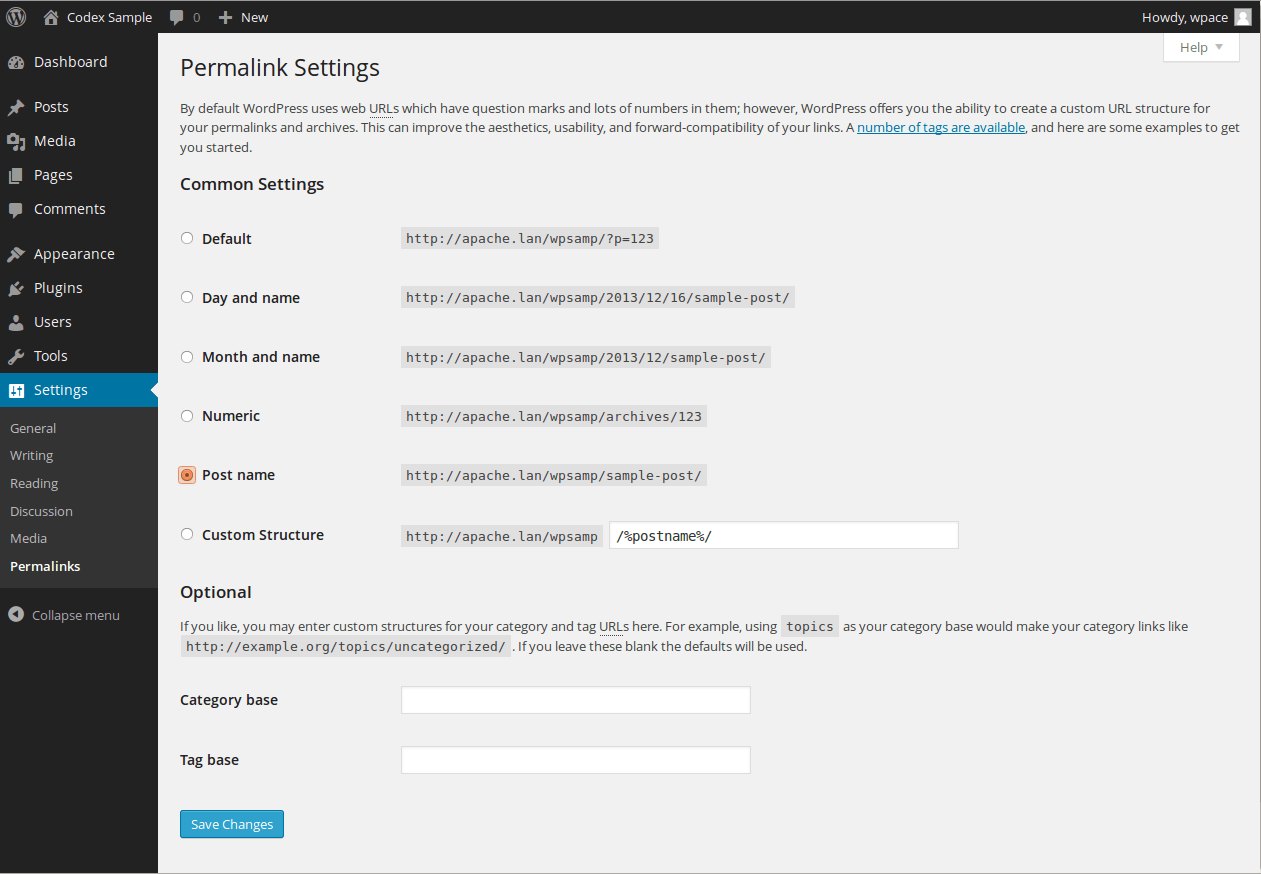
- Once logged in, navigate to the “Settings” menu on the left-hand side and click on “Permalinks.” This will take you to the Permalinks settings page.
- On the Permalinks settings page, you will see several options for choosing the structure of your permalinks. Standard options include Plain, Day and name, Month and name, Numeric, Post name, etc.
- Choose the permalink structure that best suits your needs. If none of the options fit your requirements, you can create a custom structure by selecting the “Custom Structure” option and using the available tags.
- After selecting the desired permalink structure, scroll down to the bottom of the page and click on the “Save Changes” button to apply the new permalink settings.
- WordPress will generate a set of rewrite rules based on your chosen permalink structure. These rules will ensure that your URLs are properly formatted and accessible.
- Once the changes are saved, your website’s permalinks will be updated, and all your existing URLs will reflect the new structure. It’s important to note that changing permalinks can affect your website’s SEO and existing links, so make sure to set up proper redirects if necessary.
Video Tutorials
Watch the video guide & tutorial to learn how to use and customize WordPress permalinks structure settings to edit the website permanent URLs in an easy method.
WordPress Permalinks Settings Explained
Permalinks are the permanent URLs to your pages and blog posts and your category and tag archives. A permalink is the web address used to link to your content. The URL to each post should be permanent and never change;
Hence the name permalink. The WordPress Settings Permalinks Screen allows you to choose your default permalink structure. You can choose from standard settings or create custom URL structures. You must click the Save Changes button at the bottom of the screen for new settings to take effect.
By default, WordPress uses web URLs that have day and name in them; however, WordPress offers you the ability to create a custom URL structure for your permalinks and archives. This can improve your links’ aesthetics, usability, and forward compatibility.
See the Using Permalinks article for a more in-depth description of how this structure is specified. Read the Pretty Permalinks section of Introduction to Blogging for an introduction to Permalinks.
Customize Permalink Structure
Several tags are available, and here are some examples to get you started. Standard settings: check one of the radio buttons corresponding to the correct Permalink Structure for your blog.
- Default – An example of the default structure is http://www.sample.com/?p=123
- Day and name – An example of the day and name-based structure is http://www.sample.com/2008/03/31/sample-post/
- Month and name – An example of the month and name-based structure is http://www.sample.com/2008/03/sample-post/
- Numeric – An example of the numeric structure is http://www.sample.com/archives/123.
- Post name – An example of the post name structure is http://www.sample.com/sample-post.
- Custom structure – In the box, specify the custom structure you desire. One example is /archives/%year%/%monthnum%/%day%/%postname%/. Look at the Using Permalinks article for further discussion of Permalink Structure Tags.
Optional WordPress Permalinks Settings
You may enter custom bases for your category and tag URLs here. For example, using /topics/ as your category base would make your category links like http://example.org/topics/uncategorized/. If you leave these blank, the defaults will be used.
Again, see the Using Permalinks article for further discussion of Permalink Structure Tags. Keep reading this guide & tutorial to learn how to use and customize WordPress permalinks structure settings to edit or change the website permanent links & URLs easily.
- Category base – Enter a custom prefix for your category URLs here.
- Tag base – Enter a custom prefix for your tag URLs here.
Save Changes
Click the Save Changes button to ensure any changes you have made to your Settings are saved to your database. Moreover, a confirmation text box will appear at the top of the page, telling you your settings have been saved.
After you’ve clicked this button, you should receive one of two messages depending on whether your .htaccess file is writeable. For information on how to make .htaccess writeable, see Changing File Permissions.
- If .htaccess is writeable, you will get a message that says, “Permalink structure updated.” You’re all set; WordPress has been able to do everything for you automatically.
- If .htaccess is not writeable, you will see a message at the top of the screen that says, “You should update your .htaccess now.“. Near the bottom of the screen, you will see “If your .htaccess file were writable, we could do this automatically, but it isn’t, so these are the mod_rewrite rules you should have in your .htaccess file.
- Click in the field and press CTRL + a to select all.” This means you’ll have to do one extra step yourself. WordPress displays several lines of rewrite rules associated with the Permalink Structure you designated above in the text box at the bottom of the Screen. So, you must manually copy everything in this text box into your .htaccess file to make your new Permalinks work in the URL.
Final Notes About WordPress Permalinks Settings
Visiting the Permalinks screen triggers a flush of rewrite rules. There is no need to save to flush the rewrite rules. If you’re writing your .htaccess file on your local computer, remember some operating systems do not allow the creation of a file named.”.htaccess” because of the initial dot (“.”). So, you can always call the file without the initial drop or with a standard extension (e.g.,”htaccess.txt“).
Once the file is uploaded to your weblog’s directory, rename it with your FTP software. Most FTP Clients should provide you with a way to rename files. Finally, files that begin with a dot (“.”), like “.htaccess” are hidden on most servers by default.
Consult the user guide or FAQ of the FTP software you use to find out how to display these hidden files and how to use the software to change file permissions, rename files, etc. In conclusion, for more information on this, see Changing File Permissions.
WordPress Permalinks Settings by Visualmodo. Guide & tutorial to learn how to use and customize WordPress permalinks structure settings to easily edit or change the website’s permanent links & URLs.