WordPress Sub-Menus and Drop-Downs Usage Guide
Beginners guide & tutorial to learn how to create, add and use sub-menus on your WordPress website, and usage tips for navigation bar drop-downs….

Beginners guide & tutorial to learn how to create, add and use sub-menus on your WordPress website, and usage tips for navigation bar drop-downs.
WordPress Sub-Menus and Drop-Downs
This tutorial on the Visualmodo knowledge base shows how to easily use and customize the WordPress Sub-Menus and Drop-Downs menu items using our unique WordPress themes with our Visualmodo menu system.
A sub-menu or drop-down menu appears when you have some pages under the main menu item layout and your hover this main page item on the navigation menu as is shown in the image above while hovering the ‘PORTFOLIO‘ navigation menu item, and a drop-down appears.
For a better starting point, please ensure you build your ‘main menu’ following this other guide on our knowledge base to edit the nav menu.
How to build a simple menu item drop-down?
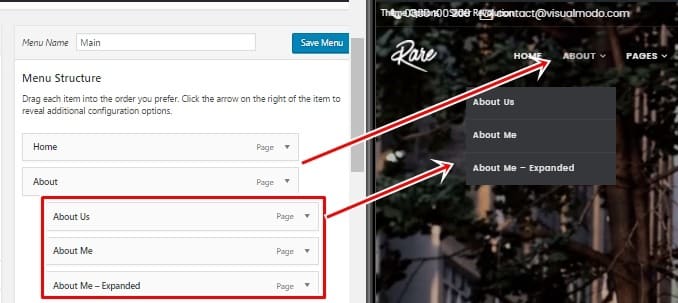
To build a simple menu dropdown, go to your wp dashboard > appearance > menus > create the menu and drag/drop the menu items under the main navigation menu page, as shown in the attached image above. NOTE: Click the ‘Save Menu’ button to save your changes.
- Firstly, log in to your WordPress dashboard.
- Secondly, go to “Appearance” -> “Menus” in the left-hand menu.
- If you haven’t created a menu yet, click on the “Create a new menu” link to create a new menu. Give it a name and click on the “Create Menu” button.
- Select the menu location where you want to add the dropdown. This depends on your theme and may vary. Common locations are “Primary Menu” or “Header Menu.” Check your theme documentation if you are unsure.
- Add the parent menu item by selecting a page, post, or custom link from the left-hand panel and clicking on the “Add to Menu” button. The parent menu item will appear in the menu structure on the right-hand side.
- To create a dropdown, add child menu items under the parent item by dragging and dropping them slightly to the right below the parent item. These will become the dropdown menu items.
- Repeat step 6 to add more child menu items as needed.
- Finally, click the “Save Menu” button to save your changes.
When you visit your website, you should see the menu item with a dropdown containing the child menu items when you hover over or click on the parent item.
How to build columns in WordPress drop-downs and sub-menus?

For this column layout, you will need to have other page items under the sub-menu pages, as shown in the attached image below. Keep reading this beginners guide & tutorial to learn how to create, add and use sub-menus on your WordPress website and usage tips for navigation bar drop-downs.
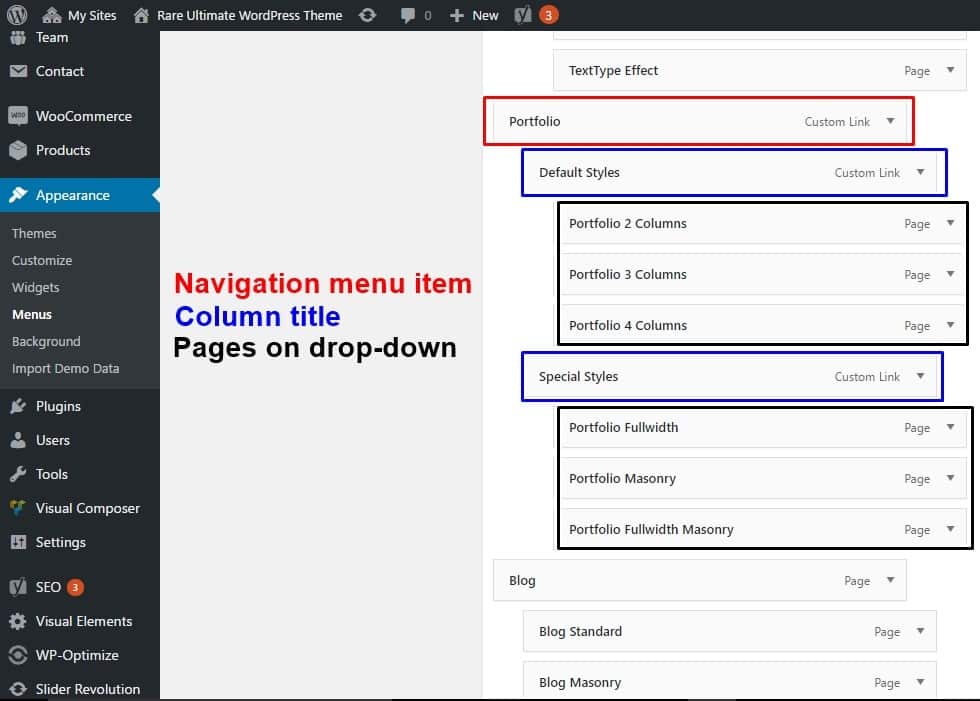
After you have built the menu design with sub-items, you must click on the main ‘navigation menu item’ arrow to open the menu item editor.
Once you open the menu item editor, you will see the entire menu item’s custom options. Please change the ‘1/2 – one / half’ option under the ‘Columns Width’ tab.


How to add background images on WordPress drop-downs and sub-menus?
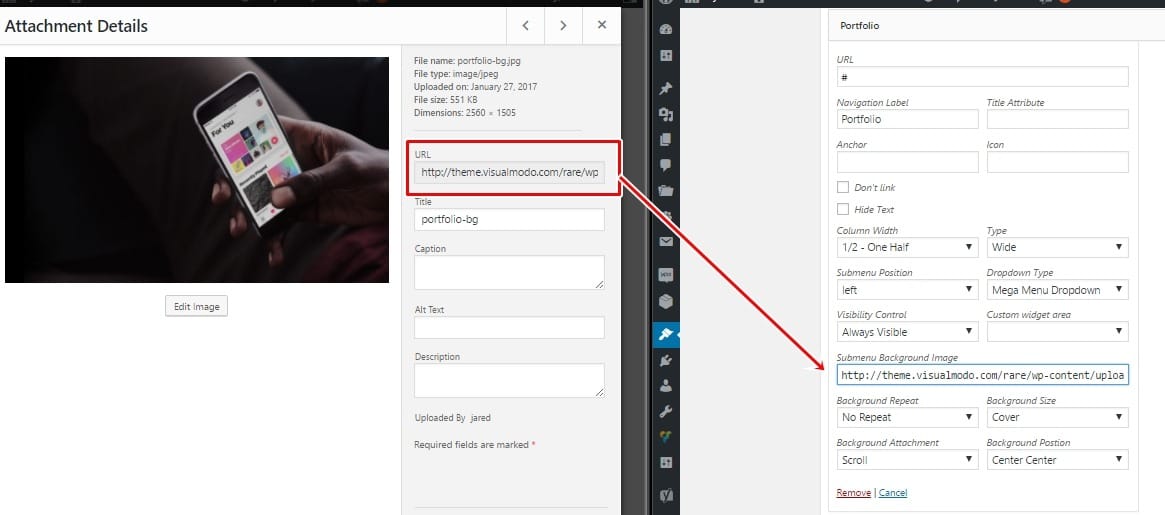
For this, you need to get/copy the image URL you have uploaded under your WordPress > media library < area and post it on the menu item editor ‘Submenu Background Image’ area. Beginners guide & tutorial to learn how to create, add and use sub-menus on your WordPress website, and usage tips for navigation bar drop-downs.
How to enable a full-size drop-down menu area? (Mega Menu)
Moreover, you can add icons for the menu sub-item or the main navigation menu items. Using the code under the ‘icon’ field: icon-plus – icon-name.
You can call widgets on the sub-menu area under the ‘custom widget area‘ field. This will contact the widgets to add on WP > appearance > widgets < widget tab area. As a result, the standard drop-down position (left/right) can change.
WordPress Sub-Menus and Drop-Downs – Visualmodo
Finally, select the ‘mega menu drop-down’ under the ‘drop-down type’ menu item editor field.

Video Tutorial
How to Add a Mega Menu on Your WordPress Site Navigation For Free?
This solution will work in any WordPress theme, for free.
How to Create a Collapsible Menu Widget in WordPress? Add in Sidebars, Footer, or Where You Want
This solution will also work in any WordPress theme for free.
What is a Down Down Menu?
A menu dropdown element, also known as a dropdown menu or a sub-menu, is a user interface component commonly found in website navigation menus. It allows organizing and displaying additional menu options or subcategories under a parent menu item.
When a user hovers over or clicks on the parent menu item, a dropdown menu appears below it, revealing the hidden menu options. These options are typically displayed vertically in a list format, allowing users to select a specific sub-item or navigate to a different page or section of the website.
Dropdown menus are widely used to accommodate complex website structures, categorize content, and improve navigation by presenting a hierarchical structure in a compact and organized manner. They help to keep the primary navigation menu clean and concise while providing access to additional menu options when needed.
Dropdown menus can be implemented using HTML, CSS, and JavaScript or through content management systems (CMS) and website builders that offer built-in menu management features. They are a common feature in WordPress themes and are often customizable to match the website’s design and branding.