See now how to properly select, edit and use the featured image on your WordPress blog posts and why you should always use it.
Articles with images get 94% more views than those without and the first image your viewership will see is the featured image.
Adding relevant images to blog posts and pages is an important element of blogging. Remember how you’d always pick up a book heavy with illustrations as a kid? It’s the same case with blogging – an image-intensive post is more visually appealing than one with just text.
In this post, we’re going to tell you everything you need to know about images in WordPress – what they are, where you can use them, and how to use them to your maximum benefit. We’ll also cover the best practices for adding and using featured images in WordPress.
Let’s get some basics out of the way first.
An Overview of Featured Images
You’ve all seen featured images in blogs but may not know exactly what they are. Typically, a WordPress site’s blog page has titles of posts along with a brief excerpt, the author’s name, and a thumbnail image. This thumbnail image is the post’s image which is displayed right on top of the text on the post’s page.
A featured image represents the contents, mood, or theme of a post or page. Posts and pages can have a single featured image, which many themes and tools can use to enhance the presentation of your site. – WordPress.com
Featured images displayed on a blog page are represented as thumbnails and can vary in size depending upon the theme that you’re using. Generally, they are placed on top of the text or to the left side of it. For this reason, images are also referred to as post thumbnails.
Capturing your potential viewers’ attention by using an eye-catching featured image is a great way to attract more traffic to your blog. Images draw readers in and the image you use for your blog post will appear the most. It’s displayed on the blog homepage, on social media posts, and on the posting page.
A Note on the Importance of Featured Images
Featured images are like the cover of a book and as the adage goes, never judge a book by its cover, the truth is that it’s hard not to. Making the best first impression becomes infinitely easier with the use of an image. A picture speaks a thousand words – a thousand words that you won’t have to captivate your readers in a single glance.
Unlike the images you add to your posts and pages, images will travel much further. From social media site shares to recent post suggestion boxes, your featured images will be published in all kinds of places for potential subscribers to stumble upon.
One of the standout features relating to the use of images is that it brings structure and consistency to your blog. Suppose you’re writing a post that doesn’t have a ton of images to go with it. You can count on the featured image you use to ensure it doesn’t get lost in your site’s archives without a single view.
Featured images have become a norm for modern bloggers and reading a blog post without an image seems a bit off. In the following section, we’ll dive right into the best practices professionals use when it comes to selecting, customizing, and adding images.
Best Practices for Using Featured Images Usage Guide
Featured images are pretty simple to understand and by now you probably have a pretty good idea as to what they are and where they’re used. In this section, we’ll explore some of the best practices adopted by editors when using images.
Size
One of the first things you need to decide before adding your first image is the size you want it to be. The size you decide for the first image will remain the same for all images you add from this point onwards. Doing this maintains consistency across your blog and gives it a professional look.
The size you select for your featured image should depend on two factors:
The theme you’re running. If your theme is concerning its design, opt for a smaller-sized image as compared to one that takes up the whole screen.

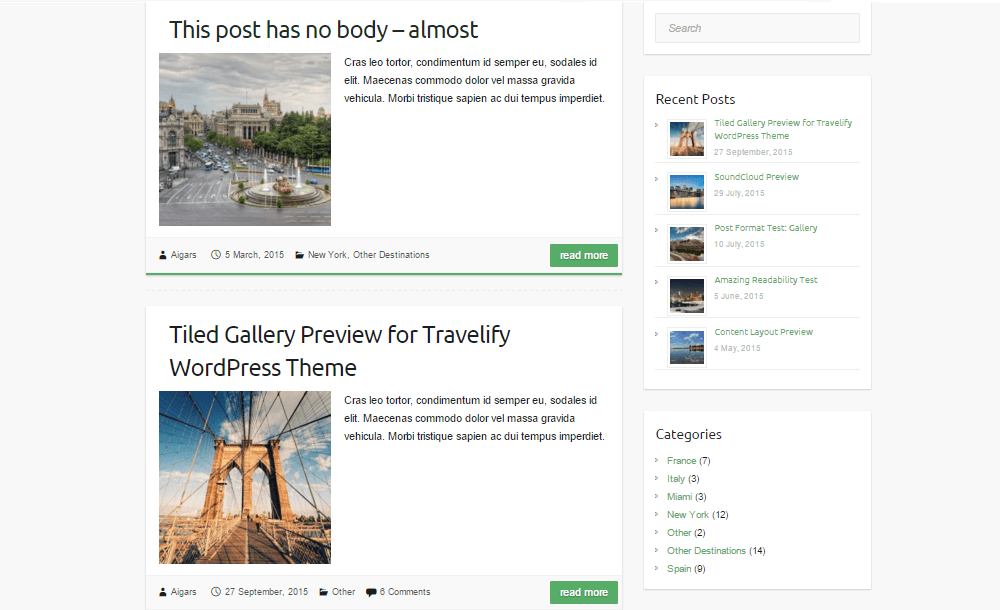
Notice how the image falls exactly into place with the post’s title and text.
The layout of your posts. Most webmasters size their featured images to sit neatly on top of their post’s text. If their post’s text runs 800px across the page, the image is also 800px wide.
Photo Quality: Featured Image Usage Guide
Featured images are usually large ranging from 500px to full-width. Keeping that in mind, it’s best to go with a high-resolution image instead of one that’ll pixelate easily. Webmasters search for relevant images on stock image sites or hire an in-house designer to create unique images for each post.
Regardless of which option you go with, remember to optimize the image for the web before uploading it to your site to save storage space on your server. Online tools work great and if you’d like to install a plugin then EWWW Image Optimizer is a popular option.
Relevancy
Featured images are needed to capture the essence of the blog post they’re. But where would you find a relevant image that goes with your content and fits our best practices criteria? If you’re operating a high-authority website then your first action plan should be to hire a designer to create images. And if you’d prefer to create them yourself, tools like Photoshop, GIMP, and Illustrator can help you out a great deal.
But those of you who’d rather not break the bank for images just yet can search for relevant images on free stock photo websites see more here.
Now that we’ve covered some of the best practices bloggers and editors adopt for images, let’s take a look at some of the most popular ways of displaying featured images on your blog’s homepage.
Featured Image Usage Guide: Layout Variations
There are tons of different ways to display images on your blog’s homepage but it mostly depends on the layouts by the theme you’re using. Let’s take a look at some different featured image layouts for different types of WordPress sites.
Featured Images Atop Excerpts
Presenting the image atop the text is one of the most popular blog page layouts. Our very own Anzu theme displays images neatly on top of the post title and posts excerpts on its blog homepage. This layout is suitable for all sorts of WordPress websites – corporate sites, general blogs, or service-based sites.

Featured Images to the Side
Sometimes a traditional image to the side layout is just what your blog’s homepage needs. This is especially true if you want to highlight the post excerpts or add additional post details. Such as the author’s name, the date, and the categories under it. Our Anzu theme is a wonderful example of this featured image layout. So a great work as part of the featured image usage guide.
Magazine Style Images

If your website’s content centers around images then it’s probably best to go with a Pinterest-style theme complete with an image-intensive, magazine-style blog homepage layout. Our Ink Blog theme does just that with different-sized featured images displayed as post thumbnails on the homepage.
There are some themes out there that don’t support images although its meta box is by the WordPress CMS. If you’re running a theme that doesn’t offer support for featured images. So, the blog post’s first image will be present each time you share the post’s link. To a social media site or on RSS feeds. As a result, this can be an issue if the first image on your post is difficult to view. For instance, a graph.
To resolve this issue, most webmasters add custom code to the theme’s files. Or opt for a plugin to add the featured image. Default Featured Image and Quick Featured Images are both great options for adding featured images.
How to Add Featured Images in WordPress
By now you know what a featured image is and why it’s important to blog posts and your WordPress website. In general. In this section, we’ll walk you through a quick tutorial on how to add featured images in WordPress.
1: Firstly, add a new post by navigating to Posts > Add New from the WordPress Dashboard.
2: Secondly, add a title and some content to your post.
3: Finally, scroll down the screen till you see a meta box titled Image in the right sidebar.

image meta box
Step 4: Click the link that reads Set featured image. The media uploader screen will pop open.
Step 5: Upload a new image from your drive or select one from your media library. Make sure the image you select is ready for the web.
Step 6: Add the image’s title and description and also adds the image alt text as part of the WordPress featured image usage guide.

Select an image from your media library.
Step 7: Click the blue Set image button to continue.
Step 8: Once you click the button. The image will be the featured image and the meta box should look like this.
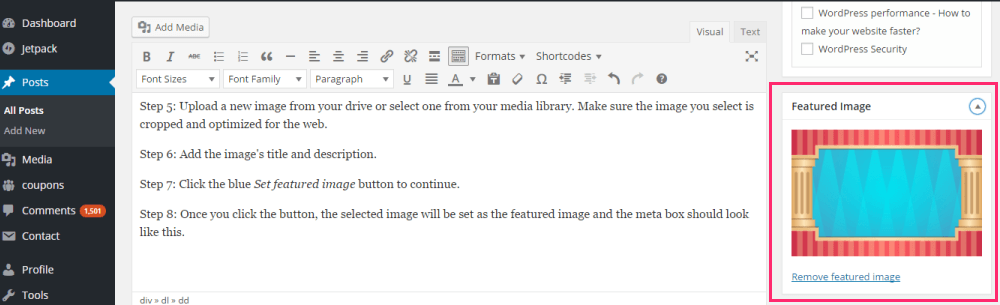
Your selected image will appear in the meta box.
That’s all there is to it! You’ve successfully added an image to your blog post. By following the same procedure, you can easily add featured images to pages and custom post types.
Wrapping It Up
Featured images are captivating and a fun feature to play around with – not to mention they have great SEO value! Adding the main photo to your blog posts is simple. Straightforward process and easy enough to incorporate into your blog post’s pre-publishing checklist.
Let’s quickly review the areas we covered in this guide:
- Follow image best practices to find the right image.
- Select a blog homepage layout that offers the best value to your site’s viewership.
- If your theme doesn’t support images, install a plugin to add the functionality.
- Last, but certainly not least. Add a suitable image using the steps outlined above to capture your readers’ attention.
Were you able to add a main photo to your blog posts and select a layout for the blog homepage? Did you run into any problems finding a featured image? We’d love to hear from you so get in touch by commenting below!