Know how to remove the background of images in photoshop, we’ll teach in this guide; to remove an unwanted background from an image, Photoshop offers a variety of techniques. And, using the standard Magic Wand tool to select and delete the background may be sufficient for simple backgrounds.
So, you can use the Background Eraser tool to remove more complicated backgrounds. As you “paint,” this tool samples the color at the center of the brush and deletes pixels of a similar color. It’s as if you’re painting with acid. Let me demonstrate how it works.
Remove the background of images in Photoshop
1 – Open your image
Begin by selecting an image from which you want to remove the background. I will use this image because it contains areas that range from simple to difficult to remove.

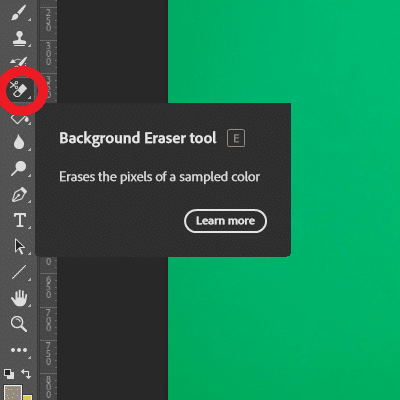
2 – Select the appropriate eraser to remove the background of images
From the Photoshop toolbox, choose the Background Eraser tool. And may hide it beneath the Eraser tool. If that’s the case, use the Eraser tool to reveal it.
3 – Tune your tool settings: Remove Background of Images in Photoshop Guide
Select a round, stiff brush from the tool options bar at the top of the screen. Depending on your working image, the best brush size will change. Press the square bracket key ([or]) to scale your brush size quickly.
Next, on the tool options bar, change the Sampling to Continuous, the Limits to Find Edges, and the Tolerance to somewhere between 20-25 percent.

Note that a low tolerance restricts your eraser’s use to similar areas to the color you sampled. Conversely, a higher tolerance increases the number of colors your eraser can choose from.
4 – Begin erasing to remove the background of images
Begin by erasing your background with your brush. A brush-sized circle with small crosshairs should appear in the center. So, the crosshairs show the “hotspot” and delete that color from the brush area wherever it appears.
So, it also performs smart color extraction at the edges of any foreground objects to prevent ‘color halos’ from appearing when the foreground object is overlaid onto another background.
And, due to the wide range of blues behind this subject, use a higher Tolerance than the 20-25 percent recommended above for the example image.
So, when erasing, zoom up your work area and try not to let the crosshairs overlap on the foreground’s edge. To avoid accidentally erasing part of your foreground subject, you’ll probably need to reduce the size of the brush in some places.
5 – Choosing effective limit and sampling settings
Even though I worked around the hair and neck area with a smaller brush, the Background Eraser managed to gouge a few chunks out of the hair and shirt.
So, you may need to adjust the Sampling and Limits for foreground image areas that share colors with the background (like this one). In this image, I’ve changed to the Sampling: Set my Limits to Discontinuous and my Tolerance to 30% as an option.
The Sampling: Once option only samples the color under the crosshair when you click it, and it does not resample as you move your brush. You can use the Discontiguous Limit option to erase all pixels that are the same sampled color as the one you’re erasing. I was able to get in between the hair strands without erasing them because of this.
So, the Background Removal Tool may be all you need to finish your task.
But if not, read on. Remove Background Photoshop Guide

6 – Quick mask or pen tool to remove the background of images
While it is easy to remove the background in the example image because the background is fairly solid, some areas of the foreground subject will inevitably be erased by mistake when we work close to the foreground edge.
In our example, the foreground and background have similar colors due to lighting. So, the easiest way to fix this is to use Photoshop’s, Pen Tool. Unfortunately, I only have a small area to retouch, so I use the stylus to create a clean selection and erase the unwanted background.
Check out our list of 5 free sites
These 5 free sites have online background remover tools to remove background from images in photoshop in a matter of seconds:
1 – Adobe Creative Cloud: Remove Background of Images in Photoshop Guide
First and foremost: Adobe Creative Cloud.
So, you will need to register to be able to use the tool but believe me; it is worth it.
The free account offers more than just removing the background of the photos; you will have access to a series of interesting features, such as the possibility to edit your images and access the platform via the internet and mobile device. Plus, it gives you 2GB of storage.
2 – Depositphotos
Close to the top spot is Depositphotos, which emphasizes on its website that “no design skills required.”
So, the tool is powered by Artificial Intelligence (AI) and guarantees special facilities to its users.
So, you can upload any image to the site: of people, objects, animals, graphics, landscapes, and the like, and the platform will remove their background.
In addition, the tool integrates with apps and websites to isolate objects from their backgrounds with a simple API call. For that, you can upgrade and choose some of the available plans, with packages of up to 15,000 images.
Even if you don’t want to subscribe to the tool, it’s worth trying its free version.
If you want practicality when it comes to removing the background from your photos, use Depositphotos. It’s fast and very easy to use.
3 – Clipping Magic
Just drag the image (or upload it) and select the desired option to remove the photo background to start the process. Then, if you still don’t like it, you can use the Precision Crop tool to refine your edit.
So, when you click to download, you will see that the image will be small. Therefore, if you want larger versions of your image, you will need to register. But don’t worry, the service will remain free!
Clipping Magic is well known for its great platform for removing image backgrounds. It’s worth testing!
4 – LunaPic
If you’re looking for functionality and ease, LinaPic might be right for you.
So, you can choose to crop, scale, rotate, or just remove the background. In addition, you can insert texts, color the image, erase traces, and much more.
When using LunaPic there are no difficulties. So, you just need to select the image on your computer, click on “Background Removal Results,” and choose how you want to modify the image’s background, and that’s it! Then, just save it to use in your projects.
A tip: using images with solid backgrounds ensures better cropping. Many elements can confuse the software.
So, removing the image background with Lunapic is a viable option for your pocket, as it’s free.
5 – RemoveBG
Taking the fifth place on our list, we have removed a site with free facilities but which has a much more complete paid version.
There are three possibilities for registration: free, monthly, and prepaid; you can choose the one that best suits your interests.
In addition to removing the background of images, the site also allows you to make other edits.
The site RemoveBG is an example of a tool that removes the background of images.
Remove background of images: Conclusion
If you’re working on a simple image with a lot of visual contrast between the subject and the background, the only thing you might be able to do is to use the Background Eraser Tool.
More complex images may require a mix of tools, patterns, tolerances, and occasional manual touch-ups. For example, sometimes there is no visual difference between foreground and background. We need to manually impose this distinction.
And don’t forget, if you save the image without adding a new background, you must save it as a PNG to maintain transparency.