In this post, we will show you everything you need to know to show Pinterest images in a WordPress post or page in an easy method. With over 200 million active users and over 1 billion boards created, Pinterest is the world-leading site for cataloging ideas and inspiration.
How to Add Pinterest Images in WordPress

Unbeknownst to some, Pinterest lets you show content from the site on your WordPress site. Showing a Pinterest image in WordPress is slightly more complicated than on other social networks (internal link here? YouTube, and Instagram), but still an easy process.
Building a Pinterest widget
The first task is finding a Pinterest image you want to show on your WordPress site. You’ll need to do this on the desktop rather than the mobile or tablet apps. Copy the URL of the image you wish to show to your clipboard.
Next, head to Pinterest Developers’ widget builder. Here you can create the widget allowing you to show your site images.
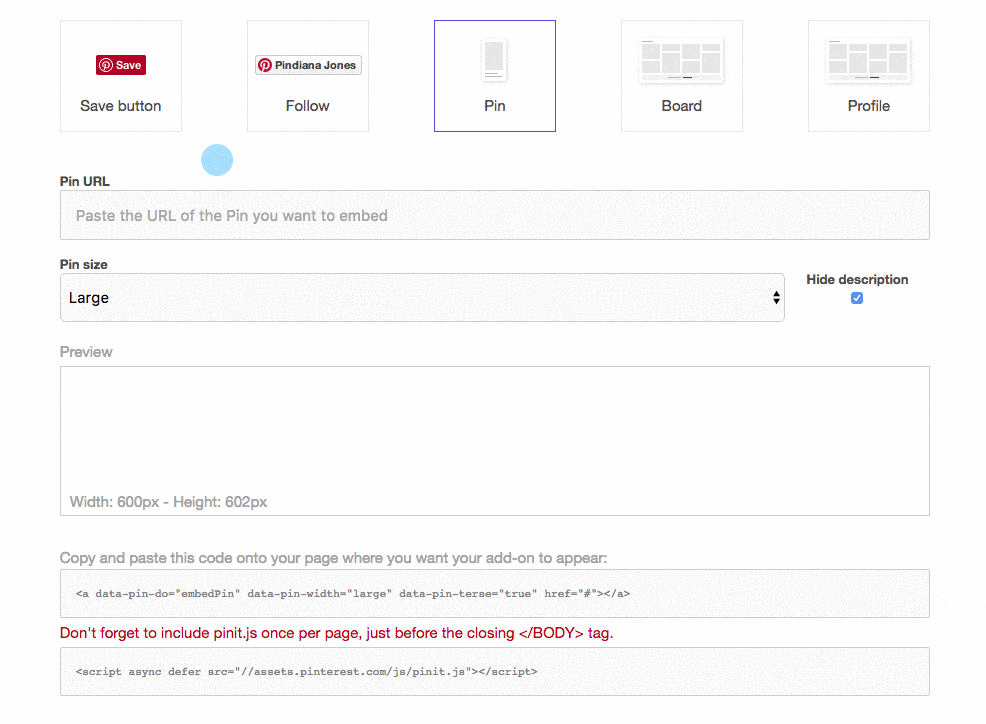
Add the URL of the image you wish to show, choose a size (Large will be full width for most WordPress sites), and decide whether to display a description. Pinterest will generate a preview of what the image will look like on your site. If you’re happy, it’s time to embed the code onto your WordPress site.
Embedding a Pinterest image to WordPress
Pinterest’s widget builder will generate two lines of code for you. The first (top line) needs to go where you want your image to display, and the second (bottom line) is some Javascript that will power the embed and needs to be added once per page – so if you are embedding multiple images, you only need to add the bottom line once.
Pinterest recommends you add the Javascript just before the closing </body> tag on your site, which is correct. However, adding the code at the bottom of the post or page will be fine for low-to-medium traffic sites. As you only need the code on the pages with Pinterest images, it’s more efficient to do this than to load the Pinterest code on every single page of your site – whether it’s needed or not.
We’re now ready to add the code. The process is the same for WordPress posts and pages, so it doesn’t matter which you’re using. Either create a new post or page or edit one you’ve already made.
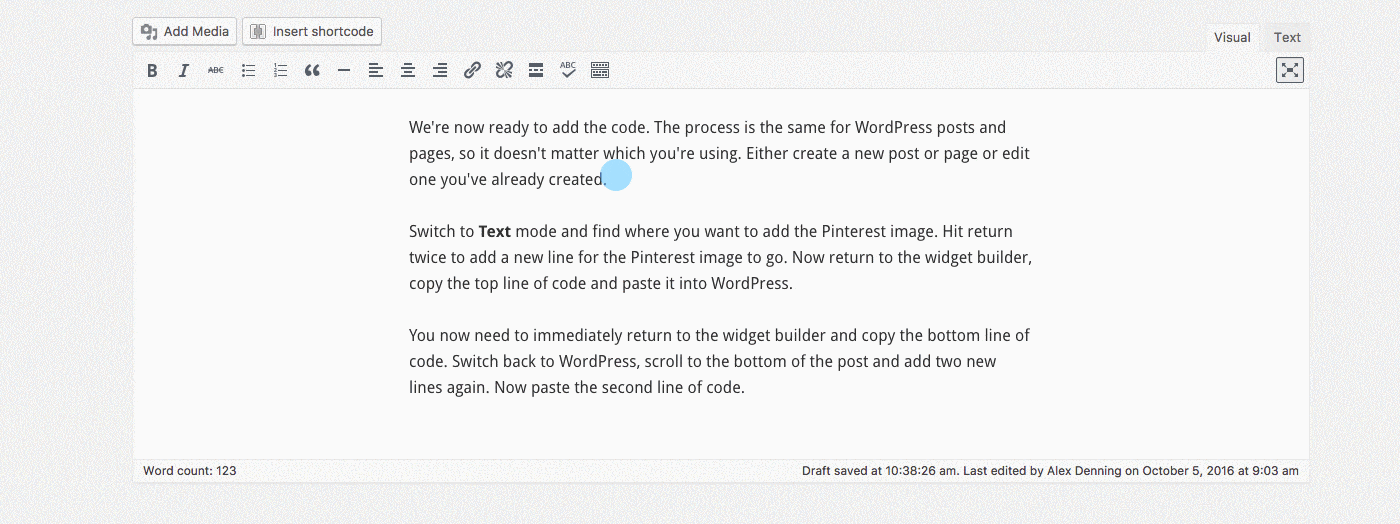
Switch to Text mode and find where you want to add the Pinterest image. Hit return twice to add a new line for the Pinterest image to go. Now return to the widget builder, copy the code’s top bar, and paste it into WordPress.
You now need to immediately return to the widget builder and copy the bottom line of the code. Switch back to WordPress, scroll to the bottom of the post and add two new lines again. Now paste the second line of code. If you’re adding multiple images on the same page, remember you only need the second line once per page.
Displaying Pinterest images in WordPress
The final step is where you need to be careful: publish or update or your post or page, but don’t switch out of Text mode (and back to Visual). Because of a quirk in how WordPress handles particular types of code, hitting back to Visual will remove the first line of code you added – and your Pinterest image.
If you switch back, you’ll need to add the first line of code again, so be careful! Once you’ve published or updated, check the public version of the post or page, and you’ll see the Pinterest image added.
Pinterest mission complete
Pinterest’s widget creation tool makes it easy to add images from the vast wealth of content on the social network to your WordPress-powered website. This post has shown you everything you need to know – so now go and make use of this great resource!