MetaMask crypto wallet is one of the most widely used self-custody cryptocurrency wallets in the world, with over 30 million monthly active users across more than 170 countries. It gives you direct access to the Ethereum blockchain and thousands of decentralized applications, including NFT marketplaces, DeFi platforms, and Web3 games, without any third party holding your funds on your behalf.
This guide covers everything you need to get started: how to create and set up a MetaMask wallet, how to fund it, how to add new blockchain networks, how to import tokens, and how to stay safe. If you follow each step carefully and keep your Secret Recovery Phrase secure, you will have a working wallet in under ten minutes.
MetaMask is a cryptocurrency wallet used to interact with the Ethereum blockchain, and you can access it through an app and a browser extension.
and will display the following options:
- Browser: Compatible with Google Chrome, Firefox, Brave, or Edge web browser.
- Android: Compatible with any smartphone running the Android operating system.
- iOS: Compatible with any iPhone.
The term hot wallet simply means that it is permanently connected to the Internet so you can easily access your crypto assets at any time.
One of the reasons new and existing users use Meta is encryption with all its interoperability techniques as all Mask is such interoperability in E. So, MetaMask allows users to connect to more than 3,700 different decentralized applications and web services 3.
What Is MetaMask and How Does It Work?
MetaMask is a non-custodial, or self-custody, cryptocurrency wallet. Non-custodial means that you, and only you, control the private keys that give access to your funds. There is no company in the middle holding your crypto. No account to verify your identity with. No customer support that can reset your password if you lose access. Your wallet, your responsibility.
This is fundamentally different from keeping cryptocurrency on an exchange like Coinbase or Binance, where the exchange holds your funds and gives you an interface to view them. With MetaMask, the private keys live on your own device. If you lose your Secret Recovery Phrase and your device is lost or broken, the funds are gone permanently.
MetaMask is what is known as a hot wallet, meaning it maintains a permanent connection to the internet through your browser or phone. This makes it convenient for frequent interactions with dApps, but it also means it is more exposed to online threats than a hardware wallet (a physical device that stores your keys offline). For small amounts used frequently, MetaMask is the right tool. For larger holdings you plan to store long-term, a hardware wallet like a Ledger or Trezor is worth the investment.
Technically, MetaMask is compatible with any blockchain that uses the Ethereum Virtual Machine (EVM) standard. This includes Ethereum, Polygon, BNB Chain, Arbitrum, Optimism, Avalanche, and dozens of others. You can switch between networks inside the same wallet without creating multiple accounts.
MetaMask is available as a browser extension for Chrome, Firefox, Brave, and Edge, and as a native mobile app for iOS and Android. You can download it exclusively from metamask.io. Do not download MetaMask from any other source.
Before You Create Your MetaMask Wallet: The Security Basics
This section comes before the setup steps because what you learn here determines whether your wallet is actually safe. Skipping it is the most common mistake new users make.
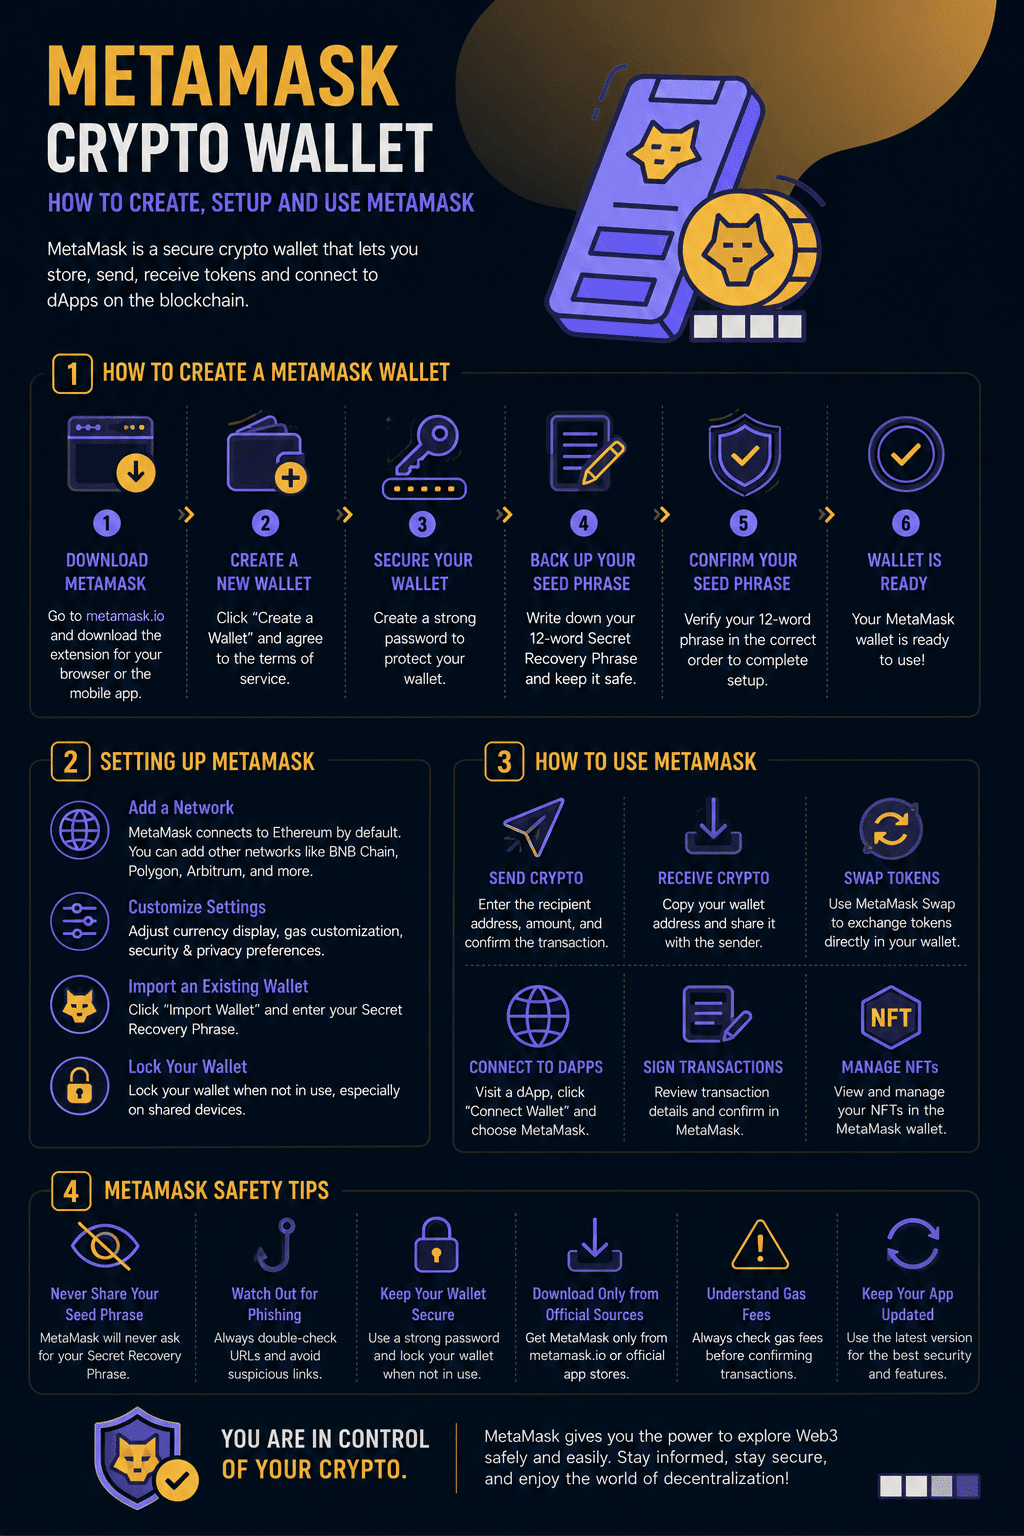
Download only from the official source
Navigate directly to metamask.io and click “Download.” Check the URL carefully before clicking anything. Dozens of phishing sites impersonate MetaMask’s website with slightly altered domain names such as metamask-wallet.io or meta-mask.io. These sites either install malware or trick you into entering your Secret Recovery Phrase on a fake interface. The legitimate URL is always metamask.io.
In the browser extension stores, check that the extension is published by “MetaMask” and has several million users. Fake extensions with similar names appear periodically and are designed to steal your funds.
Your Secret Recovery Phrase is your wallet
When you create a MetaMask wallet, you will be given a 12-word Secret Recovery Phrase (sometimes called a seed phrase). This sequence of words is the master key to your wallet. Anyone who has these 12 words has complete and permanent access to everything in your wallet, regardless of your password or device.
Write the phrase down on paper. Store it somewhere physically secure, such as a fireproof safe or a safety deposit box. Do not store it digitally: not in a photo, not in a notes app, not in cloud storage, not in your email. Do not share it with anyone for any reason.
MetaMask will never ask you for your Secret Recovery Phrase. Not through email, not through a pop-up, not through their support team, not through Discord or Twitter. If anyone claiming to be from MetaMask support asks for your Secret Recovery Phrase, they are attempting to steal your funds.
Consider a hardware wallet for larger amounts
If you plan to hold a significant amount of cryptocurrency in MetaMask, consider pairing it with a hardware wallet such as a Ledger or Trezor. Hardware wallets keep your private keys offline and require physical confirmation of every transaction, which protects against remote attacks even if your computer is compromised. MetaMask supports both Ledger and Trezor natively through the “Connect Hardware Wallet” option in the account menu.
So the question is: how to set up your MetaMask Crypto Wallet?
Step 1: Download MetaMask Crypto Wallet
Go to metamask.io/download and select your platform. MetaMask is available as a browser extension for Chrome, Firefox, Brave,
and Edge, and as a native app for iOS and Android. Click “Install MetaMask for Chrome” (or your preferred browser) and follow the browser’s standard extension installation process.

Step 2: Open MetaMask and begin setup
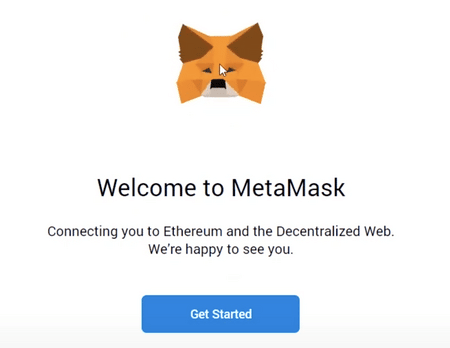
Once installed, click the MetaMask fox icon in your browser’s extension bar. On first launch, you will see two options: “Import an existing wallet” (if you have a wallet from another device and have your Secret Recovery Phrase) or “Create a new wallet.” Click “Create a new wallet.”

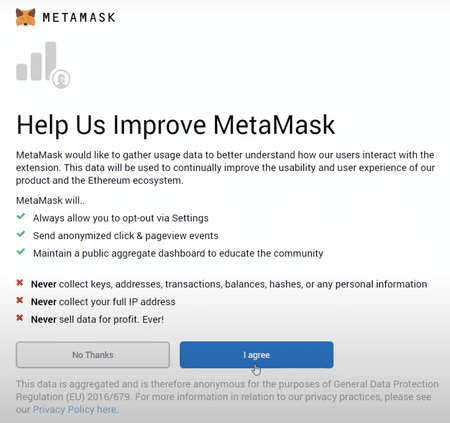
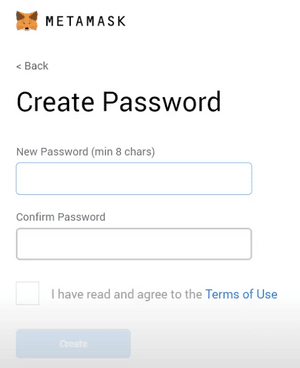
Step 3: Agree to the terms and create a password
MetaMask will ask whether you want to help improve the product by sharing anonymous usage data. This choice does not affect your wallet’s functionality. Then create a strong password. This password protects the wallet on this specific device only. It is not the same as your Secret Recovery Phrase, and it cannot be used to recover your wallet if you lose access to your device.
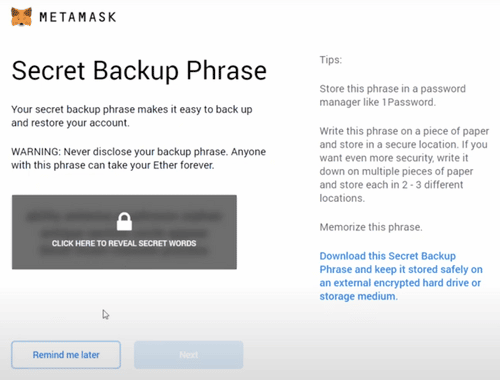
Step 4: Secure your Secret Recovery Phrase
This is the most important step. Click “Secure my wallet” and then “Reveal Secret Recovery Phrase.” MetaMask will display your 12-word phrase. Write every word down in the exact order shown, on paper, and store that paper somewhere secure. Do not take a screenshot. Do not type it into another app. Do not read it aloud near anyone else. This phrase gives complete, permanent access to your wallet.
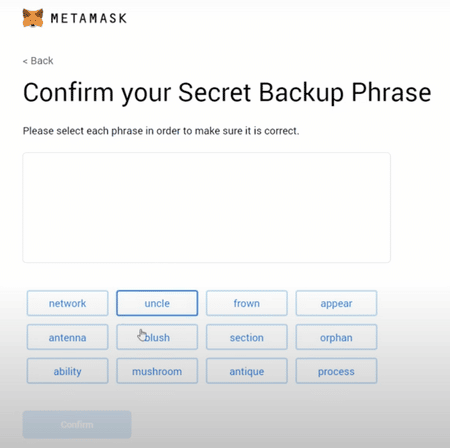
Step 5: Confirm your Secret Recovery Phrase
MetaMask asks you to re-enter the phrase in the correct order to confirm you have saved it accurately. Select each word in the sequence shown during Step 4. Click “Confirm.”
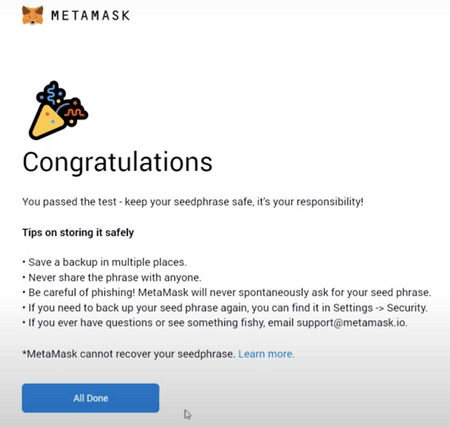
Step 6: Your wallet is ready
Your MetaMask wallet is now created. You can access it at any time by clicking the fox icon in your browser or opening the app. Your wallet address, a string of letters and numbers beginning with “0x,” is visible at the top of the wallet interface. This is your public address, which you can share freely to receive funds.
Congratulations! Your MetaMask wallet has been successfully created.
So, you can now access your wallet by clicking on the MetaMask icon in the top right corner of your preferred browser.
An overview of the MetaMask wallet
So, after completing the steps above, you will be able to access your new MetaMask wallet. And there are two primary components that you need to familiarize yourself with to start using the software:
So, identifying your public address: This is the address that you can freely share with people; or platforms like exchanges to receive cryptocurrencies in your wallet. And think of it like your home address that you share with people to receive incoming emails. However, it is always advisable to verify that all incoming tokens are MetaMask compatible before accepting them. Otherwise, they may be lost forever.

How to Add Networks to MetaMask
MetaMask defaults to Ethereum Mainnet when you first set it up. Most users eventually want to use other EVM-compatible networks, such as Polygon (for lower fees), BNB Chain, Arbitrum, or Optimism.
Method 1: Add networks through MetaMask directly
Click the network dropdown at the top of your MetaMask wallet (it shows “Ethereum Mainnet” by default). Click “Add a custom network” at the bottom of the list. You will need to enter the network’s specific details: Network Name, New RPC URL, Chain ID, Currency Symbol, and Block Explorer URL.
Method 2: Use Chainlist (faster and safer)
Chainlist.org is a community-maintained directory of EVM network details. Visit the site, connect your MetaMask wallet by clicking “Connect Wallet,” search for the network you want to add, and click “Add to MetaMask.” The network details are filled in automatically and MetaMask asks you to approve the addition. This is the fastest and most reliable method for adding common networks.
Here are the most common networks users add and their primary purpose:
- Polygon (MATIC): Very low transaction fees. Popular for NFT minting, gaming, and DeFi with minimal cost.
- BNB Chain: Binance’s own EVM-compatible chain. Lower fees than Ethereum, large ecosystem of DeFi platforms.
- Arbitrum: An Ethereum Layer 2 network. Much lower gas fees than Ethereum Mainnet while still settling on Ethereum’s security.
- Optimism: Another Ethereum Layer 2. Similar benefits to Arbitrum, with a strong ecosystem of DeFi protocols.
Once a network is added, you can switch between networks by clicking the network name at the top of your wallet. Your wallet address is the same across all EVM-compatible networks.
Understanding Gas Fees in MetaMask
Gas fees are a source of confusion and frustration for almost every new MetaMask user. Understanding how they work makes the wallet significantly easier to use.
What gas actually is
Every action on an EVM blockchain, whether sending tokens, minting an NFT, or interacting with a DeFi protocol, requires computational work from the network’s validators. Gas is the fee you pay those validators for processing your transaction. It is always paid in the native token of the network you are using: ETH on Ethereum, MATIC on Polygon, BNB on BNB Chain.
Gas prices are measured in Gwei. One Gwei is one billionth of one ETH. When the network is busy, validators can charge more per unit of gas, and fees rise. When it is quiet, fees fall. You cannot avoid gas fees entirely, but you can time transactions and adjust settings to reduce them.
How to manage gas fees in MetaMask
When you initiate any transaction, MetaMask shows an estimated gas fee before you confirm. You can click “Edit” to choose between three speed tiers:
- Low: Slower confirmation but cheaper. Fine for non-urgent transactions when the network is not congested.
- Market: The default recommended setting. Balances speed and cost appropriately for typical conditions.
- Aggressive: Faster confirmation by offering validators a higher fee. Useful when transaction speed is critical.
You can also select “Advanced” to set a custom gas price and gas limit manually, though this requires an understanding of how gas works and carries risk if set incorrectly.
If your transaction gets stuck in “Pending” status for an extended period, you can use the “Speed Up” option (which resubmits at a higher gas price) or “Cancel” (which attempts to cancel the transaction by sending a zero-value transaction to yourself at a higher gas price). Neither is guaranteed to work, but both succeed in most cases when acted on quickly.
How to Add Custom Tokens to MetaMask
MetaMask automatically displays ETH and a small number of common tokens. Most ERC-20 tokens, especially newer or less common ones, do not appear in your wallet automatically even after you receive them. They are there on the blockchain; they just need to be imported to become visible.
Finding the token contract address
Every ERC-20 token has a unique contract address on the blockchain. The safest ways to find it:
Search for the token on CoinGecko or Etherscan and copy the contract address directly from those verified sources. Never copy a contract address from a social media post, a Discord message, or an unofficial site, as fake token contracts are a common scam method.
Importing the token into MetaMask
Open MetaMask and scroll to the bottom of the “Tokens” tab. Click “Import tokens.” Enter the contract address in the first field. MetaMask will automatically fill in the token symbol and decimal places if the address is valid. Click “Add custom token” and then “Import tokens” to confirm. The token will now appear in your assets list and any balance will become visible.
Staying Safe While Using MetaMask Wallet
MetaMask’s security depends almost entirely on your own behavior. The wallet itself has no way to reverse a transaction you approved or recover funds sent to the wrong address. Here is how to protect yourself.
Verify every website URL before connecting your wallet
Before clicking “Connect” on any dApp, verify that you are on the legitimate site. Search for the platform through a trusted source such as CoinGecko or DeFi Llama rather than clicking links from social media or search ads. Phishing sites that mimic popular dApps precisely are one of the most common vectors for wallet draining.
Read transaction requests before signing
When a dApp asks you to sign a transaction, MetaMask shows what the transaction will do. Read it carefully. A legitimate signing request for a wallet connection costs nothing and simply proves you control the wallet. A transaction request that shows tokens being sent, approvals being granted to an unknown contract, or unusual permissions is a red flag. If you are unsure what a transaction does, do not sign it.
Revoke approvals you no longer need
Every time you interact with a DeFi protocol or NFT marketplace, you may grant that contract permission to spend your tokens. These approvals remain active indefinitely unless you revoke them.
Use Revoke.cash to view and revoke all active token approvals across your wallet. Doing this regularly, especially after trying new platforms, significantly reduces your exposure to exploited or malicious contracts.
Disconnect from dApps when finished
Connecting your wallet to a site does not give it ongoing access to your funds, but it does give it the ability to request transactions. You can manage and remove connected sites in MetaMask under Settings > Connected sites. Disconnect from any site you no longer use.
Never enter your Secret Recovery Phrase into any website
This point cannot be overemphasized. No legitimate site, tool, or support service will ever ask for your Secret Recovery Phrase. If any website shows a form requesting your 12 words for any reason, including claiming to fix a problem, restore your wallet, or claim an airdrop, close the tab immediately. It is a scam.
You can find MetaMask’s official security guidance at metamask.io/security.
How to finance/buy and send: These are the main functions of MetaMask.
So, you can locate your unique MetaMask public address by clicking the “Account 1″ button (black arrow). Then, to avoid manually typing it in when you need to use it, click the layered square icon below it to copy it automatically.
Finally, to start interacting with any Ethereum platform; you first need to fund your MetaMask wallet with an amount of Ether – Ethereum’s native cryptocurrency. So, all actions on the blockchain cost a fee, whether moving tokens from A to B or creating an NFT collection. This rate, known as the “gas” rate, is called Ether.
How much you choose to fund your portfolio depends on how you intend to interact with various platforms. However, $100 worth of Ether is usually a good starting point for moderate usage to cover any upfront fees.
Clicking the “buy” button (red arrow) will take you to a window where you can buy either using CoinSwitch. These options will allow you to purchase either using a debit card or by exchanging it for other crypto tokens you have.
After purchasing a large amount of Ether, you can now send crypto assets from your MetaMask to other wallets by entering the recipient’s public address in the space provided and specifying the amount, including gas fees. You can also access the “Swap” feature – which allows you to exchange Ether for various other Ethereum-based tokens within the app – or start using external services like NFT marketplaces or Defi platforms.
On most platforms, you will see a “connect” button in the upper right corner of the screen. After clicking on it, you will have the option to connect your MetaMask wallet. You may need to sign a transaction to complete the connection process. This costs nothing; it simply proves that you have control over the wallet.
Common MetaMask Wallet Problems and How to Fix Them
My transaction has been stuck as “Pending” for a long time
This usually means the gas price you set was too low for current network conditions and validators are not processing it. Open MetaMask, find the pending transaction, and click “Speed Up” to resubmit it with a higher gas price. If you want to cancel the transaction entirely, click “Cancel” instead. Neither option has a guarantee, but both succeed in most cases if acted on before the transaction is confirmed.
As a last resort, you can reset your account’s transaction history in Settings > Advanced > Reset Account. This does not affect your funds, tokens, or wallet address. It simply clears the local transaction queue so MetaMask can resync with the blockchain.
A token I received is not showing up in my wallet
The token almost certainly exists on your wallet address on the blockchain but has not been imported into MetaMask’s display. Follow the “Adding Custom Tokens” steps above: find the contract address on CoinGecko or Etherscan and use “Import tokens” to make it visible.
I can see my funds but the network shows the wrong chain
Click the network name at the top of MetaMask and select the correct network. If the network you need is not in the list, add it using Chainlist.org as described in the networks section above. Your funds on other networks are not lost; they are simply on a different chain than the one currently selected.
The MetaMask extension has stopped loading
First, try disabling and re-enabling the extension through your browser’s extension manager. If that does not work, try locking and unlocking MetaMask. If the issue persists, reinstalling the extension is usually effective. Your wallet is not stored in the extension itself but derived from your Secret Recovery Phrase, so reinstalling and importing your phrase restores full access without any loss of funds.
“Insufficient funds for gas”
This means your wallet does not have enough of the network’s native token (ETH, MATIC, BNB, etc.) to cover the transaction fee. You need to add a small amount of the correct native token before the transaction can proceed. Even on cheap networks like Polygon, you need a small amount of MATIC to pay gas.
Frequently Asked Questions About MetaMask Wallet
MetaMask itself is free to download and use. The wallet charges no fee for storing, receiving, or viewing your tokens. When you use MetaMask’s built-in token swap feature, it charges a service fee of 0.875 percent of the swap value. All transactions on any blockchain also require gas fees paid to network validators, but those fees go to the network, not to MetaMask. If you swap tokens through an external DEX like Uniswap rather than using MetaMask’s built-in swap, you avoid the 0.875 percent service fee while still paying standard gas.
MetaMask is a well-established, audited wallet used by over 30 million people. The software itself has a strong security record. The risk in using MetaMask comes almost entirely from user behavior: sharing your Secret Recovery Phrase, approving malicious transactions, downloading the wallet from unofficial sources, or connecting to phishing sites. If you follow the security practices in this guide, MetaMask is a safe and reliable tool for interacting with EVM-compatible blockchains.
MetaMask’s code is open source and has been independently audited multiple times. The wallet itself has not been hacked. However, individual users regularly lose funds through phishing attacks, malicious dApp approvals, and social engineering scams where they are tricked into sharing their Secret Recovery Phrase. Protecting your phrase and reading every transaction before signing are the two most important things you can do to keep your wallet secure.
If you lose your Secret Recovery Phrase and lose access to your device, your funds are permanently inaccessible. MetaMask has no server-side backup of your keys and cannot help you recover a wallet without the phrase. This is the fundamental trade-off of self-custody: you have full control, which means you also have full responsibility. Write your phrase down on paper and store it in at least two secure physical locations.
No. MetaMask is an EVM-compatible wallet designed for Ethereum and EVM-compatible networks. Bitcoin uses a fundamentally different blockchain architecture that is not compatible with the Ethereum Virtual Machine. To hold Bitcoin, you need a different wallet such as a hardware wallet that supports multiple assets, or a Bitcoin-specific software wallet. Some services allow you to hold Wrapped Bitcoin (WBTC) on Ethereum through MetaMask, but this is not actual Bitcoin on the Bitcoin network.
Both are self-custody EVM wallets with similar functionality. The main differences are in ecosystem and interface. Coinbase Wallet has tighter integration with the Coinbase exchange and is often considered slightly easier for absolute beginners. MetaMask has a larger user base, broader dApp compatibility, and is more commonly required by specific platforms and protocols. Both are legitimate options; the choice largely depends on which dApps you intend to use and which interface you find more intuitive.
Yes. MetaMask has native apps for both iOS and Android, available through the Apple App Store and Google Play Store. The mobile app includes a built-in browser for accessing dApps directly from your phone. Your wallet can be accessed on both desktop and mobile simultaneously by importing your Secret Recovery Phrase into each device during setup.
Keep Your Phrase Safe and You Are Ready to Go
MetaMask gives you genuine ownership of your digital assets and direct access to the decentralized web. Setting it up takes less than ten minutes. Using it safely takes a little more knowledge, which is exactly what this guide is designed to provide.
The single most important thing to remember is this: your Secret Recovery Phrase is your wallet. Write it down. Store it somewhere physically secure. Never share it with anyone, never type it into any website, and never photograph it. Every other mistake in crypto can be recovered from. Losing your Secret Recovery Phrase cannot.
If you want to go deeper into the crypto space, understanding the underlying characteristics and mechanics of cryptocurrencies gives you a better foundation for evaluating what you interact with. For those interested in building on or using NFTs, our NFT strategy guide covers what to know before you start. And for developers building in the Web3 space, this overview of hosting services for dApp developers is worth reading alongside your wallet setup.
Financial disclaimer: The content in this article is informational only and does not constitute financial or investment advice. Cryptocurrency involves significant risk, including the potential total loss of funds. Always conduct your own research before interacting with any blockchain platform, token, or protocol.
Infographic