Do you know how to create and display a WordPress blog post checklist for a WordPress editor or writer? What is the one thing that is king on any website, no matter the niche? Happy. That’s right; content is king on any site. Good, fresh, clear, and well-written content helps your website rank higher on Google. However, publishing content can be difficult without a plan. That’s why a tool like PublishPress Editorial Calendar can greatly benefit.
How To Create and Display a WordPress Blog Post Checklist For a WordPress Editor or Writer?
You can be a great content writer. That being said, this is often not enough. Having a plan in place can be beneficial because it allows you to see everything coming, understand what needs to be done, and do the things that will get your site ranked higher.
Just because you plan on writing one post a day doesn’t necessarily mean you’ll be able to stick with that plan in the long run. However, there are many benefits to having a solid WordPress editorial calendar on your website. In this post, you will learn how to create and display a WordPress blog post checklist for a WordPress editor or writer.
So, how to create and display a WordPress blog post checklist for a WordPress editor or writer?
Once you’re done writing, you’ll want to edit, proofread, add categories and tags, optimize the post for search engines, and more.
This is where a checklist can help. Checklists show you a list of tasks you need to do before publishing your posts, such as adding internal links or alt text.
Some WordPress plugins like AIOSEO use checklists to help website owners with search engine optimization.
The AIOSEO plugin SEO checklist
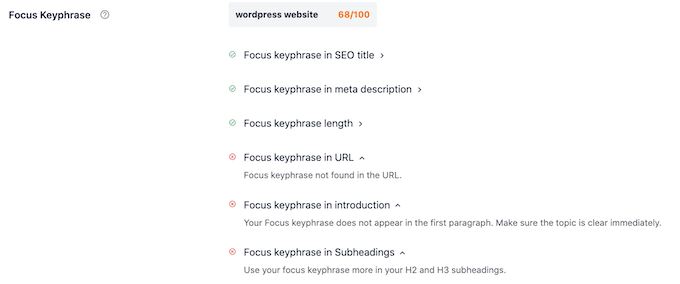
Checklists often track your post as you write and then tick off each task as you complete it. This makes it easier to see what you did well and what you still need to work on.
But what if you want to create a custom picklist in WordPress?
Maybe you have a multi-author blog where you want to ensure your content meets a certain quality standard. Checklists help here.
With that in mind, let’s see how to add a blog post listing to the WordPress editor.
How to Add a Blog Post Listing to the WordPress Editor
The easiest way to add a blog post checklist to the WordPress editor is to use the PublishPress Checklists plugin. It adds a checklist panel to the right-hand sidebar of the WordPress editor.
A blog post checklist created with PublishPress
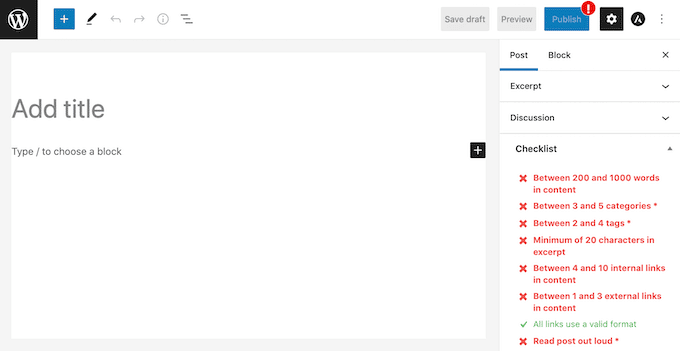
PublishPress has a standard to-do list that you can add to your checklists. It allows you also to create custom checklist tasks for your WordPress blog.
First, you will install and activate the plugin. See our guide on installing a WordPress plugin if you need further instructions.
After activation, go to Checklists >> Settings.
PublishPress Checklist Settings
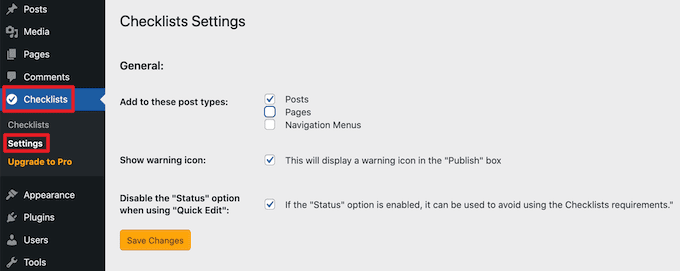
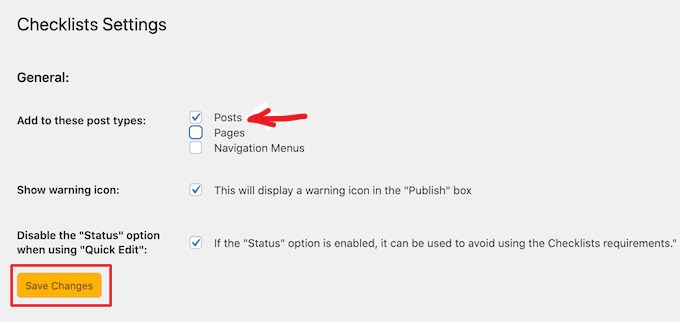
And here, you can choose where WordPress will show your checklist. For example, select the’ Posts’ checkbox to add a blog checklist to the WordPress editor.
Once this is done, click on the ‘Save Changes’ button.
Adding a Checklist to the WordPress Post Editor
So, you can then build your checklist by going to Checklists » Checklists.
Here you can see all selection tasks from your default blog selection list. In addition, publish Press can detect when tasks are complete and tag them for you.
Tasks for your WordPress blog post checklist
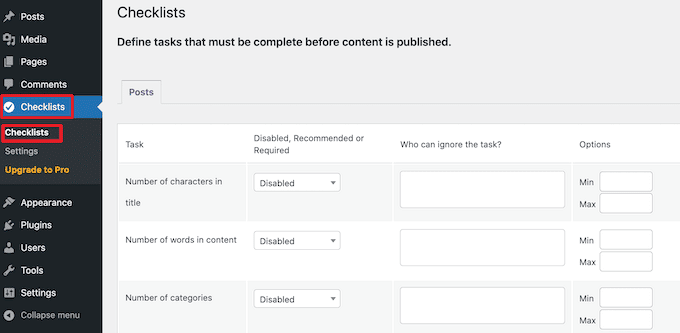
All tasks are disabled by default.
To add a task to the blog post checklist, open the ‘Disabled, Recommended, or Required’ dropdown menu.
A recommended and required checklist dropdown list
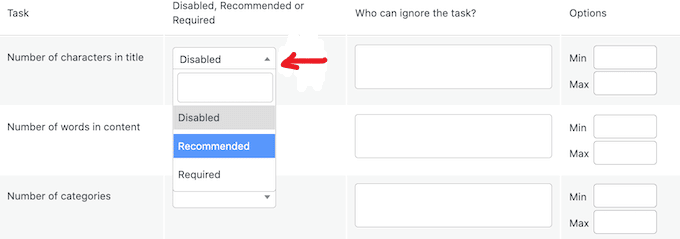
And you can now choose between ‘Required’ or ‘Recommended.’
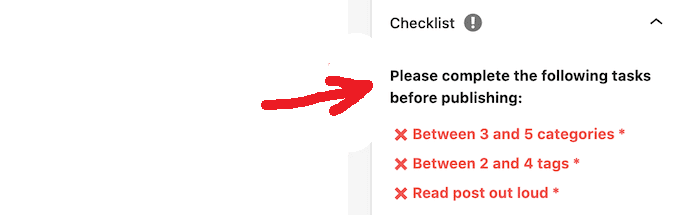
If you set a task to ‘Required,’ authors cannot publish their blog post until they have completed that task. When they click the Publish button, WordPress displays a warning message listing the outstanding required tasks they must finish before the post can go live.
A WordPress blog post checkbox
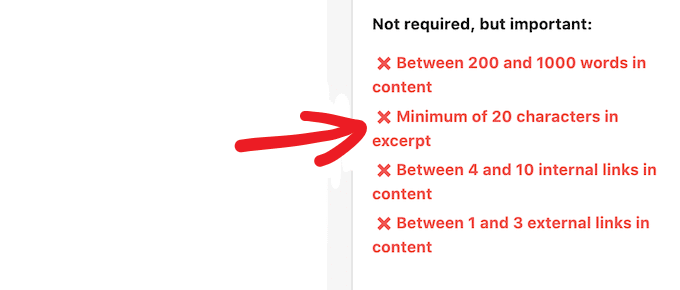
If you choose ‘Recommended’ instead, the editor will show a message encouraging authors to complete any outstanding tasks before publication.
And however, authors will be able to publish their posts without these tasks.
A list of recommended blog post tasks
After choosing between ‘Recommended’ and ‘Required,’ move on to the ‘Who can skip the task?’ dropdown.
Here you can allow certain user roles and a post other than the task to run, even if this task is ‘Required.’ For example, you can trust your site’s administrators or editors to skip this task of thinking you’re the best.
To add a user role to your ‘skip’ list, click ‘Who can skip the task?’ Cashier.
Creating an ‘Ignore’ List for Your WordPress Checklist
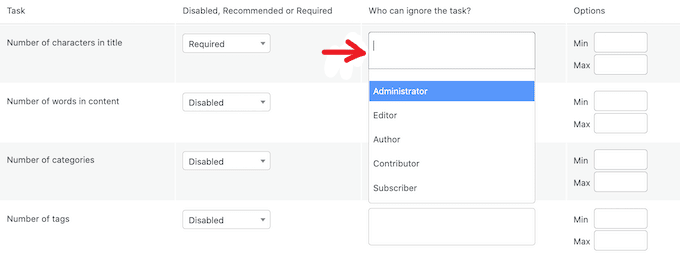
This opens a list dropdown showing your site’s different user roles.
You can click on a role to add those users to your ‘ignore’ list.
Adding a Blog Post Checklist to the WordPress Editor

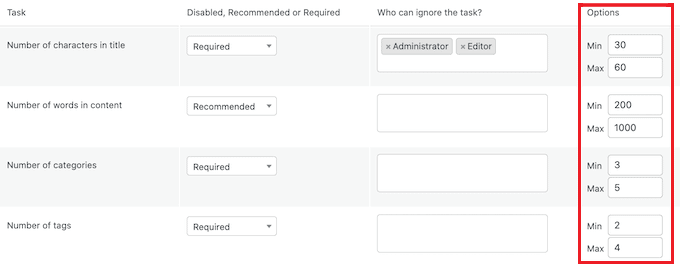
You may need to set maximum and minimum values for some tasks. For example, you can set the minimum number of categories an author must add to a post. For more information, see our guide to adding categories in WordPress.
You can enter the numbers to use if the question has min and max parts.
Set max and min tasks
To add more tasks to your list, repeat the process above.
So, you can also add custom tasks to your blog post checklist.
The downside is that PublishPress cannot verify that the author has completed custom tasks. This means that the author will need to do this verification manually.
For more information on custom tasks, you can add, see our guide on optimizing your blog posts for SEO like a pro.
To create a custom task, scroll to the screen’s bottom and click ‘Add Custom Task.’
Creating custom blog list checklist tasks
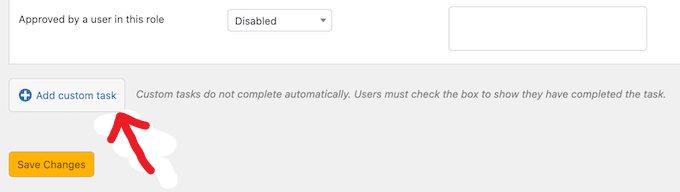
This adds a new ready-made task for you to customize.
Enter the task’s name in the ‘Enter the name of the custom task’ field. This text will show in your checklist, so make sure it lets authors know exactly what they need to do.
Adding a Title to Your Custom Checklist Task
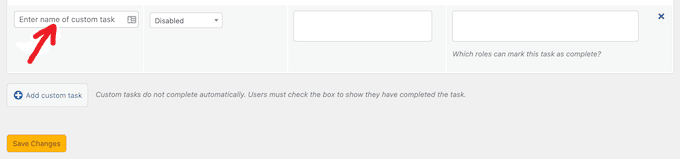
So, you can now make this task ‘Recommended’ or ‘Mandatory’ and give some users the option to skip this task by following the abovementioned process.
And for custom tasks, you can specify the users who can mark that task complete. So, for example, you can use custom tasks to create a special ‘Edit’ checklist for users with the Editor role.
And how to Add a Blog Post Checklist to WordPress

To do this, click on the ‘Which roles can mark this task as complete’ dropdown. This opens a dropdown listing wherein you may click on it to choose any of your roles.
Once you have brought all the obligations for your checklist, click on the ‘Save Changes’ button. Then go to the WordPress editor to see your live blog post checklist in action.
What to actually put on your WordPress blog post checklist
Setting up PublishPress is the technical side of the problem. The editorial side is deciding what your checklist should contain. Most sites under-utilize checklists because they add generic items rather than the specific quality gates their team actually needs.
Here is a starting template you can adapt for your own site. These items cover the most common quality and SEO requirements across a typical WordPress blog.
Content and writing quality
Before publishing, the author should confirm that:
The post targets a specific primary keyword and that keyword appears in the first 100 words naturally. The title includes the primary keyword and is between 50 and 60 characters. The meta description is written, is between 120 and 155 characters, and contains the primary keyword. The content is at least 800 words for standard posts, or 1,500 words for topic guides and tutorials, depending on your site’s standard. Headings use a logical hierarchy: one H1 (the post title), H2s for main sections, H3s for subsections. No heading levels are skipped. There are no spelling or grammatical errors after a final proofread.
Images and media
Every image has alt text that describes what the image shows and, where natural, includes the keyword. Images are compressed before upload. The post has a featured image set, sized to your theme’s recommended dimensions.
SEO and technical
A category is assigned (not “Uncategorized”). Relevant tags are added. The post has at least one internal link to another article on your site with descriptive anchor text. The URL slug contains the primary keyword and has been shortened to remove stop words. A canonical URL is set correctly if the content has ever appeared in draft or on another URL.
For multi-author sites, add editor-specific tasks:
The author’s name is correct in the post settings. The post has been reviewed by an editor before the status changes to ‘Ready to Publish.’ Any external links have been verified as live and relevant. Any affiliate or sponsored links carry the correct rel attribute (sponsored or nofollow).
In PublishPress, you can add each of these as either a Recommended or Required task. For a site where SEO consistency matters, making keyword usage, meta description, and featured image Required rather than Recommended will produce measurably more consistent content over time.
The official PublishPress Checklists plugin page documents all the automated checks the plugin can run, including word count minimums, title length, featured image presence, and Yoast SEO score tasks that PublishPress can verify automatically without relying on the author to self-certify.
Why writers and editors need different checklists in WordPress
The article’s title mentions both writers and editors, and this distinction matters in practice. A checklist designed for the person writing the content is different from one designed for the person reviewing and approving it.
A writer’s checklist covers production tasks:
These are things the author verifies before they consider the draft complete: keyword inclusion, heading structure, internal links added, images uploaded with alt text, meta description written. These are self-verified tasks, which is why they work well as recommended in PublishPress for writers. It is guidance, not enforcement.
An editor’s checklist covers quality and approval tasks:
These are things a second person confirms before the post moves to the Published or Scheduled state: fact-checking completed, readability reviewed, brand voice is consistent, SEO score passes the site’s minimum threshold, featured image is set and appropriately sized, all external links are live. These work well as Required, because they represent the site’s minimum standard of quality, not a first-draft guideline.
PublishPress handles both scenarios. You can assign specific checklist tasks to specific user roles, so writers see their tasks and editors see theirs. You can also use the “Who can mark this task complete” setting to ensure only editors can check off the editorial review task, preventing authors from bypassing the review step themselves.
For teams managing multiple content types and publishing workflows, this role-based task assignment is one of the most valuable features available in the free version of PublishPress.
How to connect your WordPress checklist with Yoast SEO or Rank Math
If your site uses Yoast SEO or Rank Math, you can connect those plugins directly to PublishPress Checklists so that the SEO score becomes part of your pre-publish gate.
In the Checklists settings panel, you will find options for Yoast SEO score and readability score. When enabled, these add items to your checklist that PublishPress populates automatically based on Yoast’s analysis. Instead of asking an author to self-report “I checked SEO,” you can require that the Yoast SEO score reaches at minimum the yellow “OK” threshold before the post can be published.
This turns the subjective question “did you optimize the post?” into a verifiable machine check, which significantly reduces variability in your content quality across authors.
The same integration is available for Rank Math in the paid version of PublishPress. You can require that the Rank Math SEO score reaches a set threshold before publishing.
To set this up, go to Checklists Settings, find the Yoast SEO section, and choose either “OK” (yellow traffic light) or “Good” (green traffic light) as your minimum required score. Setting it to “OK” is a reasonable standard for most blogs. “Good” sets a higher bar that may be more appropriate for sites where organic SEO is a primary traffic source.
Combining this automated check with best practices for creating SEO-friendly blog posts gives your team both the technical guardrails and the editorial knowledge to publish consistently optimized content.
Why a structured blog post workflow matters for WordPress sites
Why create and display a WordPress blog post checklist for a WordPress Editor or Writer? As good as a platform like WordPress is, they often don’t make it easy to see when your posts are scheduled. However, a solid content calendar gives you an overview of your blog and when each post will be published. There are also several other related tools built in that you can take advantage of, depending on the plugin you choose.
Despite well-intentioned planning and solid effort, content creation, edits, upcoming post drafts, and the schedule can get confusing and difficult to follow without a plan. The need for a WordPress content calendar cannot be overstated. Here are some other solid benefits to think about:
- It helps keep you organized and on track
- Perfect for brainstorming
- help with consistency
- Will keep the audience engaged
- Visibility across all departments
- Keeps your whole team aligned on goals and standards
- Track overall performance
The post-publishing checklist most WordPress sites skip
Most editorial checklists focus on what happens before the post goes live. The post-publishing phase also benefits from a structured checklist, particularly for sites that want to build traffic and audience engagement deliberately.
Here is what an after-publication checklist typically includes:
The post has been shared on the site’s primary social channels. The post URL has been submitted in Google Search Console using the URL Inspection tool to prompt indexing. The post has been added to any active email newsletter or digest for the publication period. Any related older posts on the site have been updated to include an internal link to this new post where relevant. The published post has been reviewed on a mobile device to confirm formatting and images display correctly.
Within the first 30 days, revisit the post to check:
Whether it is generating impressions in Google Search Console. Whether the click-through rate on the title is strong — a low CTR with reasonable impressions suggests the title or meta description may need revision. Whether any comments require moderation or response.
These post-publishing steps are easy to track inside PublishPress by adding them as custom tasks with a separate ‘Post-Publication’ label, or by managing them in a separate editorial calendar plugin alongside your checklist tool.
For a broader view of how these tasks fit into a full editorial toolkit, the guide to essential WordPress content management plugins covers both the checklist plugin covered in this article and the scheduling and calendar tools that complement it.
Final thoughts
Giving you and other editors on your site the ability to create and manage content in a way that is not cluttered and confusing is very important. This leads to better parts, more straightforward navigation, and better results.
I hope this article has shown you how easy it is to get a solid WordPress content calendar running on your website. A tool like PublishPress Editorial Calendar can start taking your website content in a better direction.
What other practices have you implemented to help with content creation and management? For example, is there another editorial calendar plugin that you like better?
WordPress blog post checklist FAQ
PublishPress Checklists is the most widely used plugin for this purpose and the one covered in this tutorial. It integrates directly with the WordPress editor, supports both Recommended and Required task levels, works with role-based permissions, and connects with Yoast SEO and Rank Math for automated quality checks. The free version covers most of what a standard WordPress blog needs.
Yes. When you set a task to ‘Required’ in PublishPress, WordPress will show a warning message when an author tries to publish without completing that task. You can configure whether this warning blocks publishing entirely or simply prompts the author to confirm before proceeding. You can also allow certain user roles, such as Administrators, to bypass specific Required tasks.
A blog post checklist defines the quality and completeness requirements that must be met before a single post is published. An editorial calendar shows the schedule of what content is planned, being written, and going live across your entire site. The two tools work together; the checklist ensures each individual post meets your standards, while the calendar manages the broader production schedule. Some plugins, including PublishPress, provide both tools within the same plugin family.
Required tasks are those where publishing without completion would cause a measurable problem: missing a featured image, skipping the meta description, or failing to assign a category. These are things you can objectively verify and that directly affect how the post performs. Recommended tasks are best-practice reminders where the author uses judgment: adding internal links, reviewing for tone, or checking headline clarity. The distinction matters for multi-author sites because Required tasks enforce consistency while Recommended tasks guide rather than restrict.
Yes. PublishPress allows you to configure which tasks are visible to which user roles. An Administrator might see a different set of tasks than a Contributor. You can also set which roles can mark specific tasks as complete, which is useful when a task should only be signed off by an editor rather than self-certified by the author who wrote the post.
Yes. The PublishPress Checklists plugin is fully compatible with the Gutenberg block editor and displays the checklist in the right-hand sidebar panel of the editor interface. It is also compatible with the Classic Editor for sites that have not transitioned to blocks.
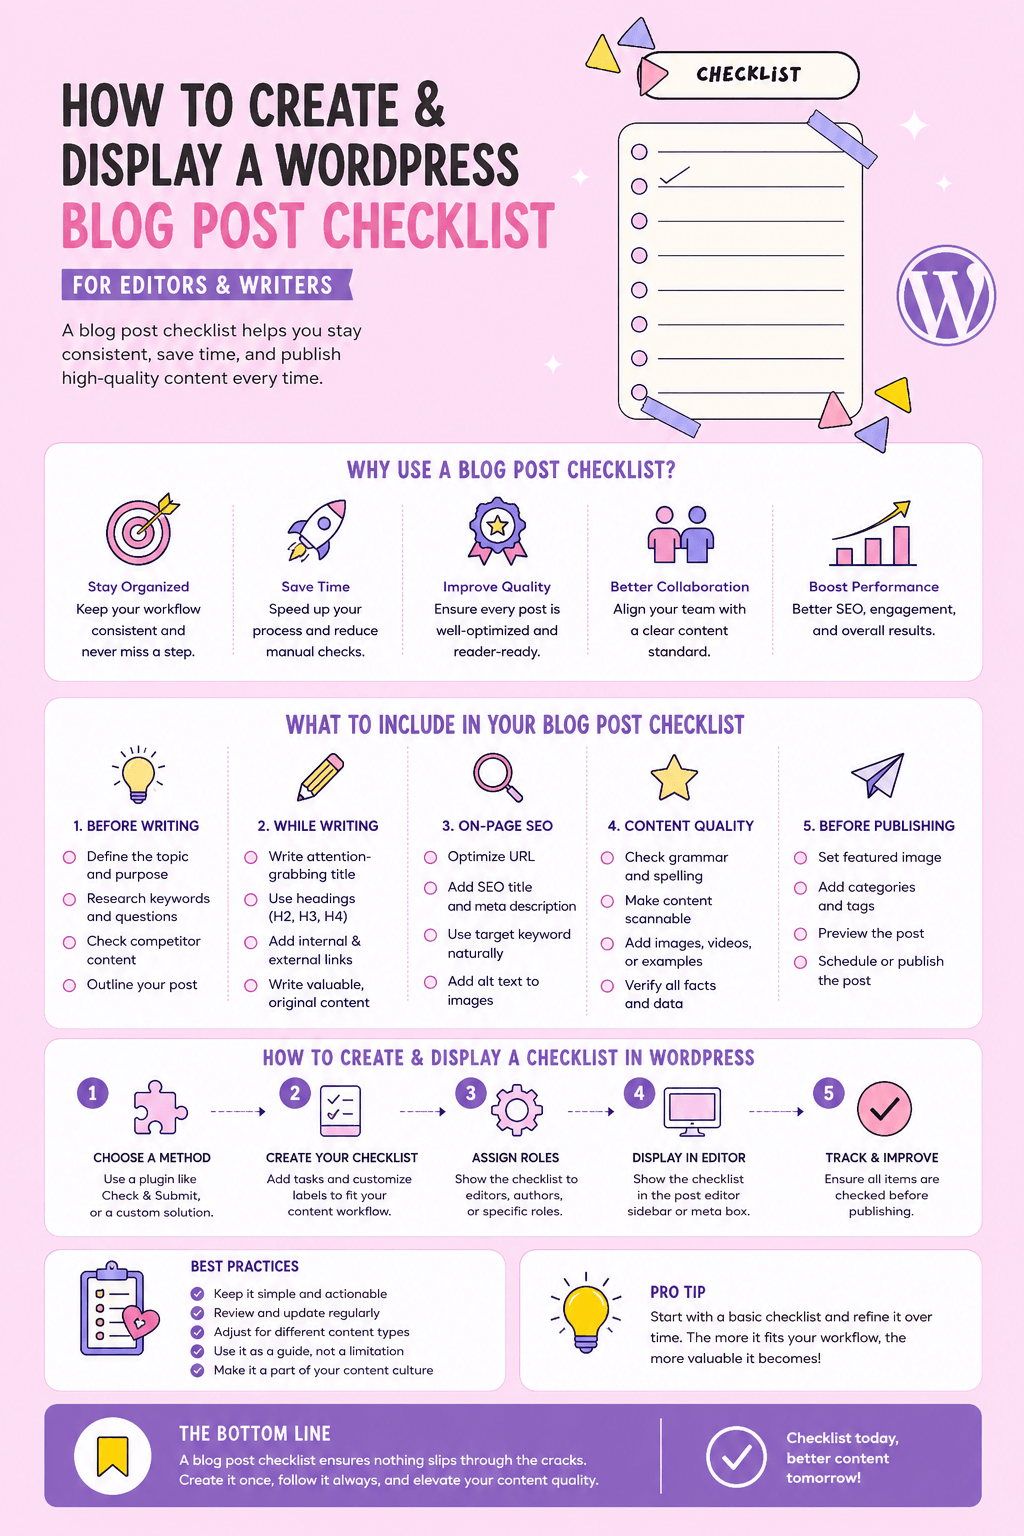
Infographic