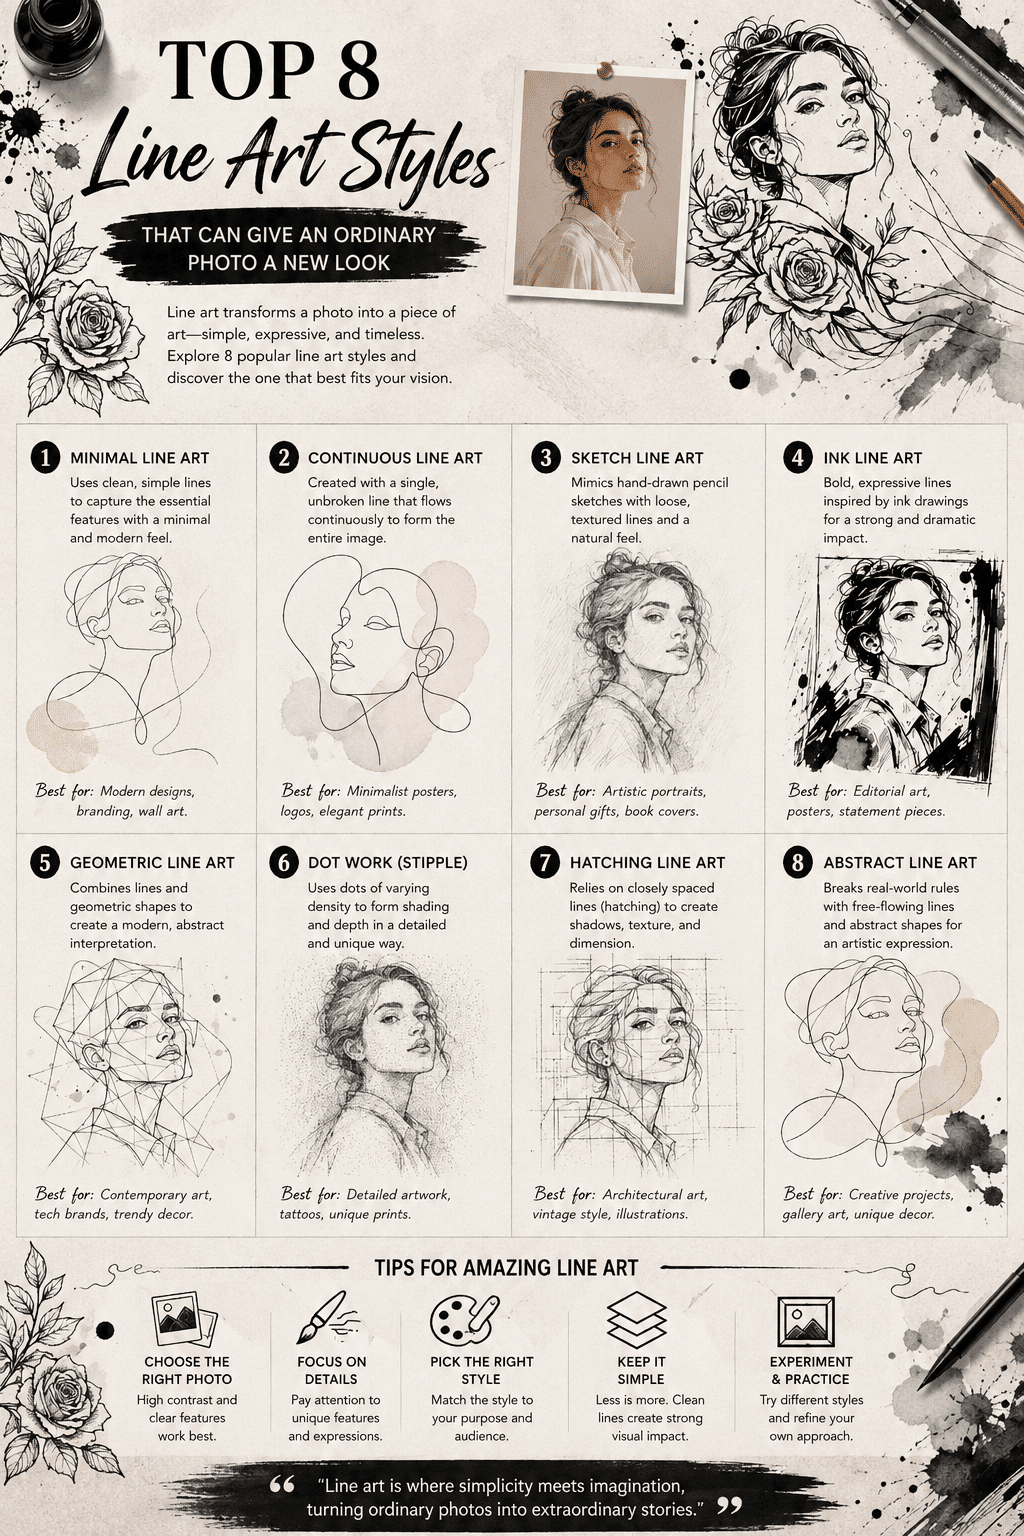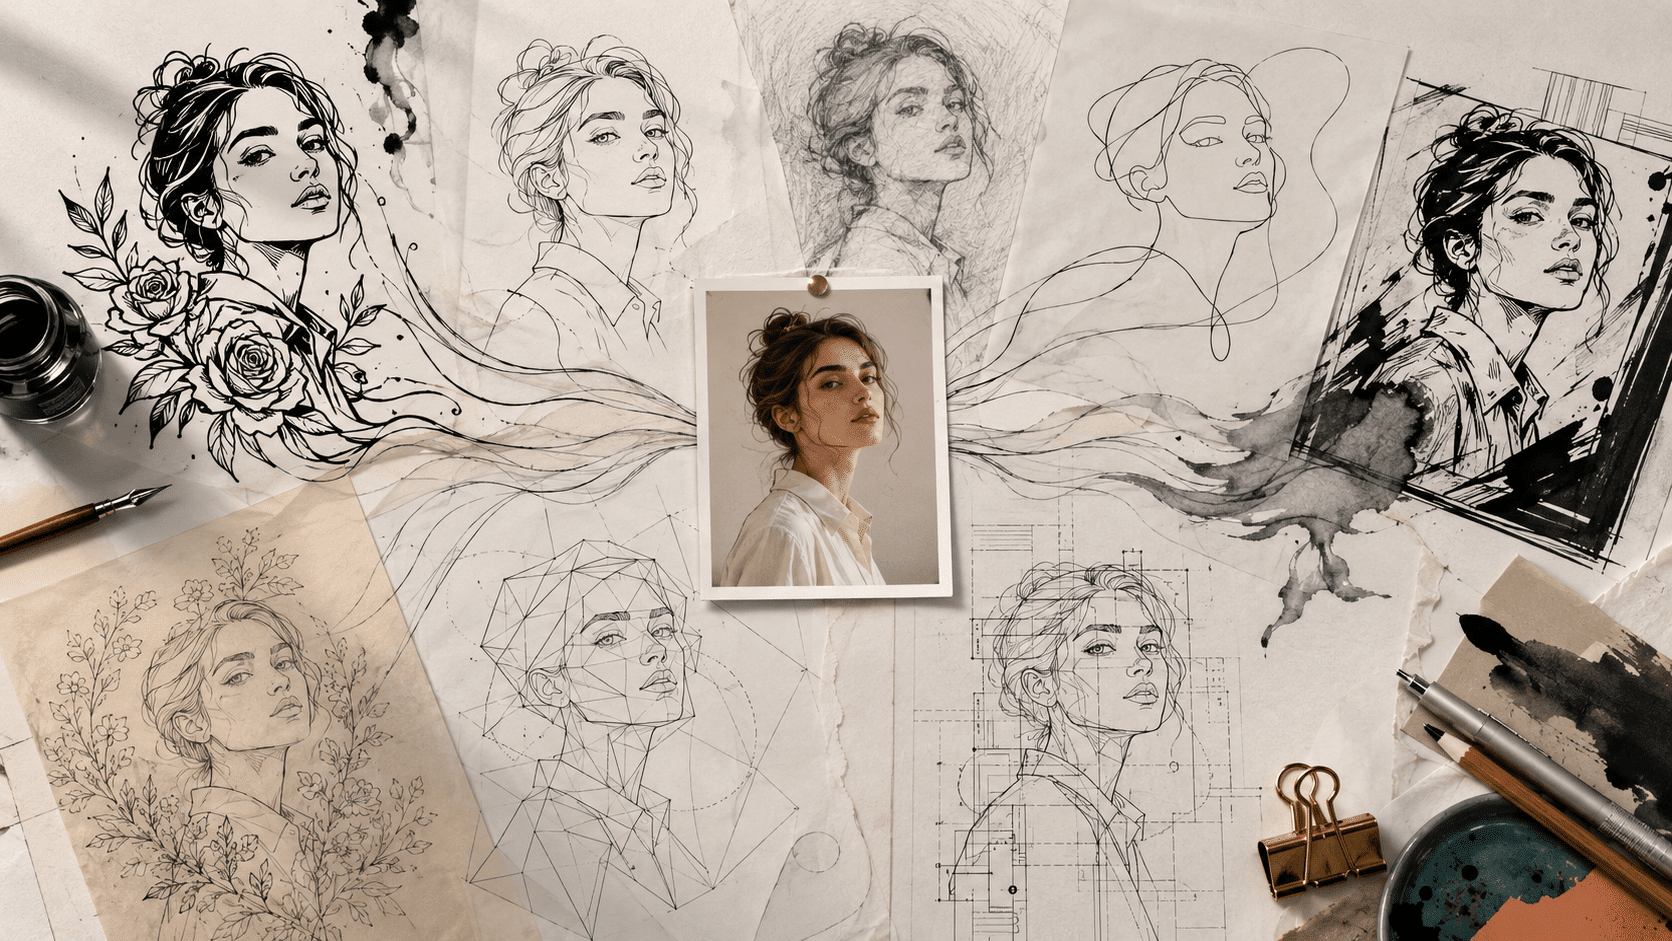
A photograph does not have to remain a photograph forever. With the right type of line treatment, a familiar image can become bold, delicate, dramatic, playful, or surprisingly modern. The same portrait might work as a strong tattoo reference, a soft pencil drawing, or a minimalist piece of wall art.
The main challenge is choosing a style that suits both the original image and the final purpose. A detailed photograph may look beautiful as a sketch but become confusing when reduced to a few thick lines. A simple object may not need much detail at all.
The following eight styles offer practical starting points for transforming photographs into line-based artwork.
1. Bold Tattoo Stencil Style
Tattoo stencil artwork focuses on clear shapes and readable outlines. Fine textures, background objects, and minor shadows are usually removed so that the main subject remains easy to recognize.
When you convert an image to a tattoo stencil, look for a result with a strong outer contour and enough internal detail to identify the subject. A portrait may need lines around the eyes, nose, mouth, and hair, while an animal design may depend more on the ears, face shape, and body position.
Best Images for This Style
High-contrast photographs tend to produce better stencil concepts. Side profiles, isolated flowers, animals, symbols, and objects with distinctive shapes are all good choices.
A complicated background can introduce unnecessary marks, so the subject should be visually separate from everything behind it. The final design should also remain understandable when viewed at a smaller size.
An automatically generated result can be useful for exploring an idea, but a tattoo artist should review and refine it before it is used on skin. They can adjust the composition, line thickness, and level of detail to fit the chosen placement.
2. Clean Contour Drawing
A contour drawing uses outlines to describe the shape of a subject. Unlike a detailed pencil sketch, it does not depend heavily on shading. The result is simple, neat, and easy to print.
An image to line drawing tool can help identify the most important edges in a photograph. This style is especially effective for faces, hands, clothing, furniture, and objects with recognizable silhouettes.
Why Contour Lines Work
The human eye does not need every detail to recognize something. A few well-placed lines can suggest the curve of a cheek, the shape of a chair, or the petals of a flower.
Clean contour art also leaves room for personal editing. You can remove lines that feel distracting, strengthen the outer shape, or add small details by hand. Because the style is not crowded, even simple changes can make a noticeable difference.
3. Minimalist Single-Line Art
Single-line art creates the impression that the entire subject was drawn without lifting the pen from the page. Some designs truly use one continuous line, while others only imitate that flowing appearance.
This style has become popular for portraits and home decoration because it feels modern without being cold. It can capture a pose, expression, or relationship using very little visual information.
The Historical Root of This Style
Continuous line drawing isn’t a recent design trend, it has real art-historical roots worth knowing. Pablo Picasso produced a well-known series of single-line animal drawings in the 1940s and 1950s, a dog, a camel, a flamingo, a bull, each rendered without ever lifting the pen from the paper. What made these works remarkable wasn’t simplicity for its own sake, it was the discipline of deciding, before drawing a single stroke, exactly which features actually communicated the subject and which could be left out entirely.
That’s the same decision anyone applying this style to a photograph has to make. A single-line portrait can’t capture every wrinkle or strand of hair, it has to find the handful of lines that carry the likeness, the same selective reduction Picasso was working through nearly a century ago.
Focus on Movement
A strong single-line design needs a clear route through the subject. The line might begin at the hair, move around the face, continue through the shoulder, and finish near the hands.
Photos with a simple pose are easier to simplify. A side profile, a person looking downward, or two faces close together can work particularly well. Group photographs and detailed scenes are usually harder to turn into a natural continuous design.
The goal is not to preserve every feature. It is to keep the parts that communicate the mood of the original image.
4. Soft Pencil Sketch
A pencil-style line drawing includes more texture than a clean contour design. It may use short strokes, light shading, and changes in pressure to create depth.
This approach suits portraits, old buildings, natural landscapes, and still-life photographs. It is a good option when you want the finished result to retain some of the atmosphere of the original photo.
Keep the Texture Under Control
Too much texture can make a digital sketch look muddy, especially when it is printed. Important features should be darker, while secondary areas can remain light.
For a portrait, the eyes and main facial outline may need stronger marks than the clothing or background. In a landscape, a building or tree can act as the main focus while distant details fade gently.
A pencil effect often looks more natural when a few areas are left unfinished. Empty space allows the viewer’s imagination to complete the picture.
5. Comic-Ink Outline
Comic-style art uses confident black lines and simplified shadow shapes. It is more dramatic than a standard contour drawing and less delicate than a pencil sketch.
This style works well for expressive portraits, action poses, vehicles, street scenes, and photographs with strong lighting. It can make an ordinary image feel like a frame from a graphic novel.
Use Different Line Weights
One of the easiest ways to create a comic look is to vary the thickness of the lines. The outer edge of the subject can be heavy, while facial details and clothing folds remain thinner.
Dark areas can be filled with solid black instead of being represented by soft gray shading. However, it is important not to cover too much of the image. A few carefully chosen dark shapes usually create more impact than large blocks of black.
For an even stronger comic effect, add a limited amount of color after the outline is complete.
6. Botanical Illustration
Flowers, leaves, branches, and houseplants naturally suit line-based artwork. Their shapes are recognizable, and small imperfections often make the final drawing feel more authentic.
Botanical line art can range from a simple flower outline to a detailed study showing veins, stems, and overlapping petals. It can be used for stationery, labels, prints, invitations, or personal art projects.
Select a Strong Plant Shape
A single flower photographed from the side may create a more graceful result than a large bouquet. Leaves with unusual edges or visible veins also provide useful detail.
Try to preserve the direction in which the plant grows. Curved stems and naturally uneven petals give botanical drawings a sense of movement. Making every leaf perfectly symmetrical can remove some of the character found in the original photograph.
Fine lines are usually suitable for delicate flowers, while thicker outlines may work better for tropical leaves and larger plants.
7. Geometric Line Art
Geometric line art rebuilds a subject using straight lines, angles, polygons, and simplified planes. It can make portraits and animals appear modern, structured, and slightly abstract.
The style is particularly effective when the subject has a strong silhouette. Wolves, birds, cats, faces, and mountain landscapes are common choices because their key shapes can be divided into clear sections.
Simplify Before Adding Angles
A geometric design should still be recognizable before the smaller shapes are added. Start with the main outer form, then divide it into a limited number of internal areas.
Adding too many triangles or crossing lines can make the image difficult to understand. It is often better to use larger shapes around the outside and smaller ones near important features such as the eyes or mouth.
Symmetry can create a polished look, but slight differences between the two sides may help the design feel less mechanical.
8. Technical Object Outline
Technical line art presents an object in a clear and organized way. It is inspired by product sketches, instruction manuals, and design drawings, although it does not need to follow strict engineering standards.
Cameras, bicycles, shoes, tools, furniture, and electronic devices can all work well in this style. The final image usually emphasizes construction, proportion, and functional details.
Pay Attention to Structure
Start with the largest parts of the object and check how they connect. On a bicycle, for example, the frame and wheels are more important than small details on the chain. On a camera, the body and lens should be clear before buttons and surface textures are added.
Straight edges should remain controlled, while circular parts need smooth curves. Removing reflections, labels, and decorative textures can help the object look cleaner.
This style is also useful for presenting an idea because it shows the shape of a product without the distraction of color.
How to Choose the Right Line Art Style
Not every style will suit every photograph. Before transforming an image, think about what makes the subject interesting.
If the silhouette is the strongest feature, bold stencil work or clean contour lines may be the best choice. If the photograph depends on atmosphere and texture, a pencil sketch may preserve more of its character. A dramatic pose could suit comic ink, while a simple portrait might look better as minimalist or geometric art.
Consider the Final Size
Small designs require fewer details and stronger lines. Fine textures that look attractive on a computer screen may disappear when printed on a card or reduced for a compact design.
Larger prints can support more internal detail, but they still need a clear focal point. Adding detail everywhere can make the result feel flat because no area stands out.
Think About the Mood
Line thickness and style can change the emotional effect of an image. Fine, flowing lines often feel calm and elegant. Heavy outlines create energy and confidence. Pencil textures may suggest warmth or nostalgia, while geometric lines feel modern and controlled.
Choose the mood before making detailed edits. This makes it easier to decide which parts of the original photograph should remain.
A Simple Process for Refining the Result
Once the first line version has been created, step away from it for a few minutes. When you look again, check whether the subject is immediately recognizable. If you need to study the image for a long time, the important shapes may not be clear enough.
Remove lines that belong to shadows, background objects, or surface textures unless they support the chosen style. Strengthen the main outline and keep internal marks lighter where possible.
Check the Design in Black and White
Color can hide problems in the structure of a drawing. Viewing the design in pure black and white makes it easier to notice weak edges, crowded areas, and broken lines.
You can also reduce the image on screen to approximately its final printed size. This quick check shows whether small details remain visible or turn into dark, unclear patches.
Finally, make a test print. Paper often reveals issues that are difficult to see on a bright screen. A line that appears fine digitally may print too lightly, while several close lines may merge together.
Getting the Resolution Right Before You Print
The advice above to make a test print is right, but it skips the one number that actually determines whether that print looks clean or fuzzy: resolution.
For raster images (JPEGs, PNGs, most photo-to-line-art conversions), 300 DPI at the final print size is the standard commercial printing benchmark. That number matters at the size you’re actually printing, not the size the file happens to be on screen, an image that looks crisp as a small preview can turn blurry the moment it’s enlarged to fill a poster or canvas. Fine, detailed line work specifically benefits from going higher, 400 to 600 DPI, since thin lines show jagged edges at standard resolution in a way photographs don’t. Where possible, exporting as a vector file avoids the question entirely, since vector graphics have no fixed resolution and stay sharp at any size.
That’s also the practical case for trying more than one conversion tool before settling on a result. For the tattoo stencil style specifically, a tool built to convert image to tattoo stencil is designed around exactly that use case, strong outer contours with enough internal detail to survive translation onto skin. For the other seven styles covered in this guide, other free browser-based conversion tools cover general line-art and sketch conversion without requiring an account. Testing a photo through two or three tools before picking a final version often produces a noticeably better starting point than the first result.
Where Line Art Fits Into a Broader Visual Strategy
Line art rarely stands alone as a design choice, it’s usually one piece of a bigger visual system.
For businesses using converted photography in product or marketing contexts, the same principle covered in How to Turn App Store Images Into a Clear Product Story applies directly: a striking visual only works if it’s paired with the surrounding content that gives it context.
For readers exploring AI-assisted image tools more broadly, beyond line-art conversion specifically, 12 Things You Should Know About AI Face Swap covers a related category of AI image transformation, including where the ethical and technical limits sit.
And for anyone considering applying these techniques to a full home redesign project rather than a single photo, AI Remodel App: How to Instantly Visualize and Redesign Your Home Using AI covers a related but distinct use of the same underlying technology.
Final Thoughts
Turning a photograph into line art is not only about removing color. The chosen line style determines what the viewer notices and how the finished image feels.
Bold stencils highlight shape, contour drawings create clarity, pencil effects preserve softness, and geometric designs introduce structure. By matching the style to the subject and final purpose, you can create artwork that feels intentional rather than automatically processed.
Experiment with different approaches, keep the strongest features of the original image, and remove anything that does not help the design. A simpler result is often the one that leaves the strongest impression.
Frequently Asked Questions About Line Art Styles
For raster files (JPEG, PNG), 300 DPI at the final print size is the standard commercial printing benchmark, used to avoid visible pixelation. Vector files don’t have this limitation and stay sharp at any size.
Bold tattoo stencil style specifically, since it prioritizes clear outer contours and enough internal detail to stay recognizable at skin scale. A tattoo artist should still review and refine any automatically generated result before it’s used.
Not identical, but directly related. Picasso’s famous single-line animal drawings from the 1940s and 1950s established the technique’s core discipline, deciding which features to include in one unbroken line. Modern single-line art applies the same principle.
Yes, several free and paid tools do this, but an automatic result is usually a starting point rather than a finished piece. Testing a photo through more than one tool and refining the result by hand typically produces a cleaner outcome.
High contrast, a clear subject separated from a busy background, and a recognizable silhouette all convert well. Group photos, cluttered backgrounds, and low-contrast lighting tend to produce muddled results regardless of style.
Vector, when the final use involves resizing, printing at large scale, or reproducing on multiple products, since vector files have no fixed resolution. Raster is fine for web use or single-size prints, as long as it meets the 300 DPI benchmark at that size.
Infographic