WordPress Testimonial Section Creation Guide
WordPress Testimonial Section Tutorial In today's guide & tutorial, you'll learn how to build a WordPress testimonial section, tips, and block creation ideas to…

WordPress Testimonial Section Tutorial
In today’s guide & tutorial, you’ll learn how to build a WordPress testimonial section, tips, and block creation ideas to share your customers and clients’ reviews.
In this tutorial in our guide section, we will show you how to create a WordPress Testimonial Section using our different methods. Including our Borderless plugin ‘testimonial’ element and editing it easily using our WordPress plugin. See the element in use on this demonstrative page.
Elemento Usage in WPBakery Page Builder + Borderless
After all, make sure you have installed your Borderless plugin (Free Visualmodo plugin on wp.org) to have this element on your page builder elements list. You can follow step #2 on themes online documentation to install the plugins.
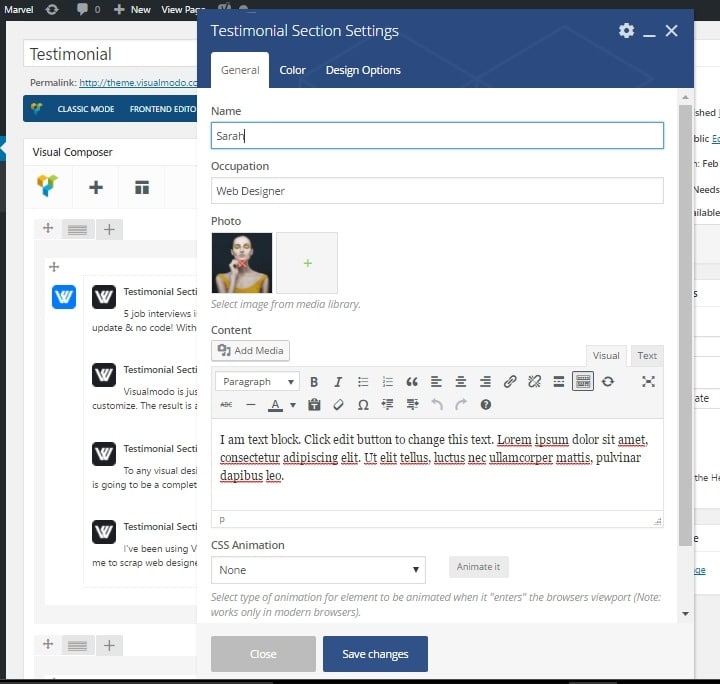
The first step is navigate to your WordPress dashboard > Pages > Add new > click on back-end or front-end editor > Add Element < one on the elements selector click on the ‘visual elements’ tab > select the ‘testimonial’ element.

A second section will appear on your page so you can add the ‘testimonial section’ just click on the ‘+’ (plus) button and select the element. Keep reading the WordPress testimonial section creation guide.

A testimonial WordPress section editor window will appear to you can add the information, name, occupation, people, or company photo, and the text itself, fulfill all the fields with your information, and save the section from closing the editor window and repeating the process to add more testimonial sections.
WordPress testimonial section by Visualmodo WordPress Themes
Widget Usage In Elementor Plugin + Borderless
Before starting, make sure that you already have your Elementor page builder (free or premium) and Borderless plugin (Free or pro) installed on your WordPress site.
Step-Step
- Firstly, go to your website’s WordPress dashboard
- Secondly, from the left sidebar of menus, hover your mouse over ‘Pages’ (Or custom post types).
- Click on ‘Add New’ and click on the ‘Edit with Elementor’ button.
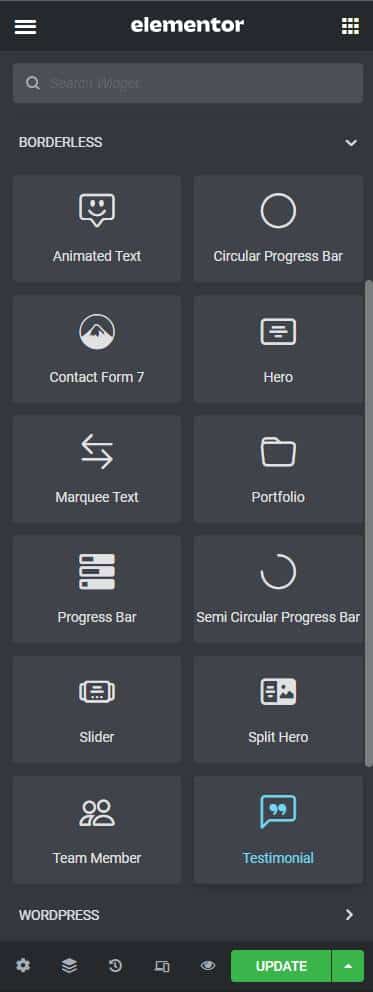
- As soon as the front-end page editor loads, review the left sidebar of widgets. Scroll it down until you see the ‘Borderless’ widgets section.
- From it, select the one called ‘Testimonial’ like in the image.
- You’re free to customize it following the video tutorial below.
- Finally, you can customize the details by adding the deployment text or review and the person’s photo & name.
- Keep reading the WordPress testimonial section creation guide.
Video tutorial
Alt Option for Adding Reviews For Free – WordPress Testimonial Section
Where should you place testimonials?
Testimonials work best when they appear near a decision point.
Good places to add testimonials include:
- Homepage, after the main value section.
- Service pages, near the call to action.
- Product pages, close to the buying section.
- Pricing pages, near plan comparisons.
- About page, after the company story.
- Landing pages, after benefits or features.
- Portfolio pages, next to project results.
- Checkout or signup pages, when the design allows it.
A testimonial should support the action you want the visitor to take. If the page asks people to book a consultation, show testimonials from clients who booked and got a good result. If the page sells a product, show feedback from people who used that product.
Why adding testimonials in your WordPress website?
Using a testimonial plugin facilitates the addition of customer or client testimonials, reviews, or feedback to your WordPress website. Moreover, this increases the social proof associated with your website and increases your customer base and revenue.
You could’ve added testimonials by handing them into your posts and pages. However, a testimonials plugin allows you to do so in various ways, including a slider, carousel, grid, or other appealing layouts.
Finally, depending on your plugin, you can display testimonials with images, a short description, reviewer information, title, business, or rating.
WordPress Testimonial Section FAQ
A testimonial section is an area of a WordPress page that displays feedback from customers, clients, students, users, or buyers. It usually includes a quote, a name, a role, a company, an image, or a rating.
You can add testimonials in WordPress with a page builder widget, a plugin, a custom block, or a theme section. Visualmodo users can create testimonial sections with the Borderless plugin using Elementor or WPBakery.
Yes. The Borderless plugin includes widgets for Elementor, including a testimonial widget when supported by the installed version.
Yes. Borderless includes visual elements for WPBakery, including a testimonial element when the plugin is installed and activated.
Testimonials work well on homepages, service pages, landing pages, pricing pages, portfolio pages, product pages, and about pages. Place them near important decision points.
A good testimonial should include a short quote, the customer’s name, role or company, and a photo when available. The best testimonials explain a real problem, result, or experience.
Real photos can make testimonials feel more trustworthy, but only use them with permission. If you do not have permission, use names, company details, or text only.
A testimonial slider can be useful for design, but the text should still be readable, accessible, and visible. Do not hide important content in a way that makes it difficult for users to read.
Yes. Testimonials can help reduce doubt and build trust, especially when they are specific, real, and placed near a call to action.
Only add review structured data when the page qualifies and the review content is visible, accurate, and follows Google guidance. Do not use fake reviews or misleading rating markup.