Stream WordPress Theme Documentation
Getting Started: Stream WordPress Theme Documentation Firstly, welcome to the Stream WordPress theme documentation, guide & tutorial! If you need anything feel free to…

Getting Started: Stream WordPress Theme Documentation
Firstly, welcome to the Stream WordPress theme documentation, guide & tutorial! If you need anything feel free to ask questions by contacting our 24 hours support accessing your Account and opening tickets, you are free to open as many tickets as you want. This is the instruction manual for the Stream WordPress theme powered by Visualmodo.
So, we ask that you read this document carefully as it will help you a lot in creating your website because it shows you much information of the theme. In addition, we suggest you take a look in the help area on Help Desk for video tutorials and step-by-step guides.
Install Your Stream WordPress Theme
In the first 3. steps of your Stream WordPress theme documentation, guide & tutorial, you will see how to get it started properly. When you purchase our Stream WordPress theme you will receive an e-mail with a link for download. Once you made the download you will have a bigger folder in .ZIP format. This is the case you have purchased our themes on the following marketplaces;
With something like 9MB of size on the marketplaces with all the theme content called ‘ThemeMaster.zip’
On this folder you will see the following files; Demo content, Theme files, License and Documentation. Please don’t try to install this ThemeMaster.zip file on your WordPress, if you try you will see an error message because it’s the row-folder.
Theme Version: 5.0.0
Last Update: Nov. 07, 2025
Compatibility: WordPress 6+
Installation Process
Firstly, to install the theme you need to open this big folder ‘ThemeMaster.zip’ with 9MB of size. Found and open a file called ‘Theme-Files’. Inside this file, you will see 2 files, theme.zip with something like 3.4MB of size in .ZIP format and theme-child .zip.
As a result, you need to extract/remove/unzip the theme.zip with 3.4. All you need to do is click on this file and drag it and drop this file on your desktop area. Finally, it will unzip the theme and you will get the ready-to-install file. Please have a look at this video tutorial;
Secondly, you need to log in to your WordPress admin area and go to ‘Appearance’. Click on ‘Themes’. Add new, Upload Theme, Select files.
Select the theme.zip file that you have unzipped before and has something like 3.4MB in size. Finally, click on the upload theme and activate the theme. Another way to install your Stream WordPress theme is using the FTP for it.
Alternative Installation Methods
Moreover, this Stream WordPress theme documentation, guide & tutorial can help you with your Stream WordPress theme installation process in case you have some issues.
The theme is missing the style.css stylesheet? See what to do!
In the case your purchase our theme on Mojo Marketplace you will receive different files. The 4 following files;
- Demo Data
- Main Files
- Help File
- Child Theme
Already separated and unzipped. You will not receive the ThemeMaster.zip with all content together on the mojo-marketplace.
So, all you will need to do is download the ‘Main Files’. This is the ready-to-upload on WordPress file. As a result, all you need to do after downloading this ‘Main Files’ folder is go to your WordPress Dashboard.
Appearance > Themes > Add New > Upload Theme. Select the ‘ThemeName.zip’ downloaded folder and upload it to your site. Finally, activate your theme. For MOJO download and install, follow this video tutorial.
In case you don’t want to install your Stream WordPress theme or have any difficulty. You are free to contact our support at https://visualmodo.com/account/ or e-mail us at contact@visualmodo.com. Ask for our support crew to enter your website and install your VisualMentor WordPress theme for you.
It’s easy, fast, and free for all Visualmodo clients. In addition, just make sure you give us the right info on this contact. We will need your login information/site URL and a print-screen/screenshot from your theme purchase with the date.
Install Your Stream WordPress Theme Plugins

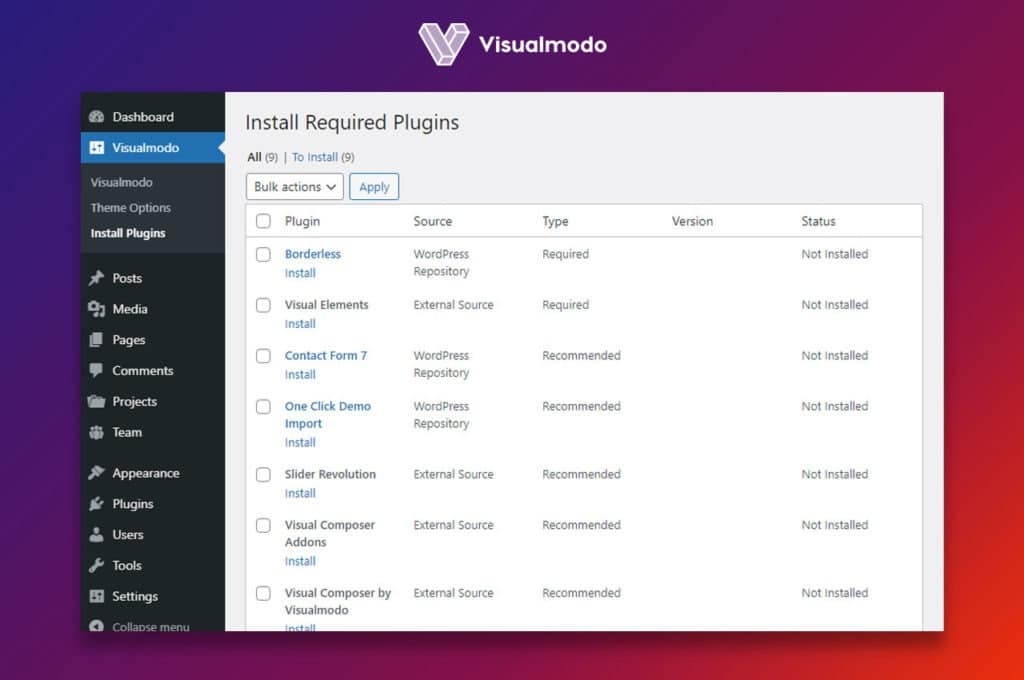
All the Visualmodo clients gain third-party developers WordPress plugins on the theme. So, as soon as you activate your theme on your WordPress site you will see a message at the top of your back-end screen. Asking to you start installing your plugins. To install the plugins all you need to do is click on the button for it.
In the case, you don’t want to use some plugin, you can disable the message because the theme works without any plugin. However, you are free to use it in case you want to. In addition, another way to upload your plugins is going on: WP Dashboard. Visualmodo. Install plugins as is shown in the images below.

Moreover, in the case that you don’t want to install your plugins or have any difficulty you are FREE to contact our support. On https://visualmodo.com/acc/ or e-mail us at contact@visualmodo.com. Ask one of our support crew to enter your site and install it for you. It’s safe, fast, and free for all Visualmodo clients.
Finally, just make sure you send us this contact the correct info, we will need your login information/site URL and a print-screen/screenshot from your theme purchase with the date.
One Click Demo Content Import
One of the most valuable features that a WordPress theme can have. As a result, you will love to start the website development process at the same starting point as the wonderful theme demo pages.
So, you can quickly design the website of your dreams. In conclusion, you can use our carefully created demo content to start with a ready-to-go website with 1-click only!
NOTE: To ensure this function properly work, please make sure you install the ‘1-click import’ plugin and in addition, have your parent theme active. Only activate the child theme after the demo importing process.
Importing Stream WordPress Theme Demo Contents
After installing the plugins, all you need to do is navigate to the WP dashboard. Appearance. ‘Visualmodo Demo’. Click on it to import the entire demo content and have a fully equipped site from the beginning. Important notes: After you click on the ‘Import Demo’ button the process can take a couple of minutes according to the host’s performance.
The required plugin installer will appear as a top WordPress site dashboard message to easily install the process with 1-click also as soon as you activate your Visualmodo WordPress theme.

Finally, after you click on the ‘Import Demo’ button the process can take a couple of minutes. According to the host’s performance. The one-click demo content import feature can’t import icons or the slider build-in Revolution Slider. Because this is plugin feature. So, to import both of these contents follow this other tutorial on our site help center area:
- Firstly, Portfolio Filter Icons in WordPress
- Secondly, How To Import Revolution Slider Demo Sliders
Stream WordPress Theme Options (Visualmodo Panel)

In this area of your Stream WordPress theme you can customize your site. Add your logos. Customize the fonts, and place some custom codes. Change your site’s global layout. Change your footer text header options.
Moreover, all your site layout using our Stream WordPress theme. In addition, this area works like ‘Customize’ under the ‘Appearance’ tab, normally used on free WordPress themes. However, the theme options have much more tools.
Stream WordPress Theme Header Options
You will completely edit your header in this area of your theme option. In addition, you will be able to upload your company logo. Place icons on your menu, like cart or search icons. Align the menu and logo, in addition to full control of the site header section.
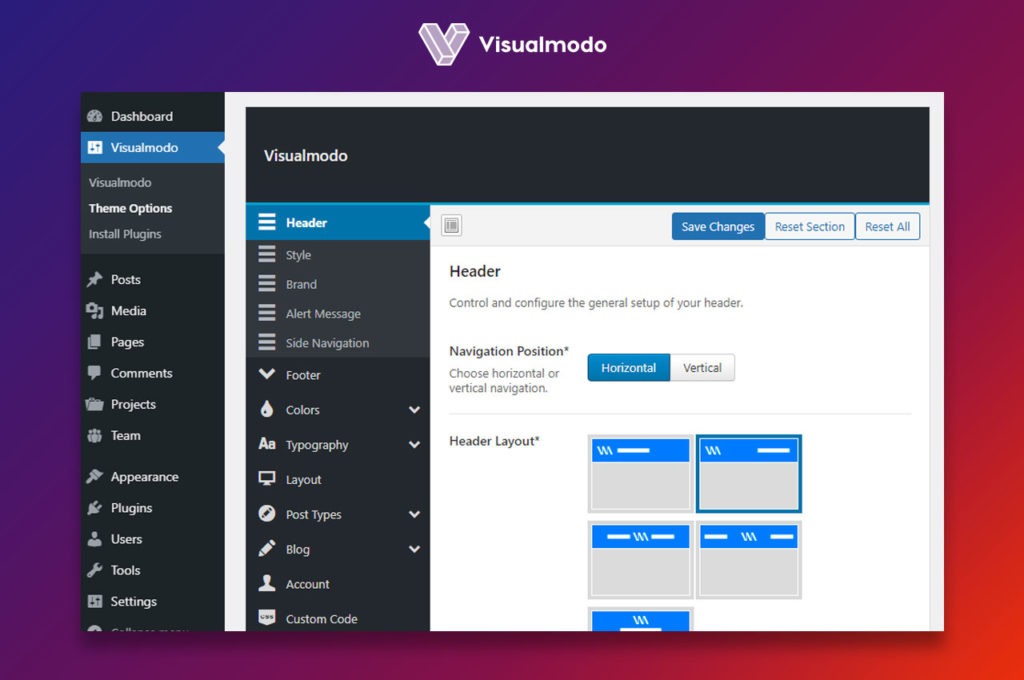
Vertical and Horizontal Menu Navigation Style

Firstly, to change your site menu navigation style from horizontal to vertical, you need to go to your WordPress dashboard. Theme Options. Header. Select ‘Vertical’ and save your changes.
As a result, your menu is set as a ‘primary menu’ under WP Appearance. Menus. Will appear in a vertical layout as you can see in this example. Moreover, you can choose a horizontal navigation style just like this video tutorial shows:
Header – Theme Options
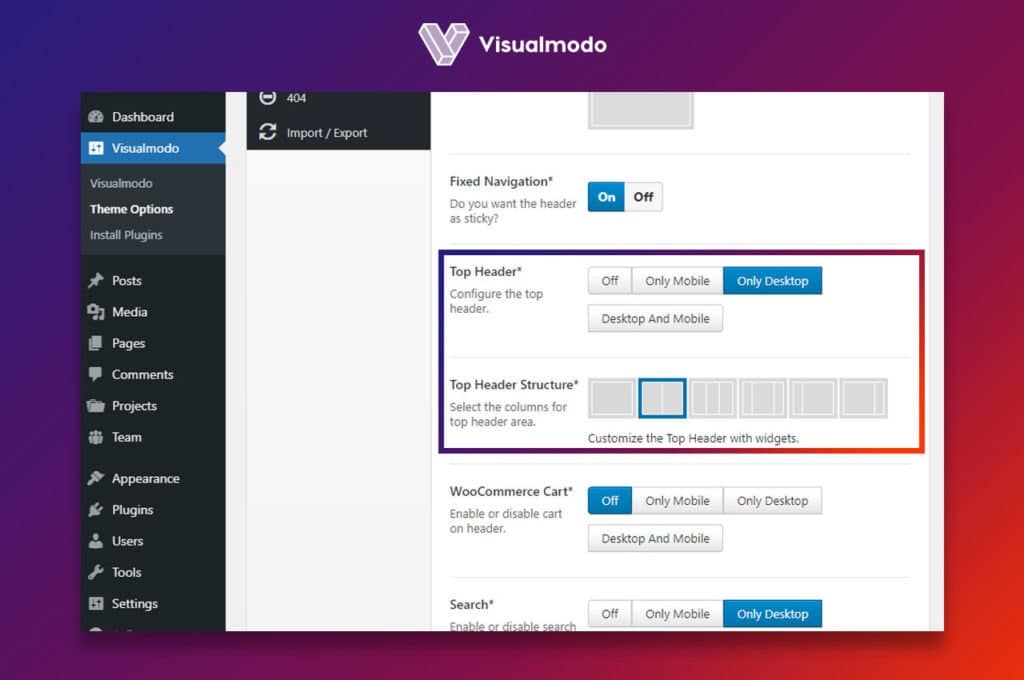
In this area of your theme options, you will be able to enable another area that can appear over of your header navigation menu area. Choose columns. In addition, this column can receive widgets. A top menu widget, texts, or social icons, for example.
Finally, set the option as ON and choose your columns layout. After that, save your changes and go to your WP Appearance. Widgets. And apply widgets in the tabs called ‘Top Header.’
Moreover, you can edit your navigation position. Align your menu and logo in the way you like and better fits for your design project. Please see the attached image below.

Header – Style

At this part of your theme options panel, you can edit your WordPress Site navigation header container style. Container size/height, in addition to width. Moreover, add responsive menu collapse options to make your menu close for a responsive style. (Hamburger) in the screen size that you want.
Another feature of this section is the possibility of making your menu container full-width under ‘Boxed or Stretched Style’ as the image on the Stream WordPress theme documentation, guide & tutorial displays.
Header – Brand (Logo)
In this area of your theme options panel, you can upload your website header logo and all the logo variations, a light logo version, a stream logo version, a default logo, and a mobile logo.
We recommend you upload the logo always in .png format, and our Visualmodo logo has 225 x 48px and the mobile logo has 48 x 24px. So, your logo upload sets need to follow your menu design color style, and you are free to upload any color you want.
You also can upload a retina logo and, in addition, combine a logo image with text (You can type the text like in the image above or leave the text field black, and in this case, the text will be the site title set on WP > Dashboard > Settings > General). Finally, watch this video on the Stream WordPress theme documentation, guide & tutorial to see in detail.
Header – Alert Message
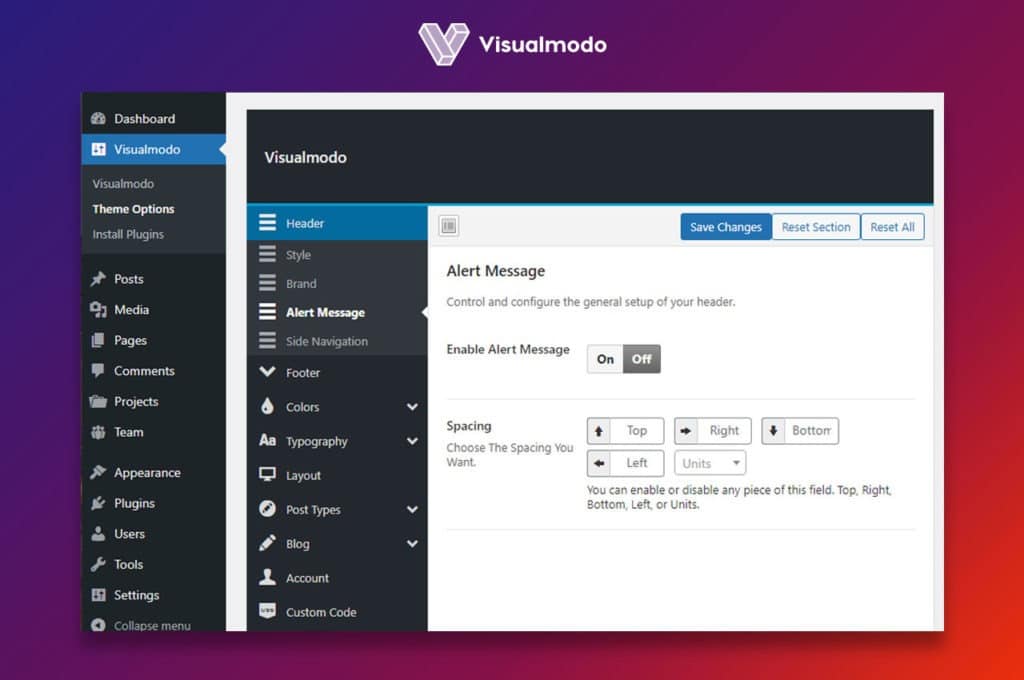
In this area of your Stream WordPress theme documentation, guide & tutorial, you can upload your website header a top header alert message that can be used to show to your users and views some message like promotion calls or some important notice.
You can enable or disable this area if you want to use you can add a background color or image, the spacing, and the text content. Finally, an example of this usage is attached to the Stream WordPress theme documentation, guide & tutorial.
Header – Side Navigation

To enable a side navigation icon on your header main menu, you need to go to WP dashboard > Visualmodo > Theme options > Header > Side Navigation < and select the style you want for the side menu while the icon is clicked; Overlay/push or full-screen. The image below uses an overlay side menu style. Please see more here.
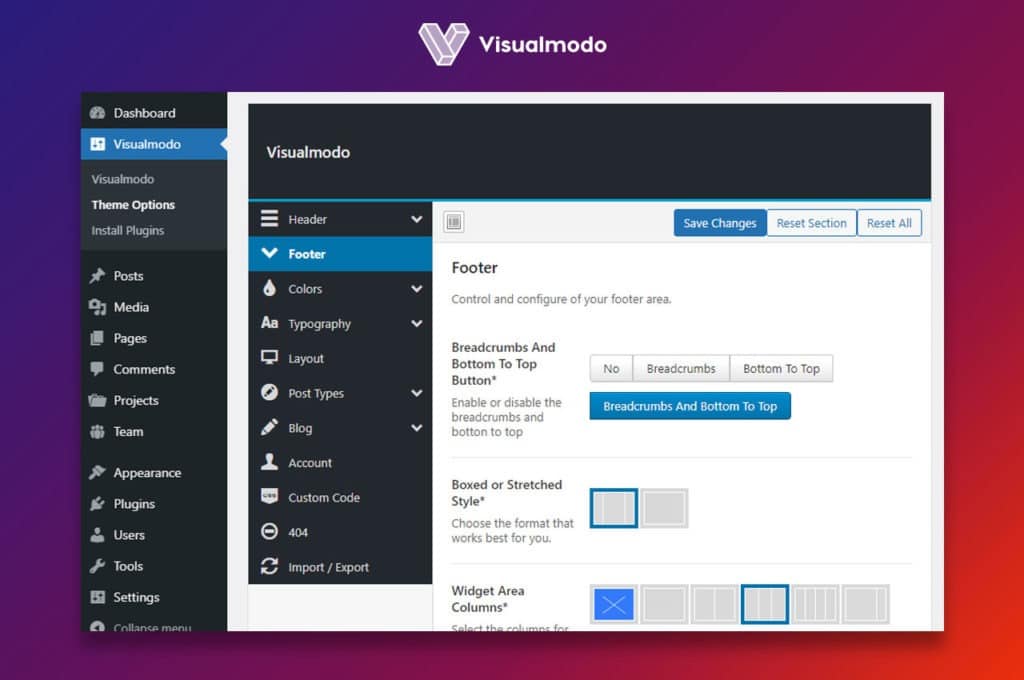
Footer – Theme Options
In this area of your site, you can select your footer text, and columns, add a background image or color and layouts. In the case, you want to remove the Visualmodo default text from your footer ‘Powered by WordPress’ simply set/type your signature text on ‘Footer Copyright Section Text’ following the attachment image.
Post Types – Theme Options

In this area of your theme options, you can disable/enable some parts of your theme that you don’t want to use.
On your theme, you have some custom post styles such as; Portfolio – Team – Knowledge Base, and you are free to create your post type if you do not use these posts, you can disable this part of your theme framework to reduce the loading requirements.
Firstly, to create a post type, you need to select the number of post types and add a name, plural name, slug, and icon. (This posts types works just like blog posts and are typically used for Portfolio / Team Members). After you create these post types, refresh your page. Secondly, Go to your WordPress ‘Permalinks’ and update the page.
Finally, go to the post type you’ve built and create your posts like on the blog. In conclusion, when you have all your post built you can call it on your pages using the page builder ‘Post Grid’ element on WP Dashboard > Pages > Add New > Back-End editor/front-end. Add elements > Posts Grid > On ‘Data source’ select the post type name you build.
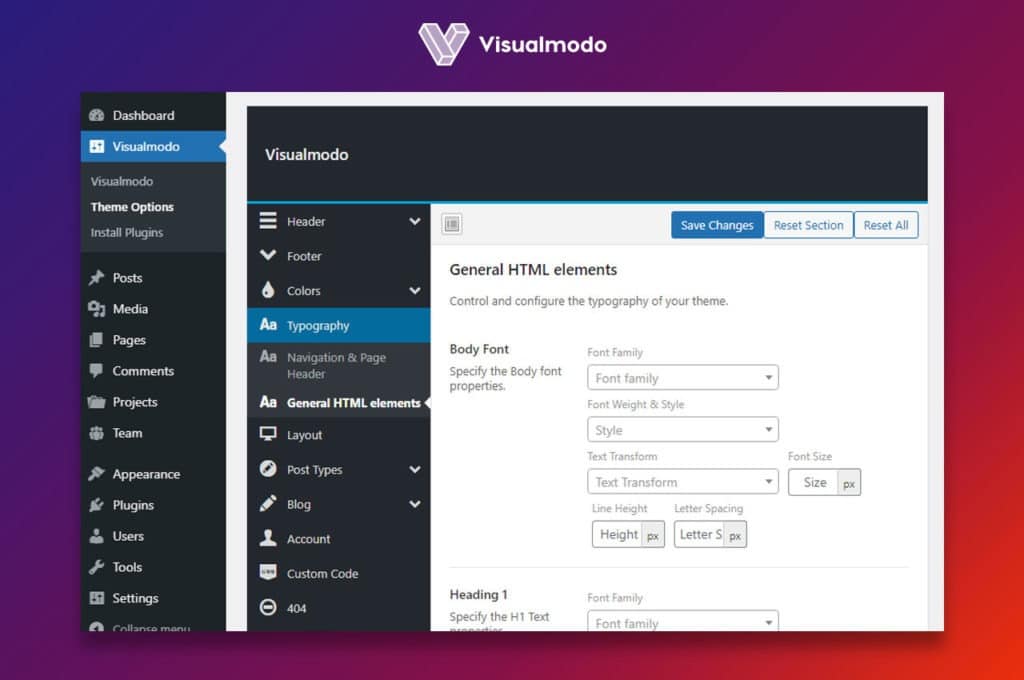
Typography – Theme Options
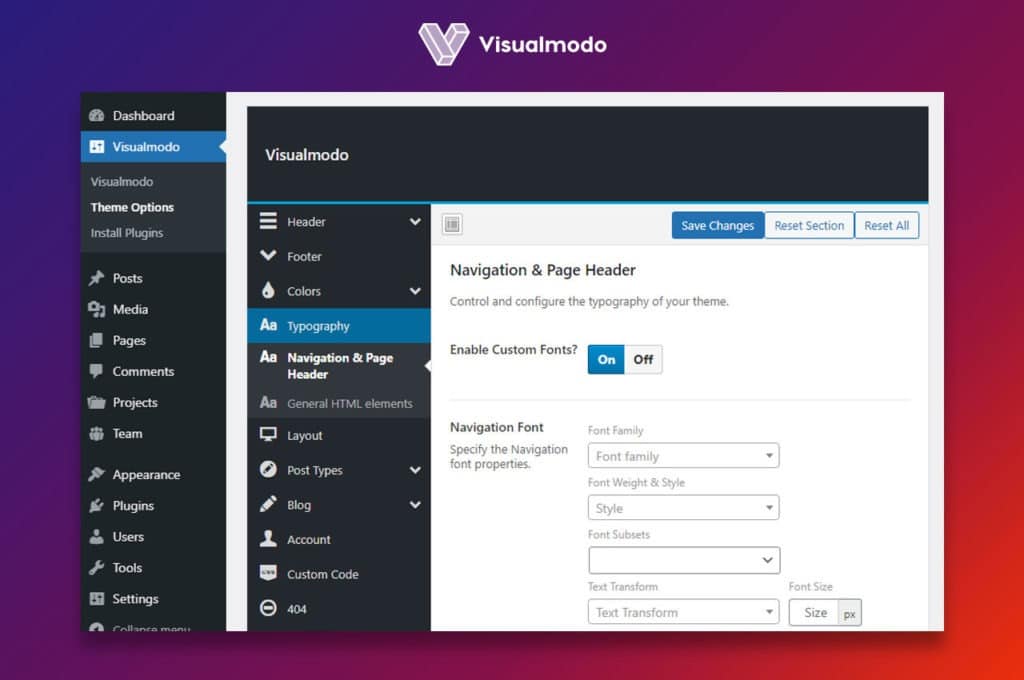
In this theme options area, you can change all the fonts on your site using the 800+ Google fonts and changing the size and layout. To start this edition, select ON in the Use Custom Fonts. Question. If you do not set ON in the first option of this panel, the other changes will not affect you, so please follow the attachment image.
You also will be able to set your font line spacing, weight, line height, and font size. The first subtab of ‘typography is for header navigation and menu elements, and the second sub-tab is for body elements.
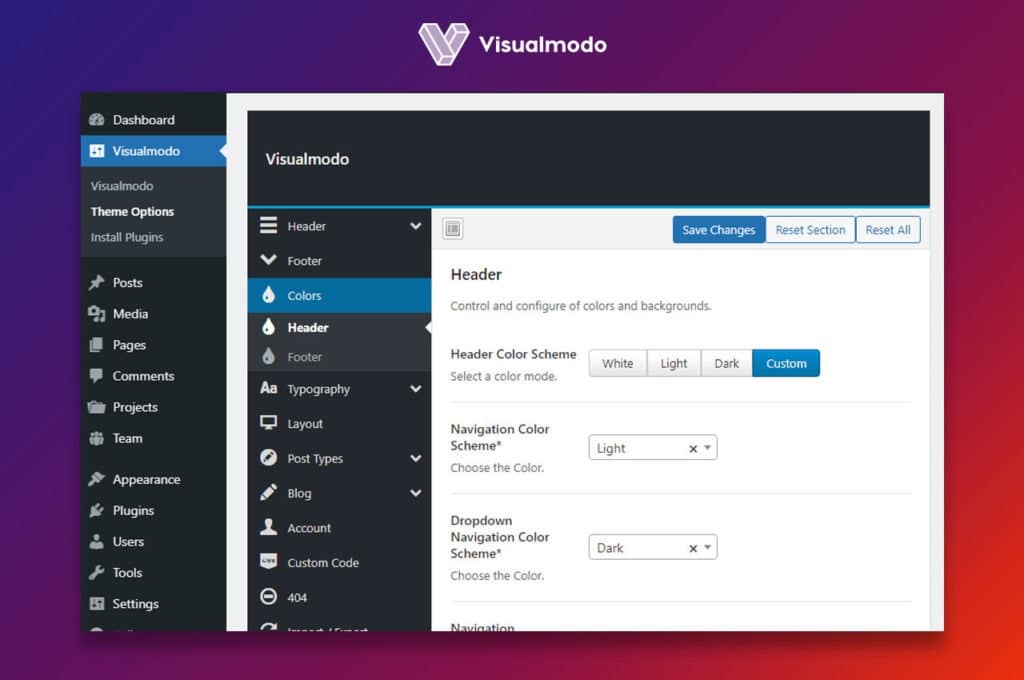
Color – Theme Options

In this area of your Stream WordPress theme documentation, guide & tutorial, you will be able to edit/change the colors of your site. The site primary color is called ‘Global Color,’ and you also can change the footer color and header color for light or stream colors.
You also can fully edit WordPress website colors under your WordPress dashboard > Appearance > Customize panel to see the result on your front end.
In the case you want more options to edit your WordPress site fully select ‘Custom Colors’ on the ‘Color Mode’ selector under your VISUALMODO > THEME OPTIONS > COLORS.

You also can fully edit your header navigation menu area colors on Colors > Header > area.
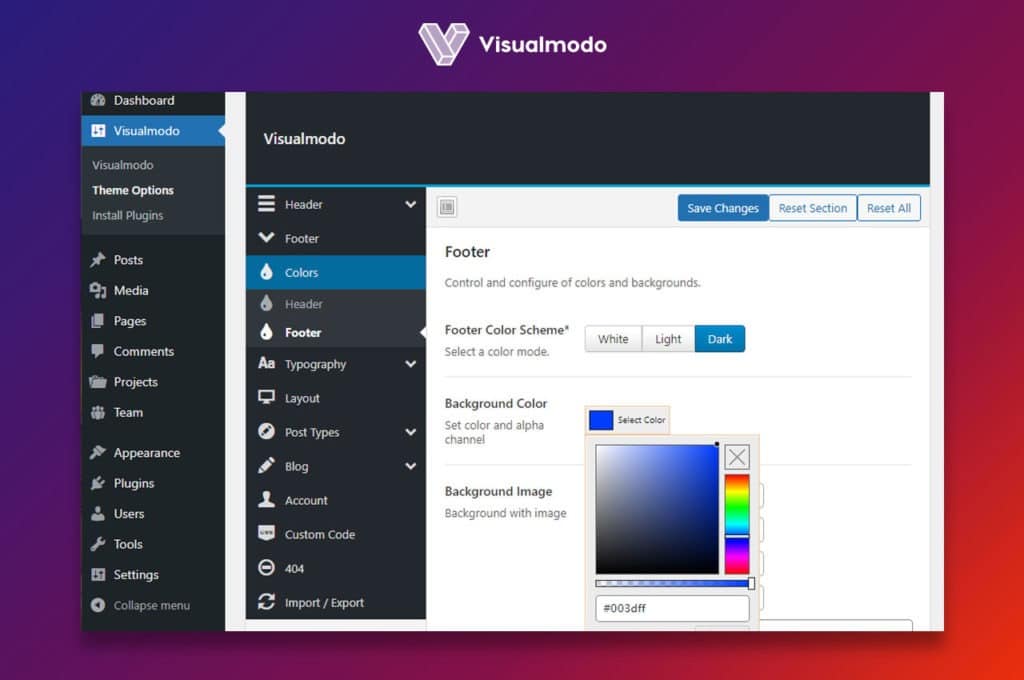
This tutorial also presents the same options for your footer area customization under theme options > Colors > Footer < More options and footer usage guide.
Custom Codes – Theme Options
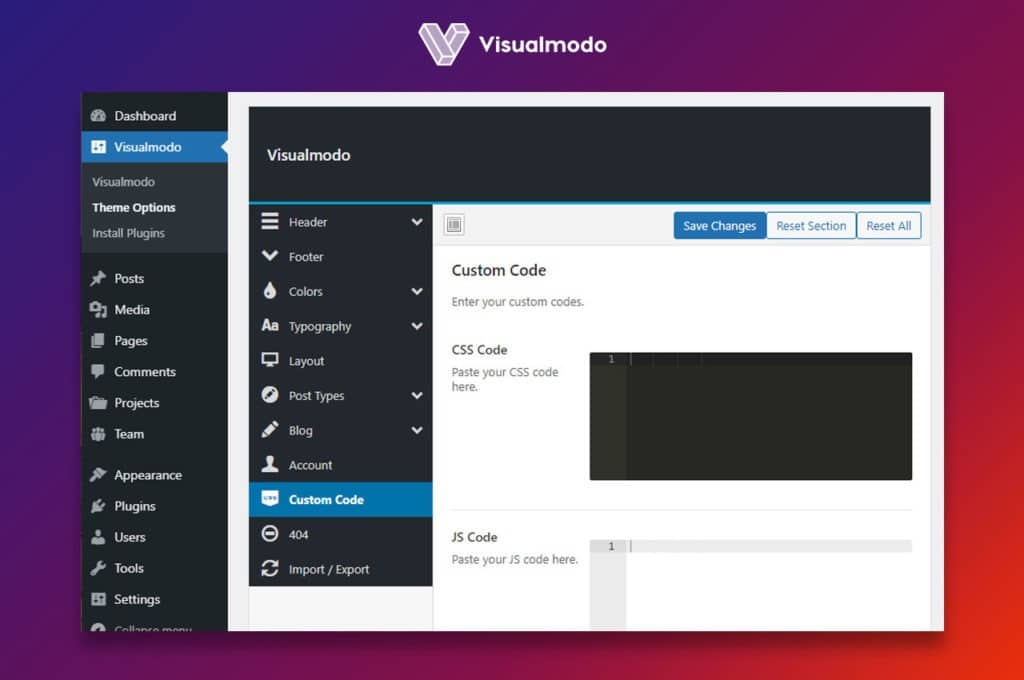
In this area of your Stream WordPress theme documentation, guide & tutorial, you can see how to apply custom codes to customize your website. In addition, you can use Google tracking codes, CSS codes, JS codes, and HTML codes.
So, make sure you have some knowledge base on these codes before applying something, you don’t need it to design a fantastic site with our theme, but this usage is about your decisions.
Layout – Theme Options
In this area of your theme option, you can enable or not this theme feature (boxed layout). If you want to use a boxed site style, you need to select ‘On’ in the first tab question, and you will be able to choose an image, colors, and layout. In case you don’t want to use it stay these options in the ‘Off’.
404 (page not found) – Theme Options

In this area of your theme option, you will be able to completely edit the page not found (404) template. As a result, add background images, text, and style so when your site visitors do not find some page be able to see a beauty template and be redirected to other of your site pages.
Account – Theme Options

In this area of your theme option, you will be able to completely edit the WordPress account pages template, add your style for your login, and register, and reset WordPress pages following the Stream WordPress theme documentation, guide & tutorial.

WooCommerce – Theme Options
In this area of your theme option, you will be able to completely edit the WooCommerce WordPress plugin template pages and change the header styles, texts, sidebars, and page layout to make your online shop looks unique.
All the Visualmodo Themes come with the most popular e-commerce WordPress plugin, the WooCommerce, and you can edit this plugin’s default template pages here if you want to build a store.
In the first theme options panel area, you can edit the layout for the main shop page, and for the single product page, choose the sidebar location or do not use a sidebar.
Header Main Shop

In this area of your theme options, under your WooCommerce tab, you can edit your header shop/store page style, add an image background, a slider build-in revolution slider plugin, the color, the title text, and the content caption. Finally, the navigation menu style.
Visual Elements Plugin – Shortcodes
The best way to create unique pages with the theme is using the Stream WordPress theme custom page builder elements. In this area, we will show you how to use it. You can use this shortcode to build pages, posts, or galleries.
We build this shortcode to add more features to the theme page builder. You will install our exclusive WordPress Visual Composer add-ons plugin for free as soon as you activate our Visualmodo theme on your site, a message for you click-to-upload our plugin.

As soon as you activate the visual elements plugin, you will see a new tab on your Visual Composer ‘add elements’ tab called ‘Borderless’ that will add new page content elements like icons, .svg icons upload, box icons, portfolio, team, blog, counts, testimonial, tweets, alerts and even more.
In case you want to edit the default plugin page content elements style, you can navigate to your WordPress Dashboard > Visual Elements > General Settings > area.
Setup a Menu

To set up a menu area, place, and custom pages please look at this tutorial with the video.
To do it please go on, Appearance, Menus, and you will be able to set 2 menus, a main (header) and a Footer.
Footer – Theme Options

To build a footer on Stream WordPress theme you need to place information in three areas of your WordPress:
- Theme Options > Footer Options
- Appearance > Menus
- Appearance > Widgets and apply widget on three tabs, footer 01, footer 02, and footer 03
Please take a look at these tutorials to see how to build a footer with widgets, menus, and text.
Stream WordPress Theme Sidebar
This video will show you to add and place a widget on a sidebar;
To do it, you need to go to the page editor, Custom Fields page area, and select a sidebar, after this, you need to go on Appearance, widget, and place widgets on the sidebar tabs.
In case, you want more widgets on your sidebar, our theme works great with plugins for it and WordPress has a lot of free plugins to apply more widgets. The https://wordpress.org/plugins/jetpack/ is an excellent example for this purpose.

Using the widgets visual composer page builder element, you can call a sidebar on any page. Please take a look at the image above to see how we design the theme blog, for example:
Slider Show – Page Options

On your Stream WordPress Theme, you have the revolution-slider plugin, a premium plugin you gain for free to save money and create some awesome slider shows. To place it on a page, please look at this document to see how the plugin works and build your slider. After having your slider build-in, you will need to add it to your page, and this can be done in several ways:
- Firstly, go to the page that you want to apply for the slider show and load the editor by, wp-dashboard > pages > edit page > scroll the page down until you see a field called ‘Options’ > in the Options field click on ‘Layout’ and on ‘Layout Header Title’ select ‘Revolution Slider’ and select the slider below as is showed on the attached image above.
- Secondly, you can add using a Visual Composer page builder element or as short-code content. Please see this tutorial.
WordPress Plugins Documentation
You have amazing third-party plugins on the theme pack that you gain for free while using your Stream WordPress Theme. However, using the plugins is not our responsibility because we are theme developers.
In addition, this is the Stream WordPress theme documentation, guide & tutorial page. So we suggest you look at the plugins devs’ sites and search for the WordPress plugins documentation pages and video tutorials. You are free to use or not any plugin. Your theme will normally work without it. Finally, our support team can help you with the usage too.
Revolution Slider WordPress Plugin
documentation: http://revolution.themepunch.com/documentation/
Video tutorials playlist: https://www.youtube.com/watch?v=iyuxFo-WBiU&index=7&list=PLSCdqDWVMJPPDcH_57CNZvLckoB8cimJF
Timetable Responsive Schedule For WordPress
documentation: http://codecanyon.net/item/timetable-responsive-schedule-for-wordpress/7010836
NOTE: This is not a tutorial page, it’s a sale page, but you don’t need to buy it because you already have it on the theme package in this page, the plugins devs show URLs and place tutorials to this plugin way to use.
Contact Form 7 WordPress Plugin
documentation: http://contactform7.com/docs/
WP Bakery Page Builder WordPress Plugin documentation (Visual Composer) https://wpbakery.com/video-tutorials/
Ultimate add-ons for visual composer plugin
documentation: https://www.youtube.com/playlist?list=PL1kzJGWGPrW9CDWwdAWrd_9YQsh1z7u6O
Visual Elements
documentation: https://www.youtube.com/c/Visualmodo
WooCommerce WordPress Plugin
documentation: http://docs.woothemes.com/documentation/plugins/woocommerce/
oAuth Twitter Feed for Developers WordPress Plugin
documentation: https://wordpress.org/plugins/oauth-twitter-feed-for-developers/
Front-Page (Home) and Posts-Page (Blog)
After you have your Stream WordPress theme and your plugins installed and activated, you will need to create 2 simple pages without content. We suggest you call them ‘Home’ and ‘Blog.’
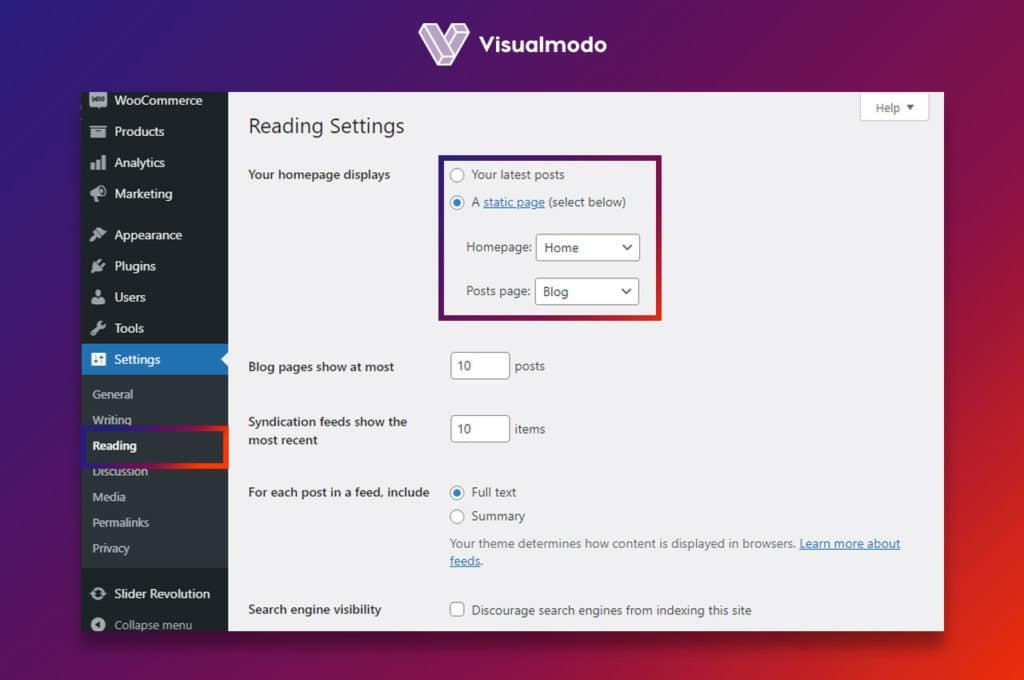
Firstly, you must go on ‘Pages’, Add a new one, Name it ‘Home,’ and click on the Publish’ button. Secondly, the same goes for your blog page; however, you can name these pages how you want. Go to the WordPress admin area, and click ‘Settings’ Reading.
Finally, in this area, you will click on the ‘Front Page Displays’ and select ‘A Static Page’. For the front page, you like ‘Home,’ and for the posts page, you choose ‘Blog.’ After setting it up, you need to click the Save Changes button.
Moreover, you have another way to build your blog also. To be able to edit more blog posts and expand this Stream theme documentation to design your own blog posts page.
Page Builder
Stream WordPress Theme comes with a drag-and-drop competent page builder. You must go on your ‘Pages’ and Add new to use it. When you see the WordPress regular editor, you need to click on a button called ‘Visual Composer, and you will see a button called ‘Add Element” Click on it to see all the page builder elements.
The page builder is typically in use while building pages, portfolios, teams, knowledge bases, or any other custom post type that you want to create. So, in back-end or front-end modes, however, we on this Stream WordPress theme documentation, guide & tutorial don’t suggest you use it while building blog posts because blog posts use a WordPress native template.
You can keep using your page builder, but add the post excerpt. So the blog posts index page does not display the page builder codes instead of the contents. Please go to the plugin documentation to see all the elements on the page builder and how to use it.
So, please look at some video tutorials on Stream WordPress theme documentation, guide & tutorial of this great WordPress Page Builder plugin to make your page layouts easy.
You can disable the native theme page builder and use any other. In addition, our theme is fully compatible with all the WordPress page builders’ engines.
Page Builder – Video Tutorials
We will apply some great start guide video tutorials for the page builder WordPress plugin and pages creation. In addition, to see all the official videos, please visit the plugin developers’ site. Moreover, we have a complete list of video tutorials for all page-building processes on WordPress on our YouTube channel. Please check it out on our Stream theme documentation.
Visual Composer Plugin Navigation Interface
Create Templates In WPBakery WordPress Plugin?
Posts Grid WPBakery WordPress Plugin Stream WordPress Documentation
Buttons Usage Guide WPBakery Stream WordPress Documentation
Add and Edit Images in Visual Composer Plugin
Drag and Drop in Visual Composer Explained
Add Visual Composer Plugin Row and Column
Add and Edit Image Gallery in Visual Composer
WordPress Front-End Editor Guide – Drag and Drop Page Builder Usage
How To Create Info-Box Section In WordPress?
How To Add Background Image Or Color In WordPress?
How To Add Background Image Or Color In WordPress?
How to Update my WordPress Theme?

We never stop our work on our Stream WordPress theme in addition to this Stream WordPress theme documentation, guide & tutorial. As a result, we use continuous upgrades to our theme for fixes, new features, and much more to improve our work! So, it is essential to keep your theme up-to-date. In conclusion, to have your theme updated, all you need to do is,
Firstly, go to your WordPress Dashboard. Secondly, ‘Updates’ area, select your theme update, and finally, click on the ‘Update new’ button.
Finally, you will download the latest theme files on your WordPress. To see if you have an update available for your theme, you can log in on your WordPress dashboard > Appearance > Themes. To end with this, click on your Visualmodo theme. In case you have an available update, you will notice a message.
If you can’t upgrade your theme or need some upgrade information. Log in to your Visualmodo account page and open a ticket with our support crew. In addition, do not forget to attach a screenshot from your theme purchase invoice with a date, please.
Using Widgets
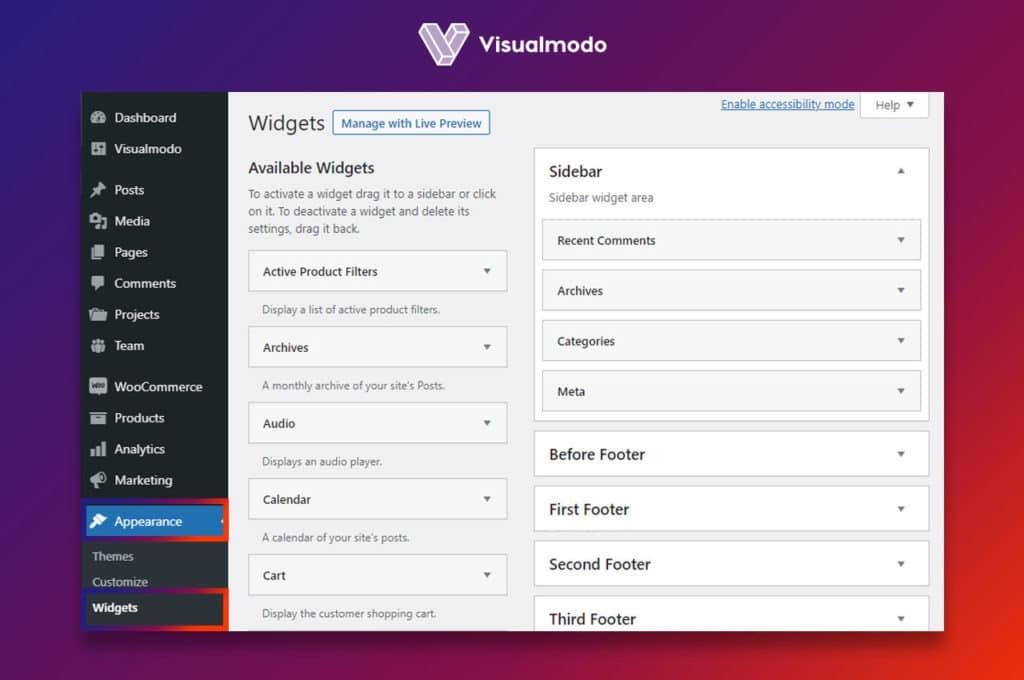
To use widgets you need to go to the Appearance tab. Click on ‘Widgets’; you only need to drag and drop your widget on the sidebars. In addition, the theme comes with many premium widgets. However, you can add more widgets to your WordPress by downloading free plugins.
Finally, to see how to use WordPress originals widgets and edit them, please go to this page on wp.org because this is a bit out of the Stream WordPress theme documentation, guide & tutorial topic.
How to Upload Favicon: Stream WordPress Theme Documentation

Go to your WordPress dashboard and click on Appearance. After that, Customize like in the Stream WordPress theme documentation video, guide & tutorial. As a result, the site will load your front page, and you will see the options.
Select the ‘Site Identity’ in this area you will be able to edit the browser tab tagline and the logo Favicon. As is shown in the attached image above in the Stream WordPress theme documentation, guide & tutorial.
Host Requirements For Good Usage
Note: This part of the Stream WordPress theme documentation, guide & tutorial is on the bases of the official WordPress.org site.
To run WordPress we recommend your host supports
- Firstly, PHP version 7 or greater
- Secondly, MySQL version 5.6 or greater OR MariaDB version 10.0 or greater
That’s it. As a result, we recommend Apache or Nginx as the most robust and featureful server for running WordPress, but any server that supports PHP and MySQL will do. That said, we can’t test every possible environment; each host on our hosting page supports the above and more without problems.
Note: If you are in a legacy environment with only older PHP or MySQL versions, WordPress also works with PHP 5.2.4+ and MySQL 5.0+, but these versions have reached the official End Of Life and as such, may expose your site to security vulnerabilities. So, we on the Stream theme documentation recommend and support the latest version
Ask for it
So, here’s a letter you can send to your host; copy and paste!
I’m interested in running the open-source WordPress https://wordpress.org/ web software and I was wondering if my account supported the following:
– Firstly, PHP 7 or greater
– Secondly, MySQL 5.6 or greater OR MariaDB 10.0 or greater
– The mod_rewrite Apache module
– Finally, HTTPS support
Thanks!
Not required, but recommended for better security
Hosting is more secure when PHP applications like WordPress run your account’s username instead of the server’s default username. So, ask your potential host what steps they take to ensure the security of your account.
Why do we support older versions?
Finally, we strongly recommend the latest versions of PHP and MySQL. However, we understand this isn’t right for everyone and that sometimes hosts can be slow or hesitant to upgrade their customers since upgrades to PHP and MySQL have historically broken applications. In conclusion, WordPress will always work on the latest versions of PHP and MySQL, which are often faster and more stable.
Finally, thank you for much for reading our Stream theme documentation.