WordPress Pricing Element Usage Guide
Guide & tutorial to learn how to add and setup pricing element in your WordPress website, price block & widget usage to create a…
Guide & tutorial to learn how to add and setup pricing element in your WordPress website, price block & widget usage to create a pricing page.
WordPress Pricing Element Using WPBakery Page Builder Plugin + Borderless (Visual Elements)
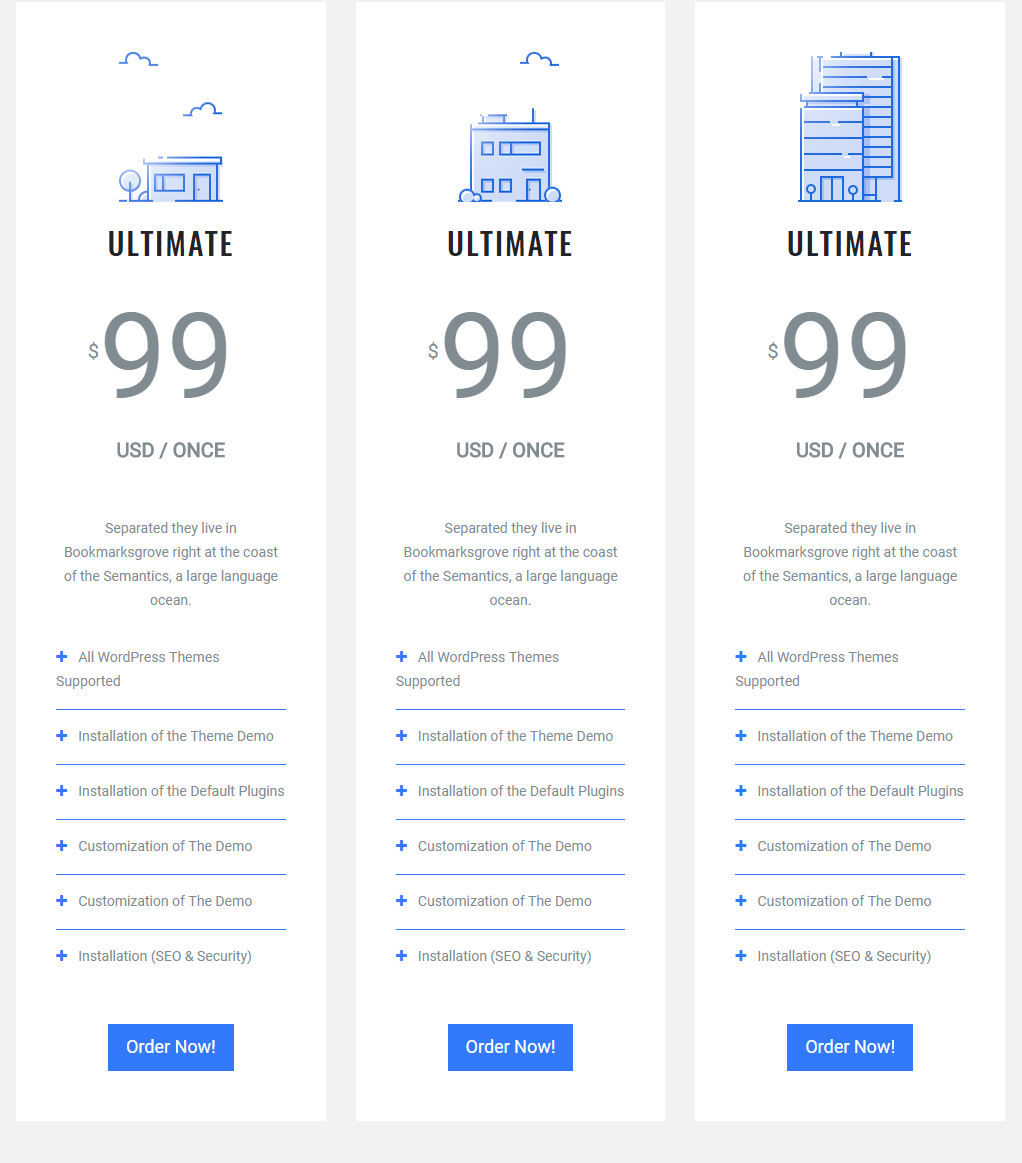
In this tutorial on our guides area. We will show you how to create a WordPress Pricing Element using our Visual Elements plugin ‘pricing’ element and edit it easily using our WordPress plugin. See the element in use on this demonstrative page.
After all, ensure you have installed your Borderless plugin (exclusive Visualmodo plugin) to have this element on your page builder elements list. You can follow step #2 on themes online documentation to install the plugins.
The first step is to navigate to your WordPress dashboard > Pages > Add new > click on back-end or front-end editor > Add Element < one on the elements selector click on the ‘visual elements’ tab > select the ‘pricing’ element.
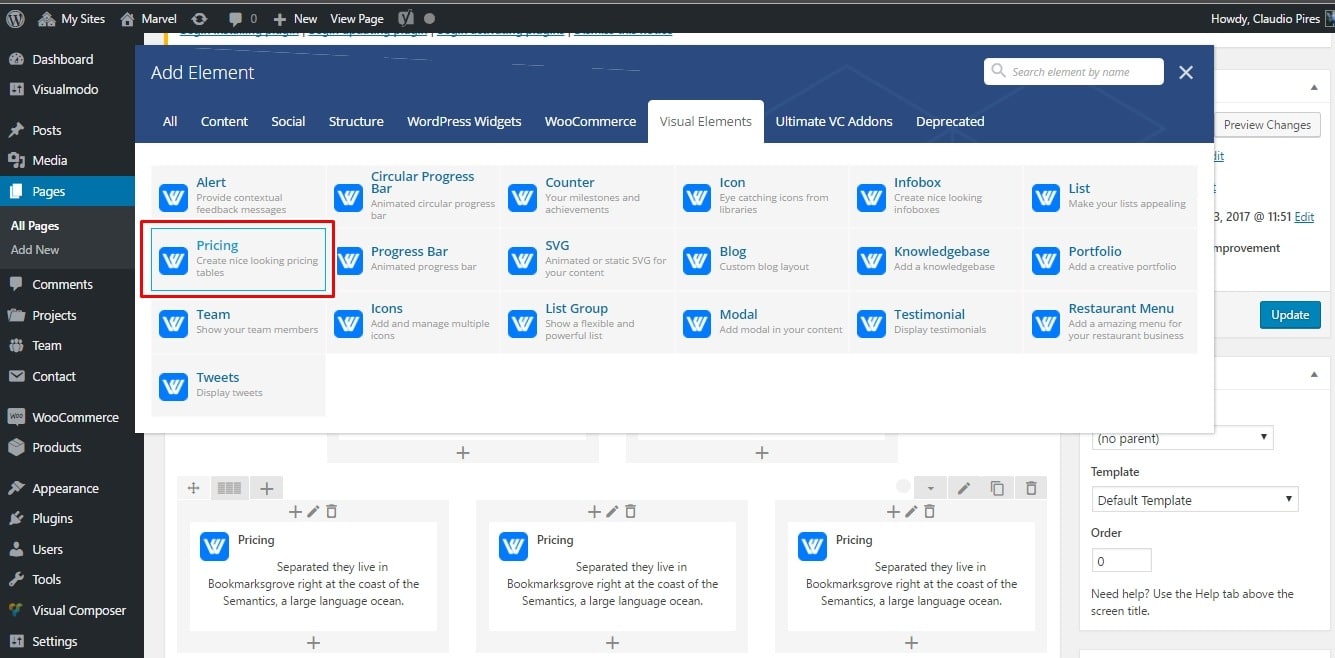
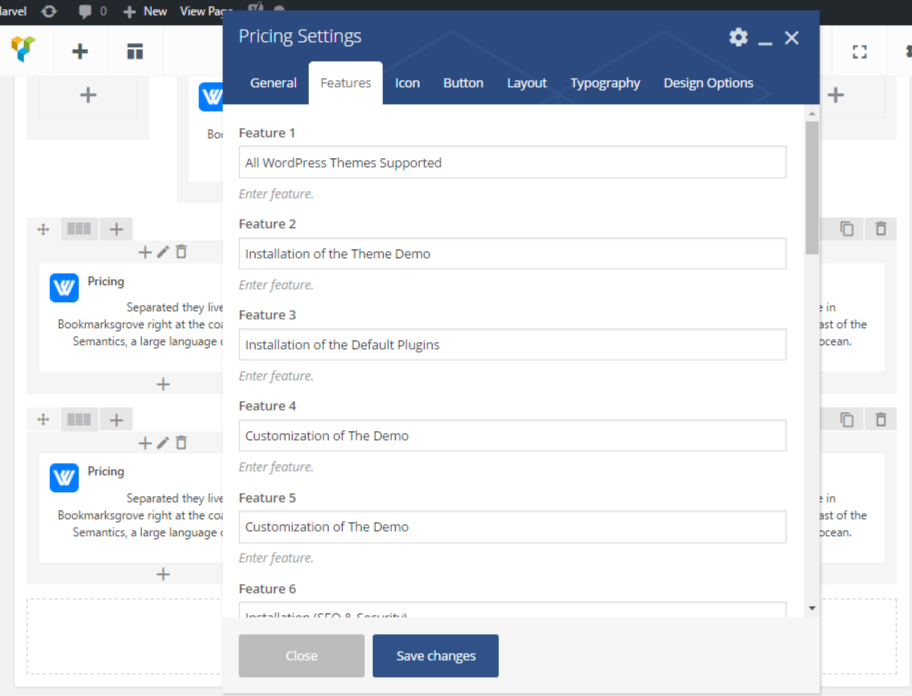
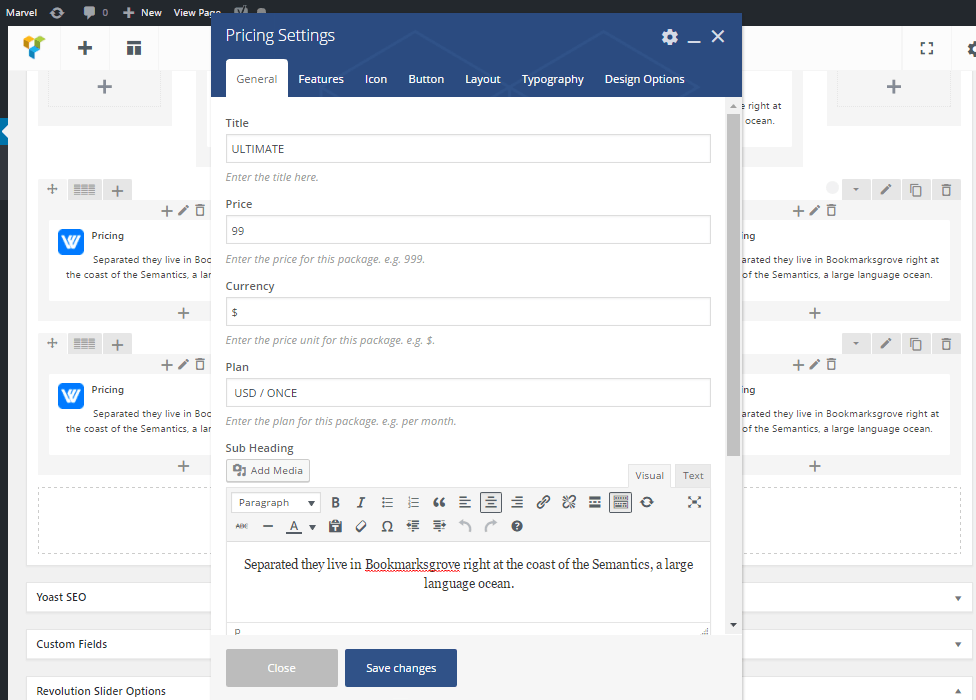
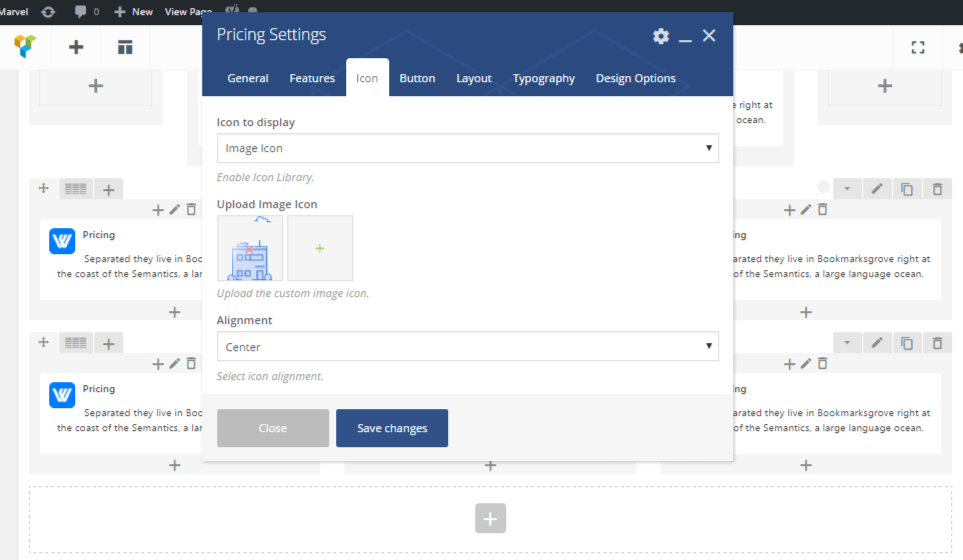
A Pricing WordPress section editor window will appear to you can add the information. Features, icons, and typography in another tab fulfill all the fields with your data. So, save the section by closing the editor window and repeating the process to add more counters elements.
Settings Window – WordPress Pricing Element Usage Guide

You can organize the pricing elements in a row/column system. With your layout to build the style you want using other page builder elements. Please take a look at this guide.
Video Tutorial – WordPress Pricing Element Usage Guide
WordPress Pricing Element by Visualmodo WordPress Themes. Guide & tutorial to learn how to add and setup pricing element in your WordPress website, price block & widget usage to create a pricing page.
How To Create a Pricing Page Using Elementor WordPress Plugin?
To create a pricing page using the Elementor WordPress plugin, follow these steps:
- Install and Activate Elementor Ensure you have the Elementor plugin installed and activated on your WordPress website. You can find and install it from the WordPress plugin repository.
- Create a New Page Go to your WordPress dashboard and navigate to Pages -> Add New. Give your page a title, such as “Pricing.”
- Edit with Elementor Click the “Edit with Elementor” button to launch the Elementor page builder interface.
Choose a Pricing Template
Elementor provides various pre-designed templates that you can use as a starting point. In the Elementor editor, click the “Folder” icon to access the template library. Search for “pricing” or browse through the available templates until you find one that suits your needs. Click on the template to select it.
Customize the Pricing Page
Once you’ve chosen a pricing template, you can customize it to match your branding and pricing structure. You can edit text, change colors, modify the layout, add or remove elements, and more. Click on a component to edit or drag and drop new elements from the sidebar.
Add Pricing Tables WordPress Element Usage Guide
Most pricing pages include pricing tables to display different plans or packages. To add a pricing table, look for the “Price Table” widget in the Elementor sidebar. Drag and drop it onto your page; it will appear as a placeholder.
Configure the Pricing Table
Click on the pricing table to open its settings. You can customize various aspects, such as the number of columns, plan names, prices, features, and buttons. Modify the content and design according to your pricing structure and preferences.
Style the Pricing Page
You can access the Elementor Style tab for each element or widget to style the pricing page. Adjust fonts, colors, borders, spacing, and other design elements to match your website’s overall style and branding.
Publish the Pricing Page
Once satisfied with the customization, click the “Update” or “Publish” button to save your changes and make the pricing page live on your website. Keep reading the guide & tutorial to learn how to add and setup pricing element in your WordPress website, price block & widget usage to create a pricing page.
Test and Optimize
After publishing your pricing page, test it thoroughly to ensure all the elements and functionalities work correctly. You can monitor the page’s performance and make iterative improvements to optimize conversions and user experience.
That’s it! Following these steps, you can create a pricing page using the Elementor WordPress plugin. Remember to save your changes regularly and keep an eye on your website’s updates to ensure compatibility with future versions of Elementor.
How To Create a Pricing Page in WordPress Using Essential Blocks Free Plugin?
To create a pricing page in WordPress using the Essential Blocks free plugin, follow these steps:
Install and Activate the Essential Blocks Plugin
Go to your WordPress dashboard and navigate to Plugins -> Add New. Search for “Essential Blocks” in the plugin repository. Install and activate the Essential Blocks plugin.
Create a New Page
Go to Pages -> Add New in your WordPress dashboard. Give your page a title, such as “Pricing.” Edit with Block Editor Click the “Edit with Elementor” button to launch the Block Editor (Gutenberg).
Add Pricing Table Block: WordPress Element Usage Guide
Click the “+” icon in the Block Editor to add a new block. Search for “Pricing Table” in the block search bar. You’ll find the “Pricing Table” block from the Essential Blocks plugin. Click on it to add it to your page.
Configure
Once you’ve added the Pricing Table block, you can start configuring it to match your pricing structure. You’ll see a default pricing table with sample content.
To edit the pricing table, click on any elements, such as the plan names, prices, features, or buttons. You can change the content and customize the appearance using the block toolbar options.
Customize the Pricing Page
Besides the pricing table, you can customize your pricing page by adding other blocks provided by the Essential Blocks plugin. The plugin offers a range of blocks like headings, testimonials, call-to-action, and more.
Click the “+” icon to add more blocks and search for the desired block type. Select the block you want, and it will be inserted into your page. Customize the block’s content and styling as needed.
Style and Format the Pricing Page
You can use the block toolbar options to style and format the pricing page. Each block has its own settings that allow you to adjust its appearance, alignment, colors, and other attributes.
You can also apply global styles to the page by accessing the “Document” tab in the right sidebar. You can set the font styles, colors, and other page-level settings from there.
Preview and Publish the Pricing Page
Once you’re satisfied with the pricing page’s design and content, click the “Preview” button to see how it will appear on your website. Make any necessary adjustments if needed.
Finally, click the “Publish” button to make your pricing page live on your website.
Test and Optimize
After publishing your pricing page, test it thoroughly to ensure all elements and functionalities work correctly. Monitor the page’s performance and make iterative improvements to optimize conversions and user experience.
That’s it! Following these steps, you can create a pricing page in WordPress using the Essential Blocks free plugin. Remember to save your changes regularly and keep an eye on plugin updates to ensure compatibility with future versions of WordPress.